In the previous tutorial, we learned how SPL tokens work. In this tutorial, we’ll implement a full SPL token lifecycle: create, mint, transfer, and query tokens using two approaches:
- On-chain with Anchor: we’ll create a Solana program with Anchor that mints SPL tokens until a predefined supply limit is hit.
- Client-side with TypeScript: we’ll also show how to interact with the Token Program directly from a TypeScript client to create SPL mints, ATAs, mint tokens, transfer, and read balances.
Why two approaches?
Knowing how to do both is crucial because:
- With Anchor, we can build custom on-chain logic on top of an SPL token (e.g., vesting schedules, conditional minting) or create an SPL token controlled by our program rather than a wallet.
- With TypeScript, we can interact directly with the SPL program for simple activities like transferring SPL tokens or authorizing/revoking a delegate.
Now let’s start with the Anchor approach.
Creating SPL Tokens in Anchor
Recall from the previous SPL token tutorial that every token uses the same on-chain program (the SPL Token Program at address TokenkegQfeZyiNwAJbNbGKPFXCWuBvf9Ss623VQ5DA) to create mint accounts and perform token minting, transfers, approvals, etc.
In this section, we’ll build an Anchor program that creates and mints SPL tokens through Cross-Program Invocations (CPI) to the Token Program.
Our program will have only two functions:
- A
create_and_mint_tokenfunction to create the mint account and mint an initial supply to a specified associated token account (ATA), via CPI to the Token Program. - A
transfer_tokensfunction to move tokens from a source ATA to a destination ATA via a CPI to the Token Program.
Now, create a new Anchor project with anchor init spl_token. Open the project and replace the code in programs/spl_token/src/lib.rs with the following:
In this code, we:
- Import our dependencies:
anchor_spl::associated_token::AssociatedTokenfor creating Associated Token Accounts (ATAs).anchor_spl::token::{Mint, MintTo, Token, TokenAccount, Transfer}for working with the SPL Token Program (these are the instructions and account types we need for minting, and transfers).
- Define a
create_and_mint_tokenfunction that:- Uses the provided mint account and the destination ATA (where the minted tokens will be deposited).
- Builds a CPI context that points to the Token Program.
- Calls the Token Program’s
mint_toinstruction to mint 100 tokens (with 9 decimals) to the ATA. - Returns success once the tokens are minted.
use anchor_lang::prelude::*;
use anchor_spl::associated_token::AssociatedToken; // Needed for ATA creation
use anchor_spl::token::{self, Mint, MintTo, Token, TokenAccount, Transfer}; // Needed for mint account creation/handling
declare_id!("6zndm8QQsPxbjTRC8yh5mxqfjmUchTaJyu2yKbP7ZT2x");
#[program]
pub mod spl_token {
use super::*;
// This function deploys a new SPL token with decimal of 9 and mints 100 units of the token
pub fn create_and_mint_token(ctx: Context<CreateMint>) -> Result<()> {
let mint_amount = 100_000_000_000; // 100 tokens with 9 decimals
let mint = ctx.accounts.new_mint.clone();
let destination_ata = &ctx.accounts.new_ata;
let authority = ctx.accounts.signer.clone();
let token_program = ctx.accounts.token_program.clone();
let mint_to_instruction = MintTo {
mint: mint.to_account_info(),
to: destination_ata.to_account_info(),
authority: authority.to_account_info(),
};
let cpi_ctx = CpiContext::new(token_program.to_account_info(), mint_to_instruction);
token::mint_to(cpi_ctx, mint_amount)?;
Ok(())
}
}
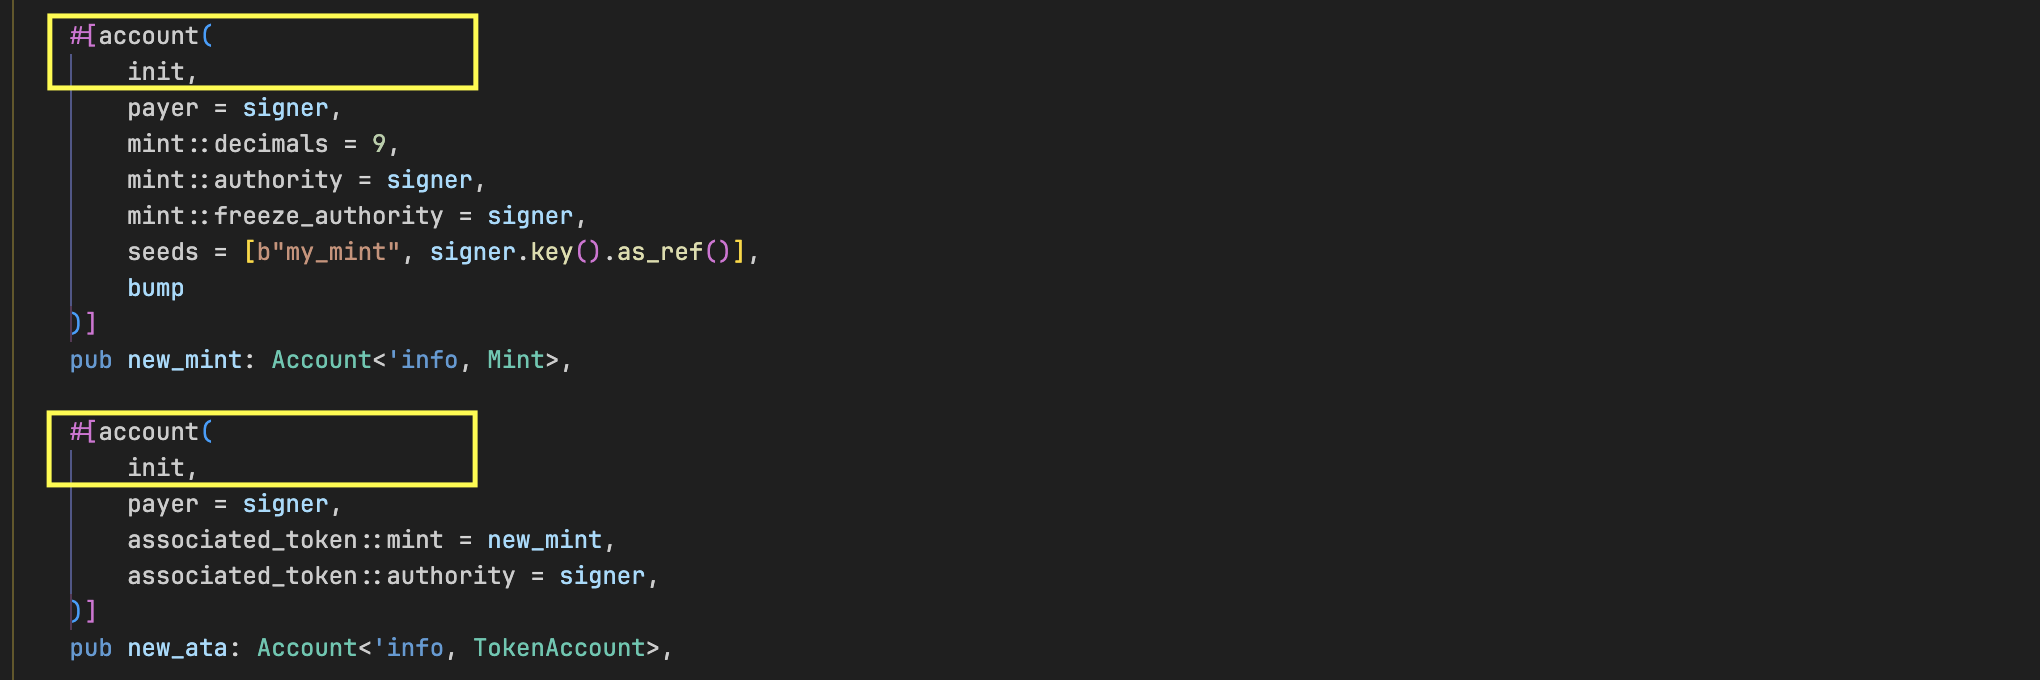
Add the CreateMint account struct. It contains the following accounts:
signer: The account that pays for transaction fees and also serves as the mint authoritynew_mint: A mint PDA account that is initialized with 9 decimal places and uses the signer as both mint and freeze authoritynew_ata: An associated token account that will be created for the new mint and uses the signer as its authority (effectively, the account that holds the signer’s balance)- Finally, we pass the Token Program, Associated Token Program, and the System Program. These are the native programs we interact with via CPI.
#[derive(Accounts)]
pub struct CreateMint<'info> {
#[account(mut)]
pub signer: Signer<'info>,
#[account(
init,
payer = signer,
mint::decimals = 9,
mint::authority = signer,
// Commenting out or removing this line permanently disables the freeze authority.
mint::freeze_authority = signer,
// When a token is created without a freeze authority, Solana prevents any future updates to it.
// This makes the token more decentralized, as no authority can freeze a user's ATA.
seeds = [b"my_mint", signer.key().as_ref()],
bump
)]
pub new_mint: Account<'info, Mint>,
#[account(
init,
payer = signer,
associated_token::mint = new_mint,
associated_token::authority = signer,
)]
pub new_ata: Account<'info, TokenAccount>,
// This represents the SPL Token Program (TokenkegQfeZ…)
// The same program we introduced in the previous article that owns and manages all mint and associated token account.
pub token_program: Program<'info, Token>,
// This represents the ATA program (ATokenGPvbdGV...)
// As mentioned in the previous tutorial, it is only in charge of creating the ATA.
pub associated_token_program: Program<'info, AssociatedToken>,
pub system_program: Program<'info, System>,
}
Now run anchor keys sync to synchronize your Program ID.
Next, update the programs/spl_token/Cargo.toml file to add the anchor-spl crate to our project as a dependency
[package]
name = "spl_token"
version = "0.1.0"
description = "Created with Anchor"
edition = "2021"
[lib]
crate-type = ["cdylib", "lib"]
name = "spl_token"
[features]
default = []
cpi = ["no-entrypoint"]
no-entrypoint = []
no-idl = []
no-log-ix-name = []
idl-build = ["anchor-lang/idl-build", "anchor-spl/idl-build"] # added "anchor-spl/idl-build"
[dependencies]
anchor-lang = "0.31.0"
anchor-spl = "0.31.0" # added this
This anchor-spl gives us access to the SPL Token Program, the ATA program, and their instructions.
Now, let us examine what is happening in the program code.
We start with the CreateMint struct.
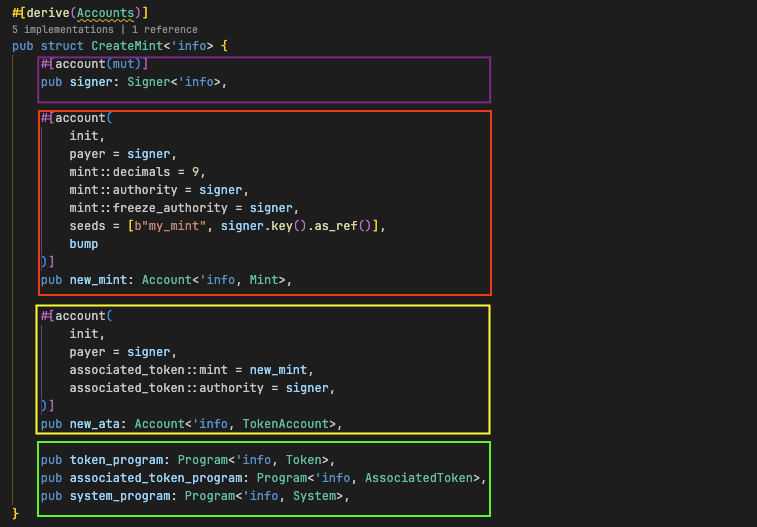
signer
First, we declare the signer who pays for the token deployment transaction, as highlighted in purple below.
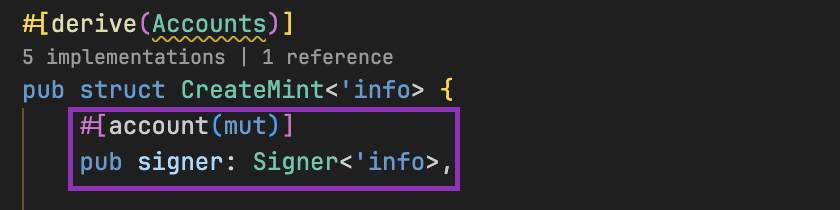
mint
Next, we declare a new_mint account, which represents the SPL token we want to create (highlighted in red below). Its account type is Mint (highlighted in yellow below). This account type represents a mint account on Solana.
As you can see in the image above, we initialize this new mint account as a Program Derived Address (PDA) and set its parameters: token decimals, mint and freeze authorities, and PDA seeds. Instead of using a keypair account, we derive the mint as a PDA from fixed seeds and the program ID, so there’s no need to generate or manage a private key like in a keypair account. We are using a mint PDA mainly for convenience.
If you’re new to how PDAs work or how they differ from keypair accounts, check out our article “PDA (Program Derived Address) vs Keypair Account in Solana.”
Finally, the init constraint tells Anchor to create and initialize the mint account automatically when create_and_mint_token runs (we’ll explain that function next).
Because of this init constraint, Anchor will make a CPI (cross-program invocation) to the Token Program’s InitializeMint instruction behind the scenes. This instruction sets the mint’s decimals to 9 and assigns both the mint and freeze authority to the signer.
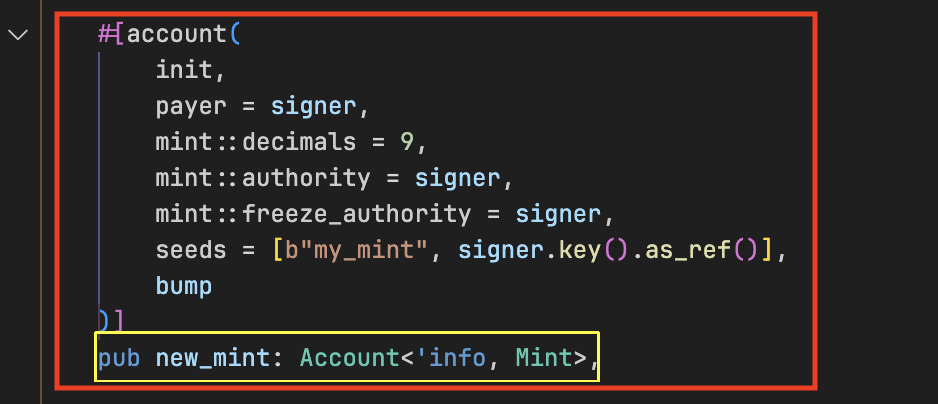
Associated Token Account
Next is the associated token account (ATA) that we’ll mint this token to (highlighted in yellow below).
Note: a mint account doesn’t need an ATA to exist. We’re only creating one here because we want to mint some to the signer.
The ATA is of type TokenAccount, which represents an ATA on Solana. Like the mint account, we set its parameters: the ATA’s mint is set to the new token we’re creating, and the signer becomes its authority. This means only the signer can authorize instructions that modify the ATA’s state. Anchor internally performs a CPI to the Token Program’s InitializeAccount instruction to apply these settings.
Note: we can safely use init here only because the mint account (new_mint) is also being created in the same instruction. If the mint already existed, using init on an ATA could fail if someone had already created that ATA, causing a denial-of-service. In cases where the mint may already exist, it’s safer to use init_if_needed instead. Otherwise, someone could frontrun the instruction and create an ATA on the signer’s behalf, and cause this transaction to fail.
native programs accounts
Finally, we declare the native Solana programs needed to create the mint and associated token account (highlighted in green below). These are the on-chain programs that our Anchor program interacts with: the Token Program to create the mint and mint tokens, the Associated Token Account Program to create the user’s ATA, and the System Program to allocate space for the accounts and manage rent.

You might have noticed that the ATA (new_ata account) does not have a seed and bump like the mint account (new_mint), this is because the InitializeAccount instruction uses the standard associated token account derivation process, i.e., user_wallet_address + token_mint_address => associated_token_account_address. So we don’t have to pass a seed and a bump. If you try to pass a seed and a bump, Anchor throws this error.

We also don’t specify the space for the mint account and ATA because Anchor adds the space for us behind the scenes too. It knows this information because we specified the program is AssociatedToken. An error occurs if we attempt to specify the space for either of them.

The actual size for mint and associated token account are 82 and 165 bytes respectively.
Now that we’ve declared all the account we need, let’s examine the create_and_mint_token function for minting SPL tokens.
Minting the SPL token
We use this function to mint 100 (with decimal of 9) of the tokens we just created to the signer’s newly created ATA.
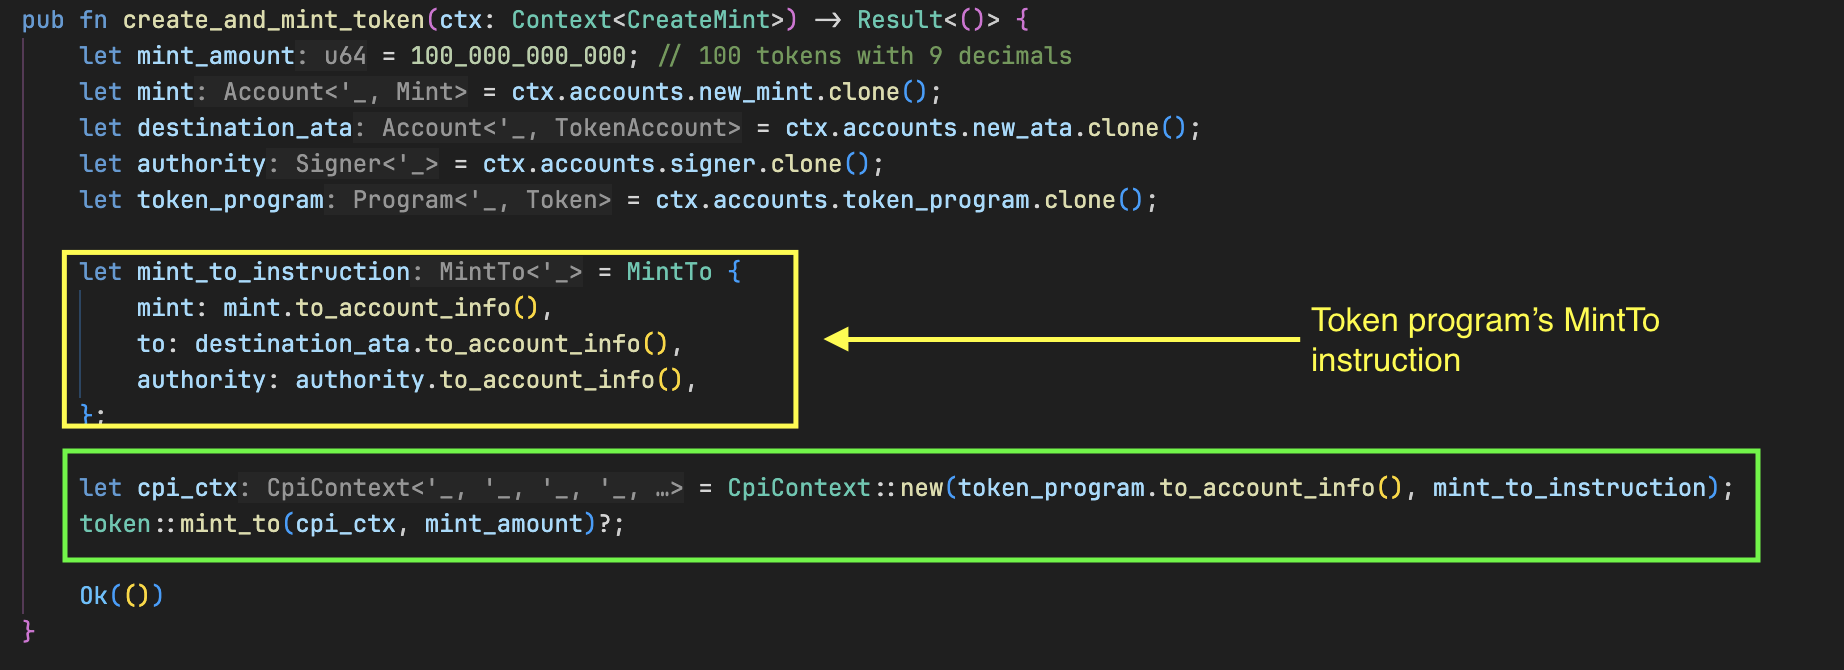
We construct a MintTo instruction in the code above. These three fields define the MintTo behavior:
mint: which token we are minting, as specified by the mint accountto: the ATA that will receive the minted tokens.authority: the account allowed to mint tokens for this mint. In our program, we set the mint authority to the transaction signer (signer), so signer must both sign and match the mint’s authority for the minting to succeed.
We then make a CPI to the Token Program with this instruction (as highlighted in green), which mints 100 units of our token to the associated token account.
Also, as discussed in the previous tutorial, both the mint account and the ATA must exist before the MintTo instruction is called (this also applies to Transfer). That’s why we use the #[account(init…)] constraint; it ensures these accounts are created just before the instruction runs.
Note: To create an NFT on Solana, you initialize the mint with mint::decimals = 0, mint exactly 1 token to a recipient, then revoke the mint authority by setting it to None. This ensures no more tokens can ever be minted and makes the token unique and non-fungible because it is not fractional, due to a decimal of zero.
Test the createAndMintToken function
Now, we will test the createAndMintToken function.
Replace the test code in tests/spl_token.ts with the following code. The test is structured this way.
- We derive the token’s mint account address off-chain using
findProgramAddressSyncfrom the@coral-xyz/anchorlibrary, with the same seeds used in our Anchor program. This step doesn’t deploy the mint account, we already handle that inside the Anchor program, as explained earlier. - Next we compute the signer’s ATA address using the
getAssociatedTokenAddressSyncfunction. Again, this doesn’t deploy the account. - We call the Anchor program function with the appropriate accounts (signer, mint, ATA, Token Program, ATA Program and the System Program) and print the transaction hash, token address and the signer’s ATA address.
- Lastly, we retrieve the mint and ATA information using the
getMintandgetAccountfunctions from the@solana/spl-tokenlibrary, and assert that their contents match what we had previously set in our Anchor Program. We assert the token decimal, authorities, token supply, ATA balance of the token, etc.
import * as anchor from "@coral-xyz/anchor";
import { Program, web3 } from "@coral-xyz/anchor";
import * as splToken from "@solana/spl-token";
import { PublicKey } from "@solana/web3.js";
import { assert } from 'chai';
import { SplToken } from "../target/types/spl_token";
describe("spl_token", () => {
// Configure the client to use the local cluster.
anchor.setProvider(anchor.AnchorProvider.env());
const program = anchor.workspace.splToken as Program<SplToken>;
const provider = anchor.AnchorProvider.env();
const signerKp = provider.wallet.payer;
const toKp = new web3.Keypair();
it("Creates a new mint and associated token account using CPI", async () => {
// Derive the mint address using the same seeds ("my_mint" + signer public key) we used when the mint was created in our Anchor program
const [mint] = PublicKey.findProgramAddressSync(
[Buffer.from("my_mint"), signerKp.publicKey.toBuffer()],
program.programId
);
// Get the associated token account address
// The boolean value here indicates whether the authority of the ATA is an "off-curve" address (i.e., a PDA).
// A value of false means the owner is a normal wallet address.
// `signerKp` is the owner here and it is a normal wallet address, so we use false.
const ata = splToken.getAssociatedTokenAddressSync(mint, signerKp.publicKey, false)
// Call the create_mint instruction
const tx = await program.methods
.createAndMintToken()
.accounts({
signer: signerKp.publicKey,
newMint: mint,
newAta: ata,
tokenProgram: splToken.TOKEN_PROGRAM_ID,
associatedTokenProgram: splToken.ASSOCIATED_TOKEN_PROGRAM_ID,
systemProgram: anchor.web3.SystemProgram.programId,
})
.rpc();
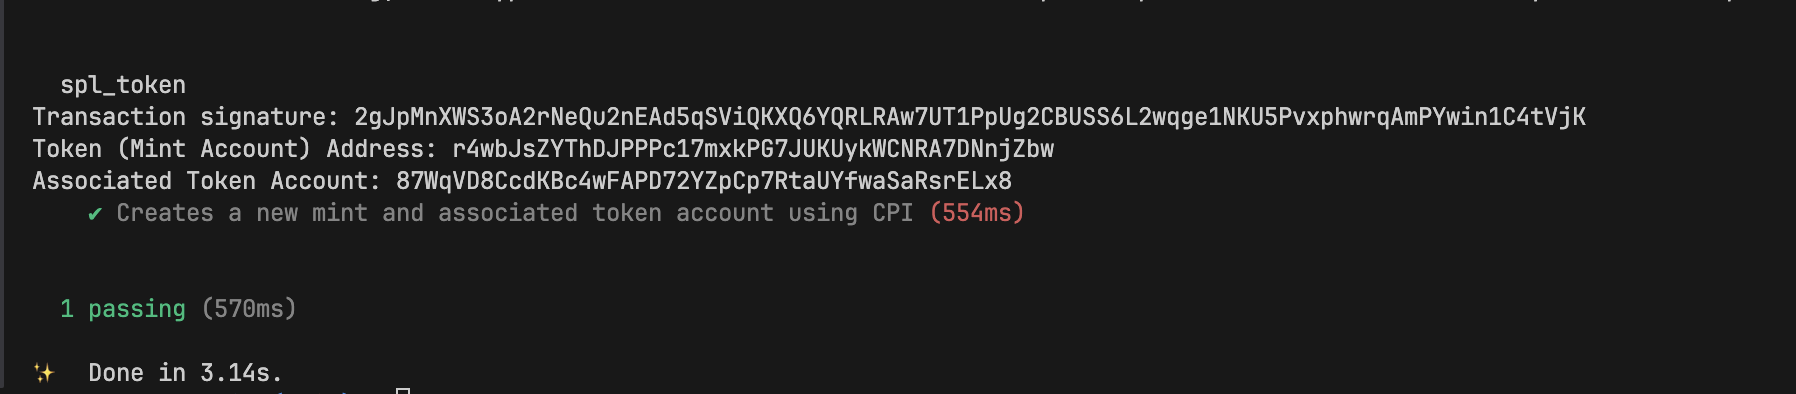
console.log("Transaction signature:", tx);
console.log("Token (Mint Account) Address:", mint.toString());
console.log("Associated Token Account:", ata.toString());
/// Verify the token details
const mintInfo = await splToken.getMint(provider.connection, mint);
assert.equal(mintInfo.decimals, 9, "Mint decimals should be 9");
assert.equal(mintInfo.mintAuthority?.toString(), signerKp.publicKey.toString(), "Mint authority should be the signer");
assert.equal(mintInfo.freezeAuthority?.toString(), signerKp.publicKey.toString(), "Freeze authority should be the signer");
assert.equal(mintInfo.supply.toString(), "100000000000", "Supply should be 100 tokens (with 9 decimals)");
// Verify the ATA details
const tokenAccount = await splToken.getAccount(provider.connection, ata);
assert.equal(tokenAccount.mint.toString(), mint.toString(), "Token account mint should match the mint PDA");
assert.equal(tokenAccount.owner.toString(), signerKp.publicKey.toString(), "Token account owner should be the signer");
assert.equal(tokenAccount.amount.toString(), "100000000000", "Token balance should be 100 tokens (with 9 decimals)");
assert.equal(tokenAccount.delegate, null, "Token account should not have a delegate");
});
});
Run npm install @solana/spl-token to install the SPL token library.
Now run anchor test and see that both the token and the ATA were deployed successfully.
Transferring SPL Tokens
To transfer tokens, we construct a Transfer instruction and make a CPI to the Token Program. This transfer works by moving the specified token unit amount from a source associated token account to a destination associated token account. The signer of this transaction must be the authority of the source ATA.
Now add the following function to your program. It does the following:
- Load the source associated token account (
from_ata) where the tokens will be taken from. - Load the destination associated token account (
to_ata) where the tokens will be sent (this ATA will be created in our test code). - Load the authority account (
from) that must sign and approve the transfer. - Load the Token Program account that will process the transfer.
- Build the
Transferinstruction with the source, destination, and authority accounts. - Create a CPI (Cross-Program Invocation) context that wraps the Token Program and the transfer instruction.
- Call the
token::transferfunction with the CPI context and the amount, which moves tokens from the source ATA to the destination ATA.
pub fn transfer_tokens(ctx: Context<TransferSpl>, amount: u64) -> Result<()> {
let source_ata = &ctx.accounts.from_ata;
let destination_ata = &ctx.accounts.to_ata;
let authority = &ctx.accounts.from;
let token_program = &ctx.accounts.token_program;
// Transfer tokens from from_ata to to_ata
let cpi_accounts = Transfer { // Transfer instruction
from: source_ata.to_account_info().clone(),
to: destination_ata.to_account_info().clone(),
authority: authority.to_account_info().clone(),
};
let cpi_ctx = CpiContext::new(token_program.to_account_info(), cpi_accounts); // Create a CPI context
token::transfer(cpi_ctx, amount)?;
Ok(())
}
In ERC-20, transfer assumes msg.sender as the token owner, and transferFrom lets a third party (a delegate) move tokens on someone else’s behalf if approved. SPL Token Program combines both into one transfer instruction, but requires passing the transfer authority explicitly as an account (AccountInfo in our Anchor code) — this maps to the Transfer.authority field. This authority is the signer allowed to move tokens; it can be the token owner or an approved delegate.
Hence, in the transfer instruction:
from: is the token sender’s ATAto: is the token recipient ATAauthority: is the signer that has permission to move tokens fromfrom(can be the owner or a delegate with approval)
Now add the TransferSpl account struct below, it defines the accounts needed to perform the token transfer.
#[derive(Accounts)]
pub struct TransferSpl<'info> {
pub from: Signer<'info>,
#[account(mut)]
pub from_ata: Account<'info, TokenAccount>,
#[account(mut)]
pub to_ata: Account<'info, TokenAccount>,
pub token_program: Program<'info, Token>, // We are interacting with the Token Program
}
We pass the transaction signer, the source and destination ATAs, and finally the Token Program we will interact with.
Add this test to our test file.
We do the following in the test.
- First, we derive the address of the token (mint account) that we want to transfer with the
findProgramAddressSyncfunction. - Next we compute the ATA address of both the source (sender’s wallet) and destination (recipient’s wallet) ATAs with the
getAssociatedTokenAddressSyncfrom@solana/spl-token, which takes in the mint address, the respective account address, and a boolean value which indicates if the ATA signer (signerKp) is a PDA or not. Which it isn’t, in this case. - We create the ATA for the destination account with the
createAssociatedTokenAccountfunction. We don’t create the ATA for the signer because it was already done in the previous test case. Since all test cases run together, the account persists. - Finally, we transfer 10 tokens to the destination ATA using the
transfer_tokensfunction in our program. Then, we retrieve the destination ATA’s token balance with thegetTokenAccountBalancefunction and assert that it is 10 (the amount we sent).
it("Transfers tokens using CPI", async () => {
// Derive the PDA for the mint
const [mint] = PublicKey.findProgramAddressSync(
[Buffer.from("my_mint"), signerKp.publicKey.toBuffer()],
program.programId
);
// Get the ATAs
const fromAta = splToken.getAssociatedTokenAddressSync(mint, signerKp.publicKey, false);
const toAta = splToken.getAssociatedTokenAddressSync(mint, toKp.publicKey, false);
// Create to_ata as it doesn't exist yet
try {
await splToken.createAssociatedTokenAccount(
provider.connection,
signerKp,
mint,
toKp.publicKey
);
} catch (error) {
throw new Error(error)
}
const transferAmount = new anchor.BN(10_000_000_000); // 10 tokens with 9 decimals
// Transfer tokens
const tx = await program.methods
.transferTokens(transferAmount)
.accounts({
from: signerKp.publicKey,
fromAta: fromAta,
toAta: toAta,
tokenProgram: splToken.TOKEN_PROGRAM_ID,
})
.rpc();
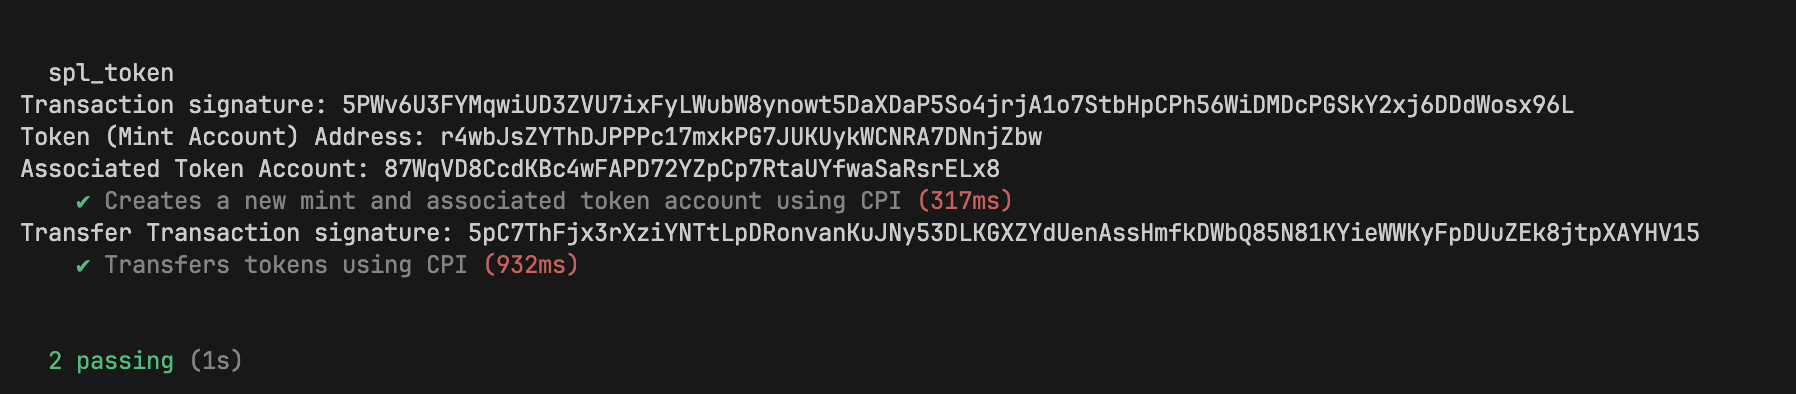
console.log("Transfer Transaction signature:", tx);
// Verify the transfer
const toBalance = await provider.connection.getTokenAccountBalance(toAta);
assert.equal(
toBalance.value.amount,
transferAmount.toString(),
"Recipient balance should match transfer amount"
);
});
Now run the test
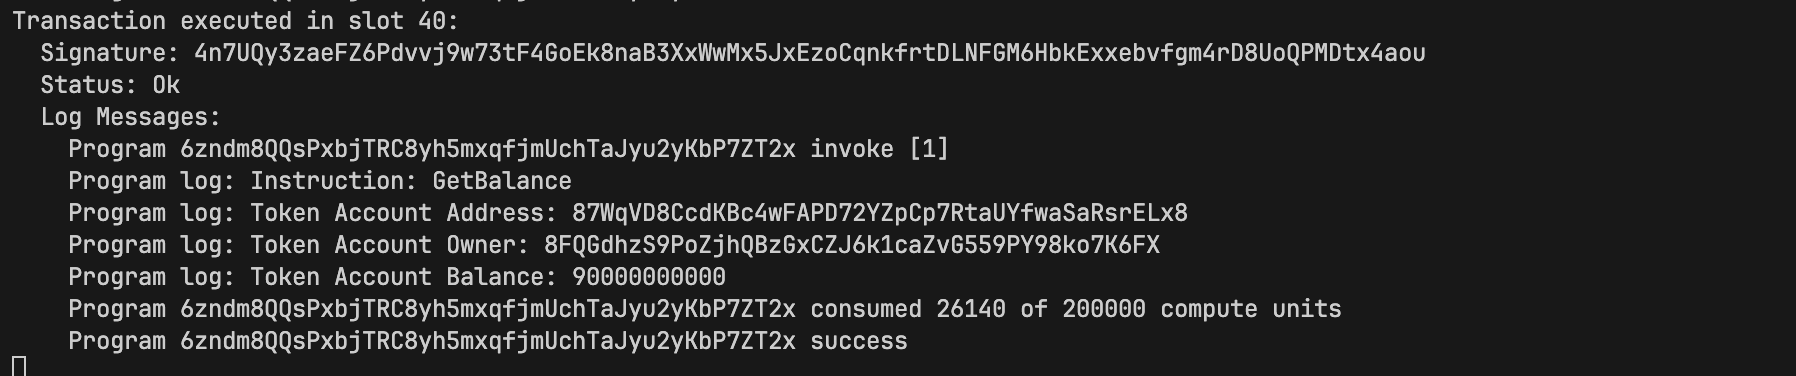
Retrieving token balances
Add this function to the program to retrieve ATA token balances
pub fn get_balance(ctx: Context<GetBalance>) -> Result<()> {
// Get the token account address, its owner & balance
let ata_pubkey = ctx.accounts.token_account.key();
let owner = ctx.accounts.token_account.owner; // the `owner` is a field in the ATA
let balance = ctx.accounts.token_account.amount; // the `amount` is a field in the ATA
// Print the balance information
msg!("Token Account Address: {}", ata_pubkey);
msg!("Token Account Owner: {}", owner);
msg!("Token Account Balance: {}", balance);
Ok(())
}
The amount field in the ATA holds the token balance. In this function, we access it directly from the ctx.accounts.token_account to print the balance.
Add the corresponding context struct:
#[derive(Accounts)]
pub struct GetBalance<'info> {
#[account(mut)]
pub token_account: Account<'info, TokenAccount>,
}
Update the test
it("Reads token balance using CPI", async () => {
// Derive the PDA for the mint
const [mint] = PublicKey.findProgramAddressSync(
[Buffer.from("my_mint"), signerKp.publicKey.toBuffer()],
program.programId
);
// Get the associated token account address
const ata = splToken.getAssociatedTokenAddressSync(mint, signerKp.publicKey, false);
// Call the get_balance instruction
const tx = await program.methods
.getBalance()
.accounts({
tokenAccount: ata,
})
.rpc();
console.log("Get Balance Transaction signature:", tx);
// Verify balance through direct query
const balance = await provider.connection.getTokenAccountBalance(ata);
assert.isTrue(balance.value.uiAmount > 0, "Token balance should be greater than 0");
});
If we run the validator and check the logs, we should see that the signer’s ATA balance has been reduced by 10 tokens (from 100 to 90). This is the amount we transferred in the previous test case.
Create and Transfer Tokens with the Typescript client directly
It is also possible to create and interact with an SPL token without a Solana program by simply using the web3.js Typescript client.
This is useful when you don’t need an on-chain program with custom logic. If you’re just minting tokens, transferring them, or reading balances, doing it from the client is faster and cheaper. There’s no need to write or deploy a program.
Let’s create new tokens and ATAs, and transfer them directly from TypeScript.
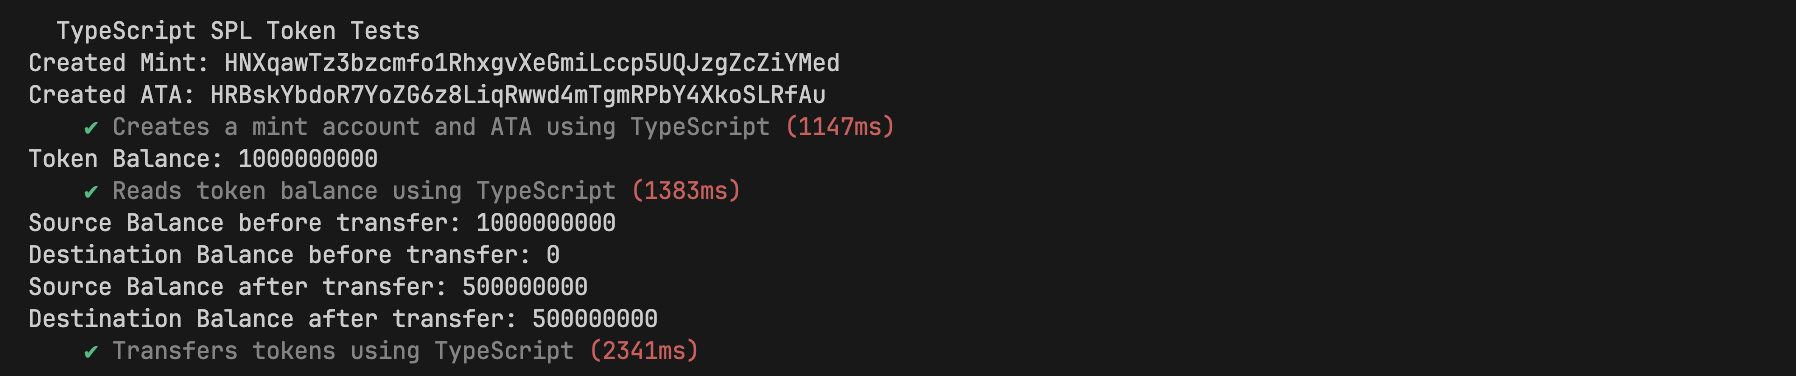
Creating a Mint and ATA in TypeScript
Create a new Anchor project spl_token_ts and replace the test with the TypeScript code block shown later in this section.
This TypeScript test suite demonstrates how to interact directly with the SPL Token program using the @solana/spl-token library.
It does the following:
- First, it calls
splToken.createMint. This function sends aInitializeMintinstruction to the Token Program to create a new SPL token mint account. We provide the connection, the payer (signerKp, our default local signer), the mint authority and freeze authority, and the desired number of decimals (6 in this case). It returns the public key of the newly created mint. - Next, it uses
splToken.createAssociatedTokenAccountto create the ATA for thesignerKpfor the newly created mint. This is a helper from the@solana/spl-tokenTypeScript SDK. Under the hood, it derives the ATA address and sends the create instruction to the Associated Token Account Program - Then,
splToken.mintTois called to issue new token units. It requires the connection, payer for the transaction (we usesignerKp), the mint’s public key, the destination ATA address, the mint authority’s public key (signerKp.PublicKey), and the amount of tokens to mint (we account for the decimals). - Finally, it verifies the setup.
splToken.getMintfetches the on-chain data for the mint account, and we assert that the decimals and authorities match what we specified.splToken.getAccountfetches the ATA’s data, and we assert that its token balance matches the amount we just minted.
import * as anchor from "@coral-xyz/anchor";
import * as splToken from "@solana/spl-token";
import * as web3 from "@solana/web3.js";
import { assert } from 'chai';
describe("TypeScript SPL Token Tests", () => {
const provider = anchor.AnchorProvider.env();
const signerKp = provider.wallet.payer;
const toKp = new web3.Keypair();
// Define mint parameters
const mintDecimals = 6;
const mintAuthority = provider.wallet.publicKey;
const freezeAuthority = provider.wallet.publicKey;
it("Creates a mint account and ATA using TypeScript", async () => {
// Create the Mint
const mintPublicKey = await splToken.createMint(
provider.connection,
signerKp,
mintAuthority,
freezeAuthority,
mintDecimals
);
console.log("Created Mint:", mintPublicKey.toString());
// Create ATA for the signer
const ataAddress = await splToken.createAssociatedTokenAccount(
provider.connection,
signerKp,
mintPublicKey,
signerKp.publicKey
);
console.log("Created ATA:", ataAddress.toString());
// Mint some tokens
const mintAmount = BigInt(1000 * (10 ** mintDecimals)); // 1000 tokens
await splToken.mintTo(
provider.connection,
signerKp,
mintPublicKey,
ataAddress,
mintAuthority,
mintAmount
);
// Verify the mint
const mintInfo = await splToken.getMint(provider.connection, mintPublicKey);
assert.equal(mintInfo.decimals, mintDecimals, "Mint decimals should match");
assert.equal(mintInfo.mintAuthority?.toString(), mintAuthority.toString(), "Mint authority should match");
assert.equal(mintInfo.freezeAuthority?.toString(), freezeAuthority.toString(), "Freeze authority should match");
// Verify the balance
const accountInfo = await splToken.getAccount(provider.connection, ataAddress);
assert.equal(accountInfo.amount.toString(), mintAmount.toString(), "Balance should match minted amount");
});
});
Fetching Token Balances in TypeScript
Now, add the following it test block to read token balance.
This test block is similar to the first test:
- It creates a new mint and its corresponding ATA for the
signerKpand mints an initial amount of tokens (1000 in this case) to this ATA (ataAddress). - The main point here is demonstrating balance retrieval. We show two ways to do this:
splToken.getAccount: Fetches the entire token account state, from which we can access the.amountproperty.provider.connection.getTokenAccountBalance: This is a more direct RPC call specifically to get the balance of a token account. It returns an object containing the amount.
- For illustration purposes, both methods are used, and we assert that the retrieved balance matches the minted amount.
it("Reads token balance using TypeScript", async () => {
// Create a new mint for this test
const mintPublicKey = await splToken.createMint(
provider.connection,
signerKp,
mintAuthority,
freezeAuthority,
mintDecimals
);
// Create ATA
const ataAddress = await splToken.createAssociatedTokenAccount(
provider.connection,
signerKp,
mintPublicKey,
signerKp.publicKey
);
// Mint tokens
const mintAmount = BigInt(1000 * (10 ** mintDecimals)); // 1000 tokens
await splToken.mintTo(
provider.connection,
signerKp,
mintPublicKey,
ataAddress,
mintAuthority,
mintAmount
);
// Read balance using getAccount
const accountInfo = await splToken.getAccount(provider.connection, ataAddress);
console.log("Token Balance:", accountInfo.amount.toString());
assert.equal(accountInfo.amount.toString(), mintAmount.toString(), "Balance should match minted amount");
// Alternative: Read balance using getTokenAccountBalance
const balance = await provider.connection.getTokenAccountBalance(ataAddress);
assert.equal(balance.value.amount, mintAmount.toString(), "Balance should match minted amount");
});
Testing Moving Tokens Between Accounts
Finally, add the last it test block to transfer tokens.
This test block:
- Creates a new mint.
- It then creates two ATAs for this mint: one for the source ATA (
signerKp) and one for the destination ATA (toKp). Note thattoKpis a newly generated keypair, representing another user. - 1000 units of the token are minted to the source ATA (
signerKp’s ATA). - The core of this test is the
splToken.transferfunction. This function builds and sends the transaction to move tokens between ATAs. It needs the connection, the payer/signer (signerKp), the source ATA, the destination ATA, the authority of the source ATA (which issignerKp.publicKey), and the amount to transfer (500 tokens). - After the transfer, it verifies the outcome by fetching the balances of both the source and destination ATAs using
provider.connection.getTokenAccountBalance. Finally, we assert that the source balance has decreased by the transfer amount and the destination balance now equals the transfer amount.
it("Transfers tokens using TypeScript", async () => {
// Create a new mint
const mintPublicKey = await splToken.createMint(
provider.connection,
signerKp,
mintAuthority,
freezeAuthority,
mintDecimals
);
// Create source ATA
const sourceAta = await splToken.createAssociatedTokenAccount(
provider.connection,
signerKp,
mintPublicKey,
signerKp.publicKey
);
// Create destination ATA
const destinationAta = await splToken.createAssociatedTokenAccount(
provider.connection,
signerKp,
mintPublicKey,
toKp.publicKey
);
// Mint tokens to source
const mintAmount = BigInt(1000 * (10 ** mintDecimals)); // 1000 tokens
await splToken.mintTo(
provider.connection,
signerKp,
mintPublicKey,
sourceAta,
mintAuthority,
mintAmount
);
// Read balance before transfer
const sourceBalanceBefore = await provider.connection.getTokenAccountBalance(sourceAta);
const destinationBalanceBefore = await provider.connection.getTokenAccountBalance(destinationAta);
console.log("Source Balance before transfer:", sourceBalanceBefore.value.amount);
console.log("Destination Balance before transfer:", destinationBalanceBefore.value.amount);
// Transfer tokens
const transferAmount = BigInt(500 * (10 ** mintDecimals)); // 500 tokens
await splToken.transfer(
provider.connection,
signerKp,
sourceAta,
destinationAta,
signerKp.publicKey,
transferAmount
);
// Read balance after transfer
const sourceBalanceAfter = await provider.connection.getTokenAccountBalance(sourceAta);
const destinationBalanceAfter = await provider.connection.getTokenAccountBalance(destinationAta);
console.log("Source Balance after transfer:", sourceBalanceAfter.value.amount);
console.log("Destination Balance after transfer:", destinationBalanceAfter.value.amount);
assert.equal(sourceBalanceAfter.value.amount, (mintAmount - transferAmount).toString(), "Source should have 500 tokens left");
assert.equal(destinationBalanceAfter.value.amount, transferAmount.toString(), "Destination should have received 500 tokens");
});
We run the full test to see if everything works as expected.
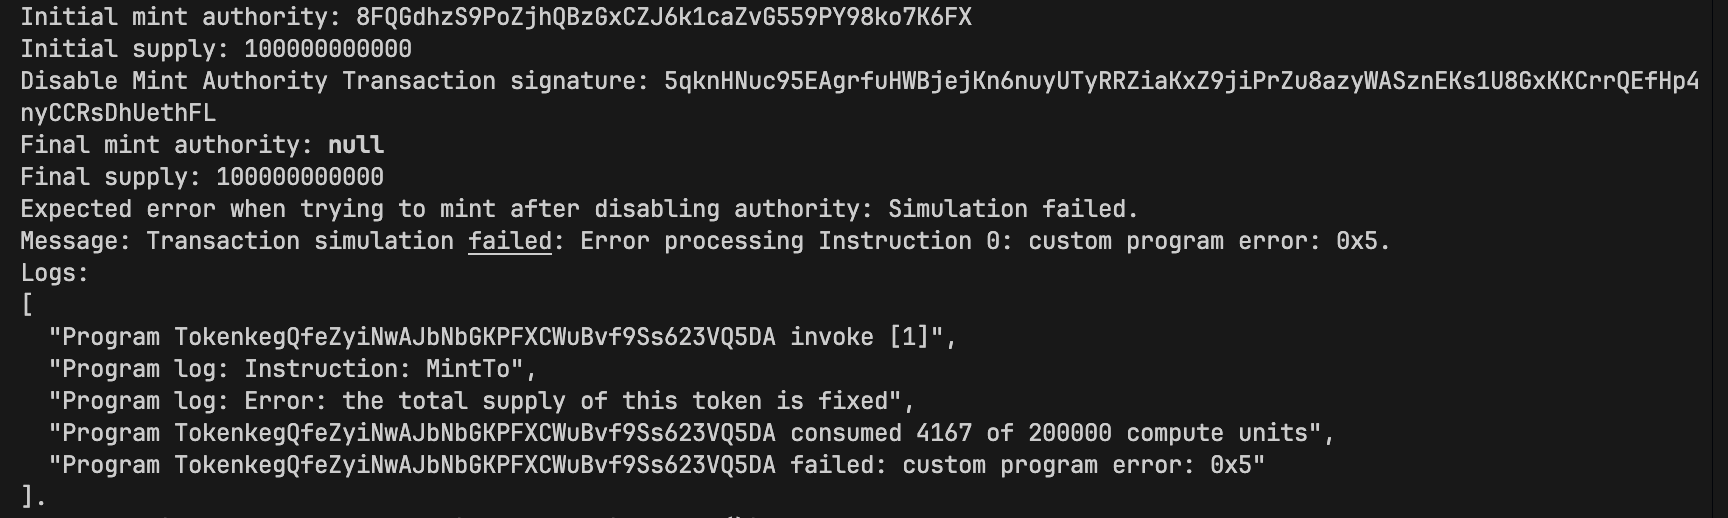
Exercise: Write a disable_mint_authority function that sets the mint authority to None through the set_authority instruction. Set the authority type to AuthorityType::MintTokens. After that, write a test to call the function, then attempt to mint more tokens, it should fail with a “supply is fixed” error. Also check that the mint authority is now null.
You should get a similar result below.
This article is part of a tutorial series on Solana.