Solana Anchor Programs में Ed25519 Signatures को Verify करना
यह ट्यूटोरियल दिखाता है कि Solana प्रोग्राम में off-chain Ed25519 signature को कैसे verify किया जाता है।
Solana में, कस्टम प्रोग्राम आमतौर पर Ed25519 या Secp256k1 signature verification जैसे cryptographic primitives को स्वयं implement नहीं करते हैं क्योंकि ऐसे ऑपरेशन्स compute-intensive होते हैं और SVM में अत्यधिक compute units की खपत करेंगे।
इसके बजाय, Solana Ed25519Program और Secp256k1Program को native programs के रूप में प्रदान करता है जो signature verification के लिए optimized हैं। यह उसी तरह है जैसे Ethereum ECDSA signatures को मान्य (validate) करने के लिए precompile का उपयोग करता है क्योंकि उस लॉजिक को सीधे EVM bytecode में implement करने पर बहुत अधिक गैस (gas) खर्च होती है।
हालाँकि वॉलेट ट्रांज़ैक्शन्स को भी Ed25519 के साथ साइन किया जाता है, उन signatures को स्वयं Solana रनटाइम द्वारा verify किया जाता है, Ed25519Program द्वारा नहीं। Ed25519Program का उपयोग तब किया जाता है जब आपको transaction instruction data के अंदर शामिल signatures को verify करने की आवश्यकता होती है, जैसे कि airdrop claim के लिए डिस्ट्रीब्यूटर (distributor) का signature।
इस लेख में, हम दिखाएंगे कि Ed25519Program और instruction introspection का उपयोग करके Solana में signature verification कैसे काम करता है। हमारा मुख्य उदाहरण एक airdrop flow होगा, जहाँ एक डिस्ट्रीब्यूटर claims को off-chain साइन करता है और प्राप्तकर्ता (recipients) उन हस्ताक्षरित (signed) claims को verification के लिए on-chain सबमिट करते हैं ताकि वे airdrop क्लेम कर सकें।
Ed25519Program stateless है
Solana का Ed25519Program केवल दिए गए इनपुट पैरामीटर्स के आधार पर cryptographic signature verification करता है। यह कॉल्स के बीच कोई persistent डेटा मेंटेन नहीं करता है, इसलिए, इसके पास कोई accounts नहीं होते। परिणामस्वरूप, यह verification के परिणाम (outcome) को स्टोर नहीं करता है। यदि signature verification विफल हो जाता है, तो पूरा ट्रांज़ैक्शन अस्वीकृत (reject) हो जाता है; यदि यह सफल होता है, तो execution जारी रहता है और अगला instruction सुरक्षित रूप से यह मान सकता है कि signature वैध था।
हमारा मुख्य उदाहरण: Airdrop
किसी airdrop में, हमें यह जानने के लिए एक तरीके की आवश्यकता होती है कि टोकन क्लेम करने के योग्य (eligible) कौन है। एक तरीका यह है कि सभी योग्य एड्रेस को on-chain स्टोर किया जाए, लेकिन यह महंगा होता है।
सभी प्राप्तकर्ता (recipient) एड्रेस को on-chain स्टोर करने के बजाय, signature-based airdrop एक विश्वसनीय डिस्ट्रीब्यूटर (जैसे प्रोजेक्ट की टीम) का उपयोग करता है, जो प्रत्येक प्राप्तकर्ता के वॉलेट एड्रेस और टोकन राशि (recipient, amount) वाले off-chain messages को साइन करता है। Airdrop वितरित (distribute) करने के लिए जिम्मेदार on-chain प्रोग्राम इन signatures को verify करता है ताकि टोकन क्लेम्स को अधिकृत (authorize) किया जा सके और amount को recipient के पास ट्रांसफर किया जा सके।
Verification प्रक्रिया कैसे काम करती है
Signature verification प्रक्रिया instruction introspection का उपयोग करती है, जहाँ एक प्रोग्राम उसी ट्रांज़ैक्शन के अन्य instructions को पढ़ सकता है। हमने पहले instruction introspection पर चर्चा की थी, और अब हम इस बात पर ध्यान केंद्रित करेंगे कि यह signature verification पर कैसे लागू होता है।
सबसे पहले, हमारा airdrop प्राप्तकर्ता दो instructions के साथ एक ही ट्रांज़ैक्शन सबमिट करता है, इस लेख में हम उन्हें instruction 1 के लिए Ed25519 Instruction और instruction 2 के लिए AirdropClaim Instruction के रूप में संदर्भित करेंगे:
याद करें कि एक instruction में एक program ID, accounts की एक सूची, और मनमाना (arbitrary) डेटा होता है जिसे प्रोग्राम इंटरप्रेट (interpret) करता है। हम इस पूरे लेख में इस instruction struct का संदर्भ देंगे:
pub struct Instruction {
/// Pubkey of the program that executes this instruction.
pub program_id: Pubkey,
/// Metadata describing accounts that should be passed to the program.
pub accounts: Vec<AccountMeta>,
/// Opaque data passed to the program for its own interpretation.
pub data: Vec<u8>,
}
Instruction 1: Signature verification के लिए Ed25519 Instruction
Ed25519 Instruction एक Solana instruction है जिसका program_id नेटिव Ed25519Program verifier (Ed25519SigVerify111111111111111111111111111) है। यह हमारे airdrop ट्रांज़ैक्शन में पहला instruction है।
चूँकि Ed25519Program stateless है, इस instruction के लिए किसी accounts की आवश्यकता नहीं होती है, इसलिए सभी इनपुट्स को instruction data में एनकोड (encode) किया जाता है।
Ed25519Program के लिए instruction data को कैसे फ़ॉर्मेट किया जाता है
Ed25519program instruction में data एक 16-byte हेडर से शुरू होता है जिसमें instruction में signatures की संख्या और offsets होते हैं। हमारे मामले में, हमारे पास केवल डिस्ट्रीब्यूटर का signature count और offsets होंगे। ये offsets शेष data की ओर इशारा (point) करते हैं ताकि उस public key, message और signature का पता लगाया जा सके जिन्हें verify किया गया था। शेष डेटा 16वें बाइट से 151वें बाइट तक जारी रहेगा।
| Ed25519 Instruction | |||
|---|---|---|---|
| [bytes 0…15] Header (16 bytes) |
[bytes 16…47] Distributor की public key (32 bytes) |
[bytes 48…111] Distributor का Signature (64 bytes) |
[bytes 112…151] Message - Recipient Pubkey (0…31) - Airdrop token की राशि (32…39, little-endian) |
यह हेडर का Rust struct है:
struct Ed25519InstructionHeader {
num_signatures: u8, // 1 byte
padding: u8, // 1 byte
offsets: Ed25519SignatureOffsets, // 14 bytes
}
struct Ed25519SignatureOffsets {
signature_offset: u16, // 2 bytes
signature_instruction_index: u16, // 2 bytes
public_key_offset: u16, // 2 bytes
public_key_instruction_index: u16, // 2 bytes
message_data_offset: u16, // 2 bytes
message_data_size: u16, // 2 bytes
message_instruction_index: u16, // 2 bytes
}
ध्यान दें कि Ed25519SignatureOffsets struct में निम्नलिखित indices हैं: signature_instruction_index, public_key_instruction_index, और message_instruction_index। इन indices का उपयोग यह निर्धारित करने के लिए किया जाता है कि क्या instruction data वर्तमान में execute हो रहे instruction में है। वर्तमान instruction data में indices को Solana Ed25519 source code में u16::MAX पर सेट किया गया है:
let offsets = Ed25519SignatureOffsets {
signature_offset: signature_offset as u16,
signature_instruction_index: u16::MAX,
public_key_offset: public_key_offset as u16,
public_key_instruction_index: u16::MAX,
message_data_offset: message_data_offset as u16,
message_data_size: message.len() as u16,
message_instruction_index: u16::MAX,
};
कोई अन्य मान (value) ट्रांज़ैक्शन में किसी अन्य instruction की ओर इशारा करेगा।
हमारे airdrop उदाहरण में Ed25519 Instruction डेटा के लिए लेआउट (layout) कुछ इस तरह दिखेगा।
| Ed25519 Instruction | |||
|---|---|---|---|
| 0…15 Header (16 bytes) |
16…47 Distributor की public key |
48…111 Distributor का Signature |
112…151 Message - Recipient Pubkey (0…31) - Airdrop token की राशि (32…39, little-endian) |
व्यवहार में (In practice), एक वैध instruction बनाने के लिए आप Web3.js या solana-ed25519-program crate जैसे off-chain हेल्पर्स का उपयोग करेंगे। नीचे ed25519 crate source code का एक स्निपेट दिया गया है जो instruction बनाने के लिए इनपुट पैरामीटर्स दिखाता है और फिर off-chain एक वैध instruction लौटाता है। (Typescript वर्ज़न बाद में दिखाया जाएगा)
use solana_ed25519_program::new_ed25519_instruction_with_signature;
pub fn new_ed25519_instruction_with_signature(
message: &[u8],
signature: &[u8; 64],
pubkey: &[u8; 32],
) -> Instruction
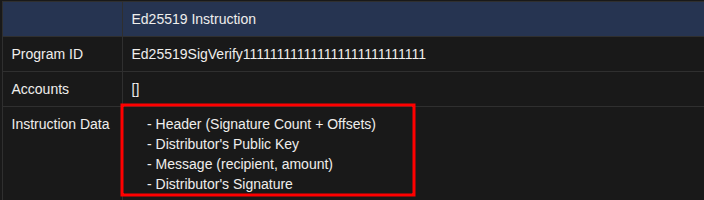
वैचारिक रूप से (Conceptually), Ed25519 Instruction का de-serialized वर्ज़न ऐसा दिखता है:
| Ed25519 Instruction | |
|---|---|
| Program ID | Ed25519SigVerify111111111111111111111111111 |
| Accounts | [] |
| Instruction Data | - Header (Signature Count + Offsets) - Distributor की Public Key - Message (recipient, amount) - Distributor का Signature |
जब ट्रांज़ैक्शन execute होता है, तो Ed25519 Instruction को Ed25519Program द्वारा प्रोसेस किया जाता है। यदि signature वैध है, तो instruction execution सफल होता है। हालाँकि, यदि signature अमान्य (invalid) है, तो यह ट्रांज़ैक्शन को निरस्त (abort) कर देता है और एक error code लॉग करता है, जिसका अर्थ है कि बाद के instructions (जैसे AirdropClaim Instruction) execute नहीं होते हैं।
हम इस लेख में बाद में प्रदर्शित करेंगे कि यह verification व्यावहारिक रूप से कैसे काम करता है।
Instruction 2: AirdropClaim Instruction
AirdropClaim Instruction एक मानक Solana ट्रांज़ैक्शन instruction है जिसे airdrop टोकन क्लेम करने के लिए airdrop प्रोग्राम को भेजा जाता है। इस instruction में introspection के लिए airdrop program ID, recipient account, और instructions sysvar account शामिल होते हैं।
| AirdropClaim Instruction | |
|---|---|
| Program ID | airdrop program ID |
| Accounts | [recipient, instructions sysvar account] |
| Instruction Data | No custom data (कोई कस्टम डेटा नहीं) |
Airdrop प्रोग्राम सबसे पहले instruction sysvar का उपयोग करके ****Ed25519 Verification Instruction: Instruction 1 को introspect करेगा ताकि यह मान्य (validate) किया जा सके कि:
Ed25519 Verification Instruction: Instruction 1का program IDEd25519Program(Ed25519SigVerify111111111111111111111111111) से मेल खाता है।Ed25519 Verification Instruction: Instruction 1में कोई accounts नहीं हैं, जैसा कि statelessEd25519Programके लिए अपेक्षित है।- Instruction के डेटा में सही डिस्ट्रीब्यूटर की public key, signature, और message शामिल हैं, जो अपेक्षित मानों (expected values) से मेल खाते हैं।
यदि introspection यह दिखाता है कि Ed25519 Verification Instruction: Instruction 1 वैध है, तो यूज़र अपना airdrop टोकन क्लेम कर सकता है।
Ed25519 Verification Instruction और AirdropClaim Instruction का Execution flow
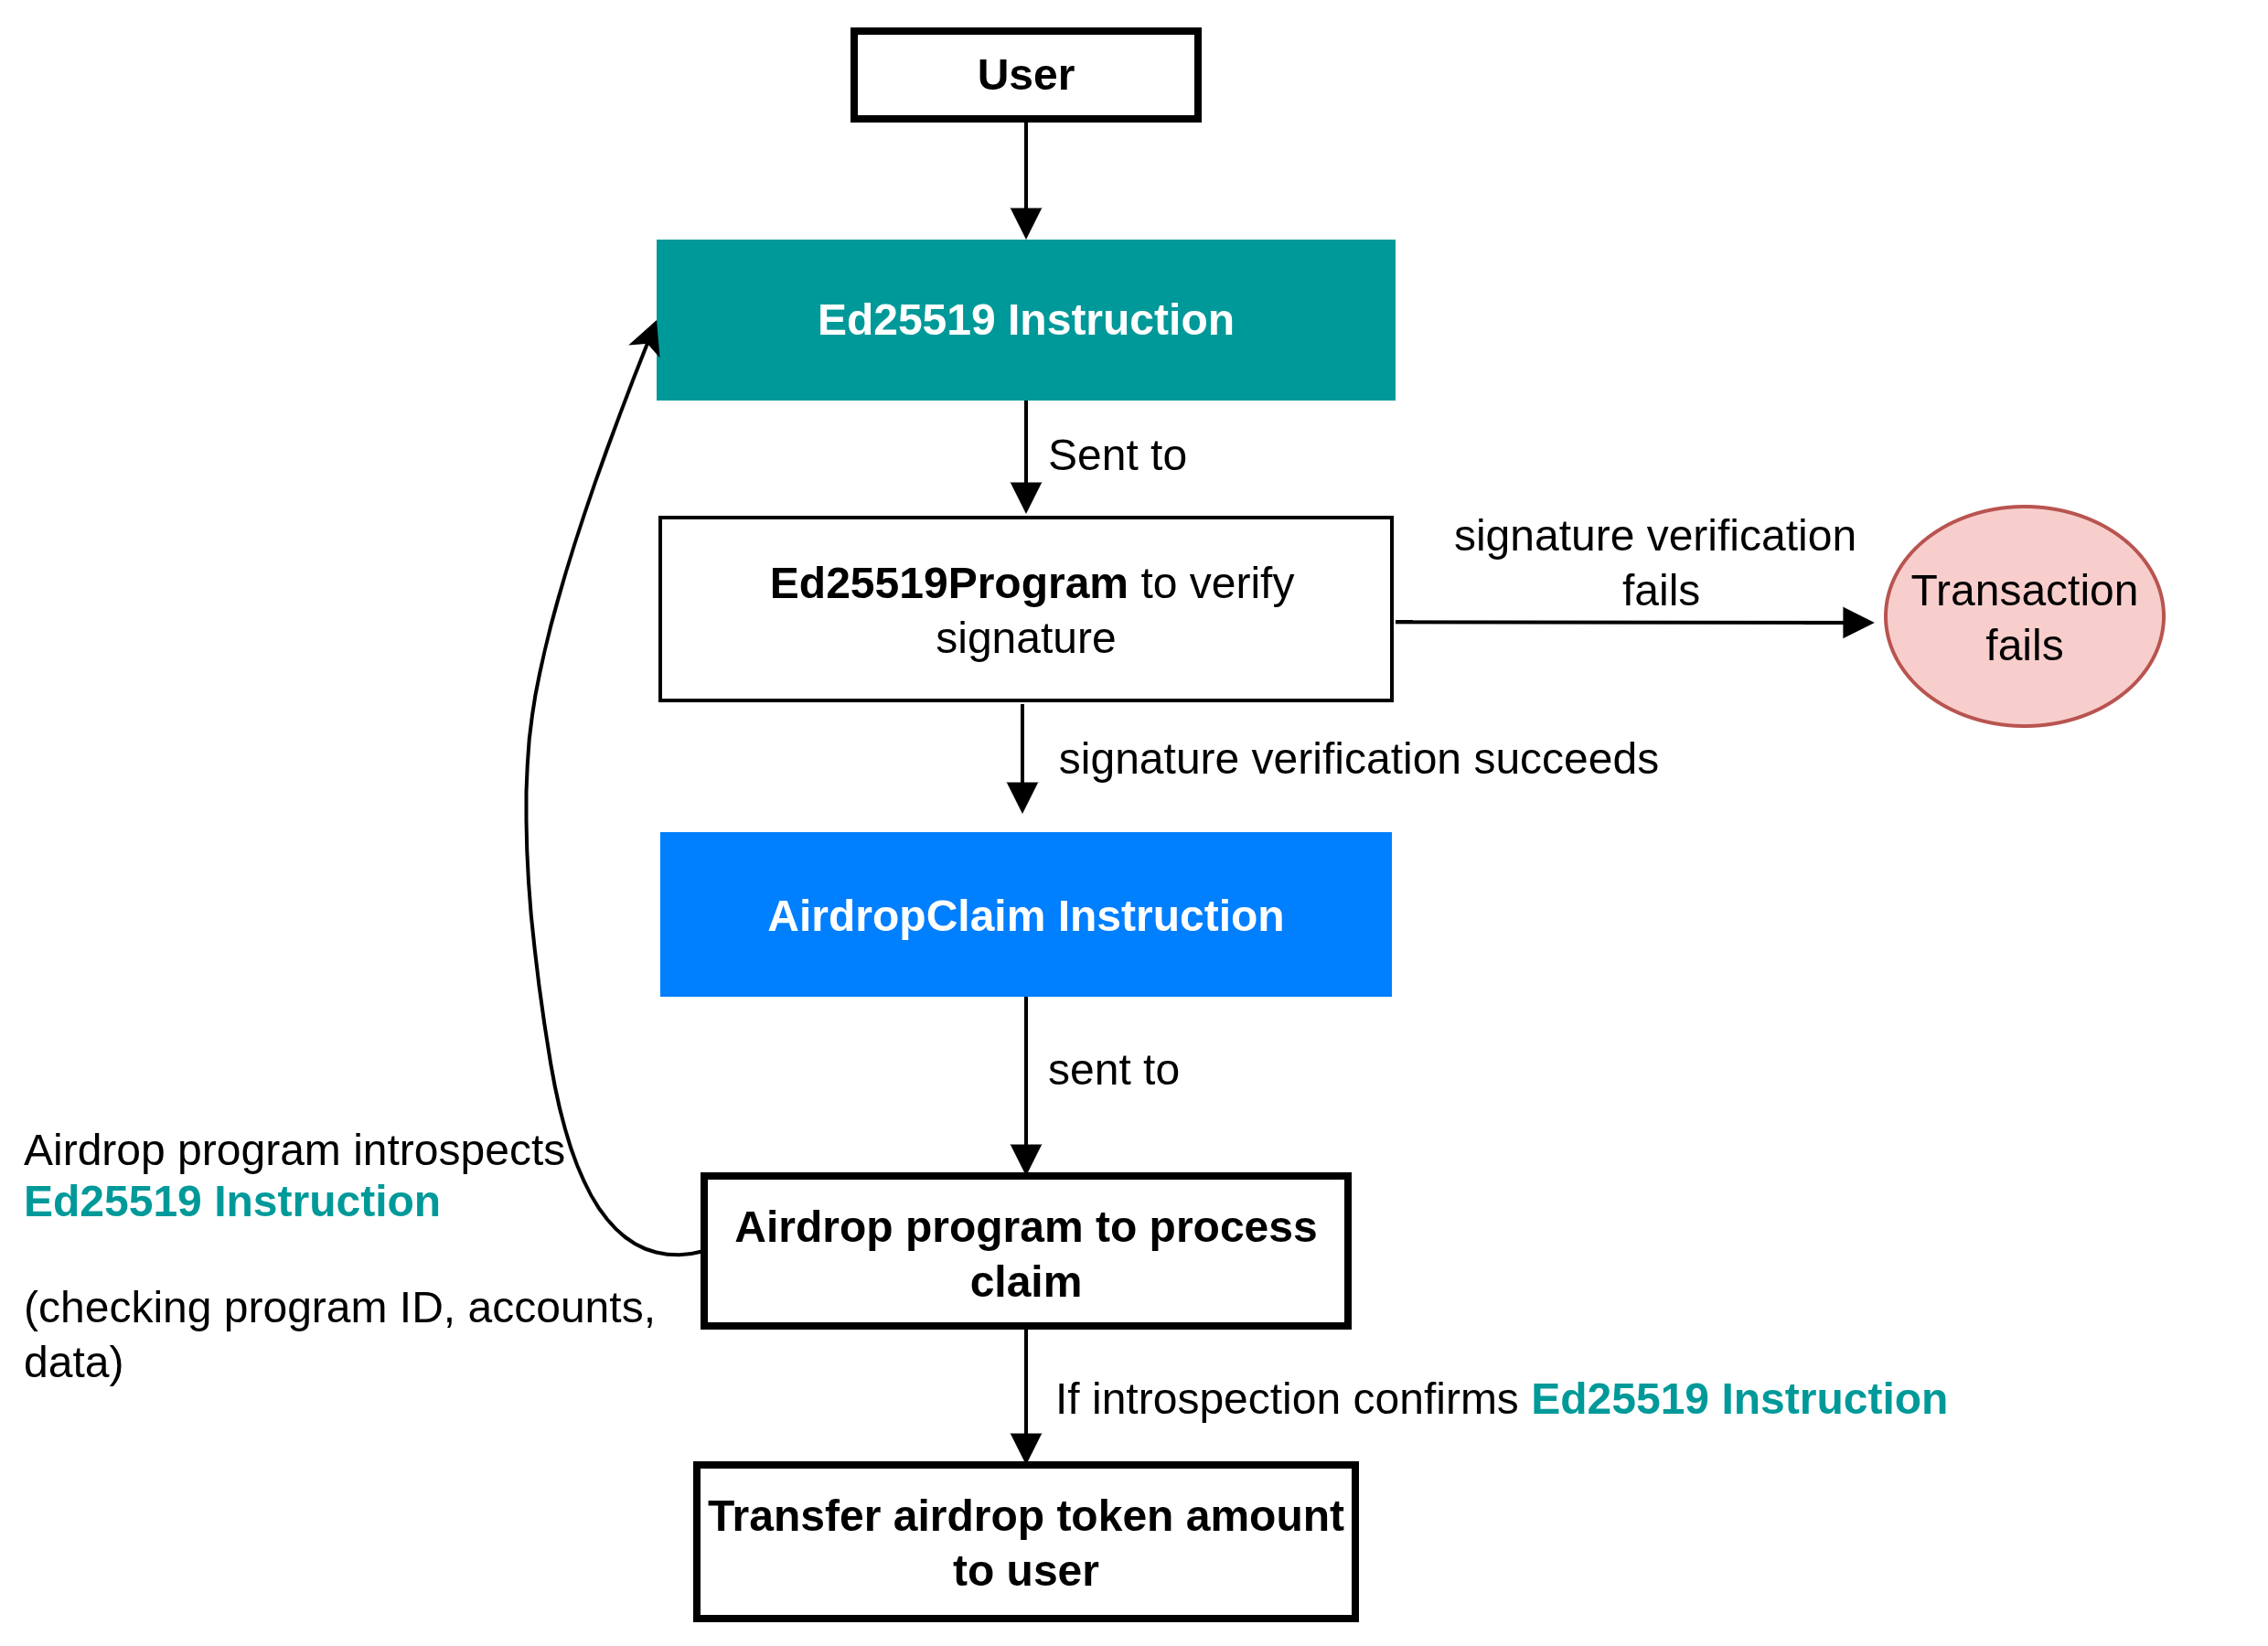
नीचे दिया गया आरेख (diagram) हमारे प्रोग्राम में airdrop क्लेम किए जा सकने से पहले Ed25519 Verification Instruction और AirdropClaim Instruction का एक high-level execution flow दिखाता है।
यूज़र दो instructions के साथ एक ट्रांज़ैक्शन भेजता है: Ed25519 Verification Instruction और AirdropClaim Instruction।
Ed25519 Verification Instructionडिस्ट्रीब्यूटर के signature को verify करने के लिएEd25519Programपर जाता है।- यदि signature verification विफल हो जाता है, तो पूरा ट्रांज़ैक्शन विफल हो जाता है। यदि यह सफल होता है, तो execution flow जारी रहता है।
- इसके बाद
AirdropClaim Instructionको Airdrop program में भेजा जाता है। - Airdrop program
Ed25519 Verification Instructionको introspect करता है, यह पुष्टि करने के लिए कि यह एक वैधEd25519verification था, इसके program ID, accounts और डेटा की जाँच करता है। - यदि introspection
Ed25519 Verification Instructionकी पुष्टि करता है, तो यूज़र अपना airdrop टोकन क्लेम कर सकता है।
Airdrop वितरण के लिए Signature verification प्रोग्राम
आइए वास्तविक कोड लिखें जो प्रदर्शित करता है कि हमारे airdrop वितरण प्रवाह (flow) का पालन करते हुए Ed25519 signatures को verify करने के लिए instruction introspection का उपयोग कैसे किया जाए। इस एप्लिकेशन के दो चरण (phases) हैं:
- Client side ट्रांज़ैक्शन बनाता है जिसमें
Ed25519 Verification Instruction: Instruction 1औरAirdropClaim Instruction: Instruction 2जोड़ा जाता है, और फिर नेटवर्क पर ट्रांज़ैक्शन भेजता है। - Program logic introspection के माध्यम से
Ed25519 Verification Instruction: Instruction 1को मान्य (validate) करता है और यूज़र को अपना airdrop टोकन क्लेम करने की अनुमति देता है।
हम टेस्ट सूट (test suite) में client side logic को implement करेंगे, इसलिए आइए पहले program logic बनाकर शुरुआत करें।
Program logic: क्लेम verification
इस अनुभाग का पालन करने के लिए, सुनिश्चित करें कि आपकी मशीन पर Solana development environment सेटअप है। अन्यथा, इसे सेटअप करने के लिए सीरीज़ का पहला लेख पढ़ें।
Anchor कमांड चलाकर एक Anchor एप्लिकेशन इनिशियलाइज़ (initialize) करें:
anchor init airdrop-distribution
programs/airdrop-distribution/lib.rs फ़ाइल में imports को इन Anchor imports के साथ अपडेट करें। हमें आवश्यकता है:
- हमारे verification के लिए
ed25519_programimport, - विभिन्न इंस्टेंसेस के लिए public key जहाँ हमें इसकी आवश्यकता होती है,
- और फिर हम introspection के लिए
sysvarimports का उपयोग करेंगे।
use anchor_lang::prelude::*;
use anchor_lang::solana_program::{
ed25519_program,
pubkey::Pubkey,
sysvar::instructions as ix_sysvar,
sysvar::SysvarId
};
अपना जनरेट किया गया declare_id बनाए रखें
declare_id!("Gh2JoycvxfreSgjzhCHuRDK7sZDAbxeo7Pd8GKCoSLmS");
आगे, हम बाकी program logic को शामिल करेंगे और इसे स्टेप-बाय-स्टेप समझेंगे।
प्रोग्राम में एक claim फंक्शन है जहाँ सारा लॉजिक मौजूद है। यहाँ इस बात का विश्लेषण दिया गया है कि फंक्शन में क्या होता है:
- यह पूरे ट्रांज़ैक्शन instructions को पढ़ने के लिए instructions
sysvarको लोड करता है। - वर्तमान instruction का index खोजता है और उसके ठीक पहले वाले instruction को लोड करता है।
- यह सुनिश्चित करता है (
requireके माध्यम से) कि पिछला instruction नेटिवEd25519प्रोग्राम को भेजा गया था और उसमें कोई accounts नहीं थे। Ed25519 Verification Instruction: Instruction 1डेटा को पार्स करता है, फिर हेडर की जाँच करता है, signatures की संख्या को मान्य करता है, और offsets निकालता है।- Verify करता है कि हेडर में सभी offsets उसी instruction के भीतर डेटा को पॉइंट करते हैं और विशेष रूप से signature, public key, और message की ओर इशारा करते हैं।
- डेटा से डिस्ट्रीब्यूटर की public key का पुनर्निर्माण (reconstruct) करता है और जाँचता है कि यह अपेक्षित डिस्ट्रीब्यूटर account से मेल खाती है।
- हस्ताक्षरित संदेश (signed message)
[recipient pubkey (32)][amount (u64 little-endian)]का पुनर्निर्माण करता है और जाँचता है कि signed message से प्राप्तकर्ताAirdropClaim Instruction: Instruction 2में प्राप्तकर्ता (recipient) account से मेल खाता है।
use anchor_lang::prelude::*;
use anchor_lang::solana_program::{
ed25519_program,
pubkey::Pubkey,
sysvar::instructions as ix_sysvar,
sysvar::SysvarId
};
declare_id!("Gh2JoycvxfreSgjzhCHuRDK7sZDAbxeo7Pd8GKCoSLmS");
#[program]
pub mod airdrop {
use super::*;
pub fn claim(ctx: Context<Claim>) -> Result<()> {
// --- constants for parsing Ed25519 instruction data ---
const HEADER_LEN: usize = 16; // fixed-size instruction header
const PUBKEY_LEN: usize = 32; // size of an Ed25519 public key
const SIG_LEN: usize = 64; // size of an Ed25519 signature
const MSG_LEN: usize = 40; // expected message length: [recipient(32) + amount(8)]
// Load the instruction sysvar account (holds all tx instructions)
let ix_sysvar_account = ctx.accounts.instruction_sysvar.to_account_info();
// Index of the current instruction in the transaction
let current_ix_index = ix_sysvar::load_current_index_checked(&ix_sysvar_account)
.map_err(|_| error!(AirdropError::InvalidInstructionSysvar))?;
// The Ed25519 verification must have run just before this instruction
require!(current_ix_index > 0, AirdropError::InvalidInstructionSysvar);
// Load the immediately preceding instruction (the Ed25519 ix)
let ed_ix = ix_sysvar::load_instruction_at_checked(
(current_ix_index - 1) as usize,
&ix_sysvar_account,
)
.map_err(|_| error!(AirdropError::InvalidInstructionSysvar))?;
// Ensure it is the Ed25519 program and uses no accounts (stateless check)
require!(ed_ix.program_id == ed25519_program::id(), AirdropError::BadEd25519Program);
require!(ed_ix.accounts.is_empty(), AirdropError::BadEd25519Accounts);
// Ed25519 Verification Instruction data
let data = &ed_ix.data;
// --- parse Ed25519 instruction format ---
// First byte: number of signatures (must be 1)
// Rest of header: offsets describing where signature, pubkey, and message are
require!(data.len() >= HEADER_LEN, AirdropError::InvalidInstructionSysvar);
let sig_count = data[0] as usize;
require!(sig_count == 1, AirdropError::InvalidInstructionSysvar);
// helper to read u16 offsets from the header (little-endian)
let read_u16 = |i: usize| -> Result<u16> {
let start = 2 + 2 * i;
let end = start + 2;
let src = data
.get(start..end)
.ok_or(error!(AirdropError::InvalidInstructionSysvar))?;
let mut arr = [0u8; 2];
arr.copy_from_slice(src);
Ok(u16::from_le_bytes(arr))
};
// Extract the offsets for signature, pubkey, and message
let signature_offset = read_u16(0)? as usize;
let signature_ix_idx = read_u16(1)? as usize;
let public_key_offset = read_u16(2)? as usize;
let public_key_ix_idx = read_u16(3)? as usize;
let message_offset = read_u16(4)? as usize;
let message_size = read_u16(5)? as usize;
let message_ix_idx = read_u16(6)? as usize;
// Enforce that all offsets point to the current instruction's data.
// The Ed25519 program uses u16::MAX as a sentinel value for "current instruction".
// This prevents the program from accidentally reading signature, public key,
// or message bytes from some other instruction in the transaction.
let this_ix = u16::MAX as usize;
require!(
signature_ix_idx == this_ix
&& public_key_ix_idx == this_ix
&& message_ix_idx == this_ix,
AirdropError::InvalidInstructionSysvar
);
// Ensure all offsets point beyond the 16-byte header,
// i.e. into the region containing the signature, public key, and message
require!(
signature_offset >= HEADER_LEN
&& public_key_offset >= HEADER_LEN
&& message_offset >= HEADER_LEN,
AirdropError::InvalidInstructionSysvar
);
// Bounds checks for signature, pubkey, and message slices
require!(data.len() >= signature_offset + SIG_LEN, AirdropError::InvalidInstructionSysvar);
require!(data.len() >= public_key_offset + PUBKEY_LEN, AirdropError::InvalidInstructionSysvar);
require!(data.len() >= message_offset + message_size, AirdropError::InvalidInstructionSysvar);
require!(message_size == MSG_LEN, AirdropError::InvalidInstructionSysvar);
// --- reconstruct and validate the distributor's pubkey ---
let pk_slice = &data[public_key_offset..public_key_offset + PUBKEY_LEN];
let mut pk_arr = [0u8; 32];
pk_arr.copy_from_slice(pk_slice);
let distributor_pubkey = Pubkey::new_from_array(pk_arr);
if distributor_pubkey != ctx.accounts.expected_distributor.key() {
return err!(AirdropError::DistributorMismatch);
}
// --- reconstruct and validate the signed message ---
// Format: [recipient pubkey (32 bytes)][amount (u64 little-endian)]
let msg = &data[message_offset..message_offset + message_size];
let mut rec_arr = [0u8; 32];
rec_arr.copy_from_slice(&msg[0..32]);
let recipient_from_msg = Pubkey::new_from_array(rec_arr);
if recipient_from_msg != ctx.accounts.recipient.key() {
return err!(AirdropError::RecipientMismatch);
}
let mut amount_bytes = [0u8; 8];
amount_bytes.copy_from_slice(&msg[32..40]);
let amount = u64::from_le_bytes(amount_bytes);
// User can now claim the airdrop token.
// The airdrop transfer can now be implemented here.
Ok(())
}
}
#[derive(Accounts)]
pub struct Claim<'info> {
/// The recipient of the airdrop (must match the recipient in the signed message)
#[account(mut)]
pub recipient: Signer<'info>,
/// Expected distributor pubkey (checked against signed message, not Anchor)
/// CHECK: Validated manually against the parsed message
pub expected_distributor: UncheckedAccount<'info>,
/// The sysvar containing the full transaction's instructions
/// CHECK: Validated by requiring its well-known address
#[account(address = ix_sysvar::Instructions::id())]
pub instruction_sysvar: AccountInfo<'info>,
/// System program used for the transfer
pub system_program: Program<'info, System>,
}
#[error_code]
pub enum AirdropError {
#[msg("Invalid instruction sysvar")]
InvalidInstructionSysvar,
#[msg("Expected Ed25519 program id")]
BadEd25519Program,
#[msg("Bad Ed25519 accounts")]
BadEd25519Accounts,
#[msg("Distributor public key mismatch")]
DistributorMismatch,
#[msg("Recipient mismatch in message")]
RecipientMismatch,
}
आइए उपरोक्त कोड के प्रमुख भागों (key parts) की व्याख्या करें। हम कवर करेंगे:
- Solana Rust SDK द्वारा प्रदान किए गए relative instruction indexing हेल्पर फंक्शन्स का उपयोग करके उपरोक्त कोड sysvar account से
Ed25519 Verification Instruction: Instruction 1को कैसे लोड करता है Ed25519 Verification Instruction: Instruction 1डेटा को एक्सेस करना और verify करना- हेडर रिजन (header region) में signature count और offsets प्राप्त करना
- वर्तमान ट्रांज़ैक्शन में सटीक signature, public key, और message को एक्सेस करने को सुनिश्चित करने के लिए वैलिडेशन (Validation)
- Instruction डेटा में डिस्ट्रीब्यूटर के signature, public key, और message को एक्सेस करना
हम ऊपर दिए गए प्रोग्राम कोड के प्रत्येक प्रमुख भाग के स्क्रीनशॉट साझा करेंगे और अगले अनुभागों में उन पर चर्चा करेंगे।
1. Introspection: Ed25519 Verification Instruction: Instruction 1 को लोड करना और मान्य (validate) करना
हमारे प्रोग्राम कोड का नीचे दिया गया स्क्रीनशॉट दिखाता है कि हम Ed25519 Verification Instruction: Instruction 1 को verify करने के लिए instruction sysvar के माध्यम से instruction introspection का उपयोग कैसे करते हैं।
- वर्तमान instruction का index प्राप्त करने के लिए हम
load_current_index_checked()को कॉल करते हैं और इसके ठीक पहले वाले instruction को लोड करने के लिएload_instruction_at_checked()को कॉल करते हैं। - एक बार जब हमारे पास पिछला instruction (
Ed25519 Verification Instruction: Instruction 1) आ जाता है, तो हम:- verify करते हैं कि इसका program ID
Ed25519Programसे मेल खाता है। यह सुनिश्चित करता है कि instruction वास्तव में एक Ed25519 signature verification है। - और पुष्टि करते हैं कि instruction की account सूची खाली (empty) है।
- verify करते हैं कि इसका program ID
- एक बार जब ये जाँचें सफल हो जाती हैं, तो हम instruction का डेटा निकालते हैं, जो एक vector है और इसे
dataवेरिएबल से बाइंड (bind) करते हैं।
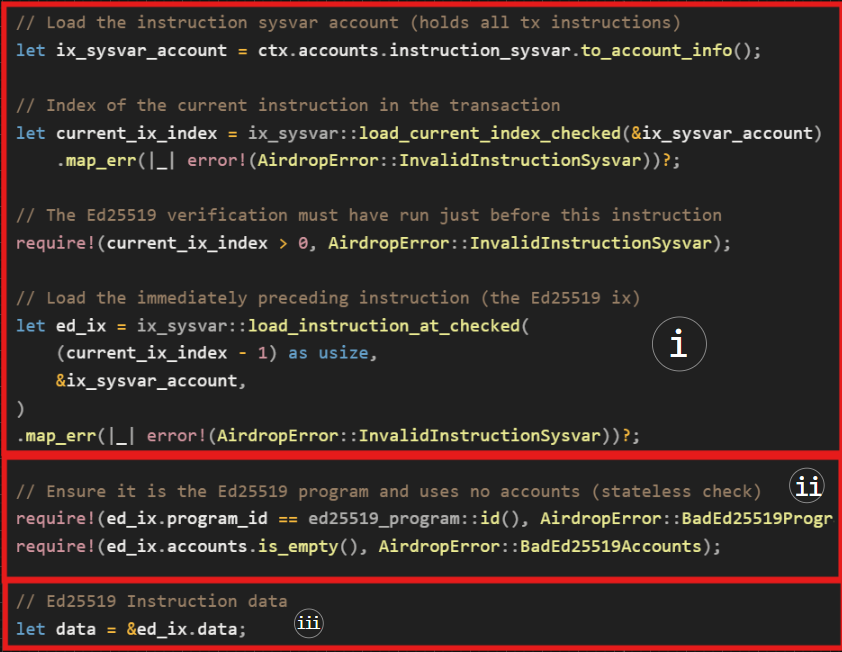
अब, हम शीर्ष-स्तरीय (top-level) ed2559Program instruction जानकारी को verify करने में सफल हो गए हैं: ID और accounts। हमने Ed25519 Verification Instruction: Instruction 1 डेटा भी प्राप्त कर लिया है, इसलिए, अगला कदम डेटा की सामग्री (content) को verify करना है। डेटा u8 डेटा टाइप का एक vector है।
2. Ed25519 Verification Instruction: Instruction 1 डेटा को एक्सेस करना और verify करना
हम अपेक्षा करते हैं कि instruction डेटा क्रमानुसार एनकोड होगा: एक हेडर जो निम्नलिखित फ़ील्ड्स के लिए signature count और offsets निर्दिष्ट (specify) करता है; डिस्ट्रीब्यूटर की public key; message; और डिस्ट्रीब्यूटर का Ed25519 signature।
अब, हम अपने कोड के अगले भाग पर जाएँगे यह देखने के लिए कि airdrop प्रोग्राम कैसे Ed25519 Verification Instruction: Instruction 1 डेटा को एक्सेस कर रहा है और verify कर रहा है।
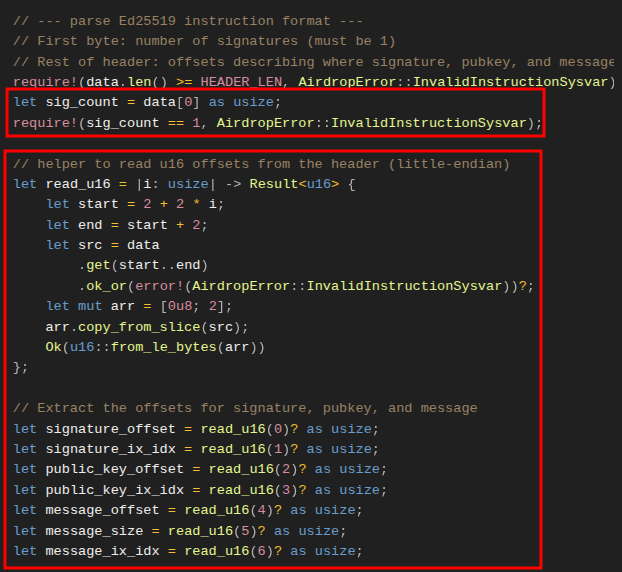
3. हेडर रीजन में signature count और offsets प्राप्त करना
नीचे दिए गए स्क्रीनशॉट में कोड signature count, offsets और उन indexes को निकालता है जो यह दर्शाते हैं कि प्रत्येक तत्व (element) Ed25519 Verification Instruction: Instruction 1 डेटा vector में कहाँ है।
हेडर में, signature count पहले index में होना चाहिए, हम उसे data[0] के साथ प्राप्त करते हैं। यह अपेक्षा है कि count 1 है क्योंकि केवल एक डिस्ट्रीब्यूटर signature होना चाहिए। हम इसे require स्टेटमेंट के साथ लागू (enforce) करते हैं।
उसके बाद, हेडर में offset और index वैल्यू होती हैं जो हमें बताती हैं कि instruction डेटा के भीतर डिस्ट्रीब्यूटर की public key, signature, और message कहाँ ढूँढें।
उन्हें पार्स करने के लिए, हम एक closure read_u16 परिभाषित करते हैं जो डेटा बफ़र में एक बार में दो बाइट्स स्टेप करता है, और प्रत्येक offset को u16 के रूप में लौटाता है। इससे एक सुसंगत (consistent) instruction डेटा लेआउट को पुनर्निर्मित करना आसान हो जाता है।
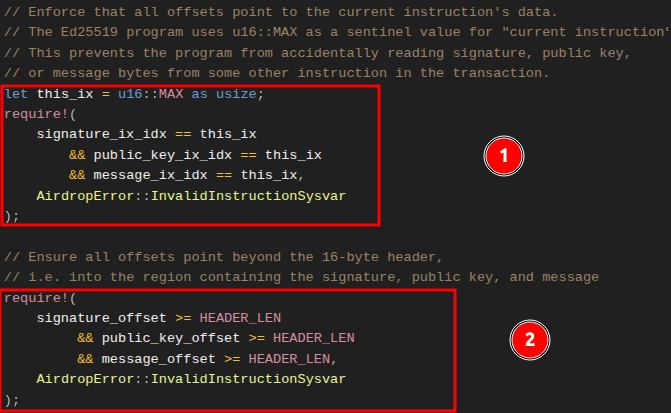
4. वर्तमान instruction में सटीक signature, public key, और message को एक्सेस करने को सुनिश्चित करने के लिए वैलिडेशन
इस बिंदु पर, हमारे पास signature count और offsets हैं लेकिन हमें यह सुनिश्चित करने की आवश्यकता है:
- हम उस instruction के साथ इंटरेक्ट कर रहे हैं जिसे हमने sysvar से वर्तमान instruction के रूप में लोड किया है। याद करें कि वर्तमान instruction डेटा में signature (
signature_ix_idx), public key (public_key_ix_idx), और message (message_ix_idx) का index Ed25519 सोर्स कोड मेंu16::MAXपर सेट किया गया है। कोई अन्य मान ट्रांज़ैक्शन में किसी अन्य instruction की ओर इशारा करेगा। - Offsets 16 बाइट हेडर के बाहर उस vector के हिस्से की ओर इशारा कर रहे हैं जिसमें signature, public key और message शामिल हैं।
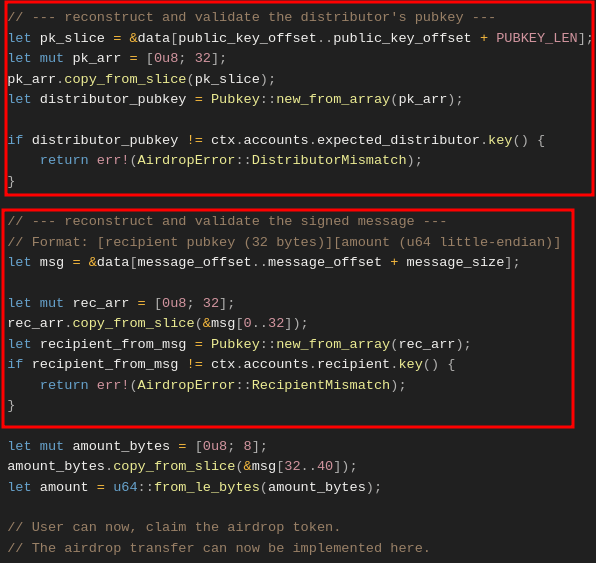
5. Instruction डेटा vector में डिस्ट्रीब्यूटर के signature, public key, और message को एक्सेस करना
नीचे दिया गया स्क्रीनशॉट दिखाता है कि हम Ed25519 Verification Instruction: Instruction 1 डेटा हेडर से पार्स किए गए offsets का उपयोग करके instruction डेटा के भीतर डिस्ट्रीब्यूटर की public key और message content (recipient और amount) का पता कैसे लगाते हैं, और यूज़र द्वारा AirdropClaim Instruction: Instruction 2 में प्रदान किए गए वर्ज़न के विरुद्ध उन्हें कैसे मान्य करते हैं।
- पहला चिह्नित (marked) क्षेत्र दिखाता है कि हम कैसे
Ed25519 Instructionडेटा से डिस्ट्रीब्यूटर की public key को स्लाइस करके निकालते हैं, इसे 32-बाइटPubkeyके रूप में पुनर्निर्मित करते हैं, और इसकी तुलनाAirdropClaim Instruction: Instruction 2में डिस्ट्रीब्यूटर account से प्राप्तexpected_distributorpublic key से करते हैं। - दूसरा चिह्नित क्षेत्र दिखाता है कि हम कैसे हस्ताक्षरित संदेश (recipient + amount) को स्लाइस करके निकालते हैं, प्राप्तकर्ता (recipient) pubkey का पुनर्निर्माण करते हैं, और verify करते हैं कि यह
AirdropClaim Instruction: Instruction 2मेंrecipientaccount से मेल खाता है।
यदि दोनों जाँचें सफल होती हैं, तो signature verification पूरा हो जाता है। इस बिंदु पर आप प्राप्तकर्ता को टोकन ट्रांसफर implement कर सकते हैं। चूँकि यह लेख verification पर केंद्रित है, हमने ट्रांसफर को implement नहीं किया है।
Client side: off-chain ट्रांज़ैक्शन का निर्माण करना
हमने देखा कि signature verification कैसे काम करता है। अब, एक ट्रांज़ैक्शन बनाकर इसका परीक्षण (test) करते हैं जिसमें दो instructions शामिल होंगे — Ed25519 Verification Instruction: Instruction 1 और AirdropClaim Instruction: Instruction 2।
Dependencies
डिस्ट्रीब्यूटर का signature बनाने के लिए हम tweetnacl क्रिप्टोग्राफ़िक लाइब्रेरी का उपयोग करेंगे, इसलिए नीचे दी गई कमांड चलाकर इसे इंस्टॉल करें:
yarn add tweetnacl
एक बार यह हो जाने के बाद, नीचे दिखाए अनुसार tests/airdrop-distribution.ts में अपने imports में निम्नलिखित imports के साथ tweetnacl जोड़ें। हम verification के लिए पहला instruction बनाने के लिए Ed25519Program dependency का उपयोग करेंगे, जबकि TransactionInstruction एक अपेक्षित मानक (expected standard) ट्रांज़ैक्शन instruction प्रकार है।
import * as anchor from "@coral-xyz/anchor";
import { Program } from "@coral-xyz/anchor";
import { expect } from "chai";
// Add the following
import { Airdrop } from "../target/types/airdrop"; // The IDL
import {
PublicKey,
Keypair,
SystemProgram,
Transaction,
**TransactionInstruction,
Ed25519Program**
} from "@solana/web3.js";
import * as nacl from "tweetnacl";
हमारे पास चार टेस्ट केस परिदृश्य (scenarios) होंगे:
- Valid claim: डिस्ट्रीब्यूटर सही recipient और amount को साइन करता है,
Ed25519Programinstructionclaiminstruction से पहले चलता है तब ट्रांज़ैक्शन सफल होता है। - Wrong order:
claiminstructionEd25519Programसे पहले आता है, ट्रांज़ैक्शनInvalidInstructionSysvarके साथ विफल (fail) हो जाता है। - Wrong distributor: signature
expectedDistributorsignature से मेल नहीं खाता है, ट्रांज़ैक्शनDistributorMismatchके साथ विफल हो जाता है। - Wrong recipient: साइन किया गया recipient airdrop के signature को क्लेम करने का प्रयास करने वाले यूज़र से भिन्न (differ) है, ट्रांज़ैक्शन
RecipientMismatchके साथ विफल हो जाता है। - Multiple claims: यह दिखाने के लिए एक टेस्ट केस कि कई
AirdropClaim Instructionबनाकर सिस्टम को धोखा देने का प्रयास विफल हो जाएगा। ऐसा इसलिए है क्योंकि प्रोग्राम का introspection लॉजिक केवल ठीक पहले वालेEd25519 Verification Instruction: Instruction 1को देखता है, इसलिए दूसराAirdropClaim Instructionविफल हो जाएगा।
स्थानीय क्लस्टर (local cluster) का उपयोग करने के लिए पहले टेस्ट सेटअप करके शुरुआत करें और डिस्ट्रीब्यूटर, प्राप्तकर्ता, और नकारात्मक (negative) टेस्ट केसेस के लिए एक अमान्य डिस्ट्रीब्यूटर account के लिए टेस्ट accounts सेटअप करें।
// ...
describe("airdrop", () => {
// Configure the client to use the local cluster
anchor.setProvider(anchor.AnchorProvider.env());
const program = anchor.workspace.Airdrop as Program<Airdrop>;
const provider = anchor.getProvider();
// Test accounts
let distributorKeypair: Keypair;
let recipientKeypair: Keypair;
let invalidDistributorKeypair: Keypair;
before(async () => {
// Generate test keypairs
distributorKeypair = Keypair.generate();
recipientKeypair = Keypair.generate();
invalidDistributorKeypair = Keypair.generate();
});
आगे, हम एक हेल्पर फंक्शन जोड़ेंगे जो Ed25519 Verification Instruction: Instruction 1 बनाता है। यह प्राप्तकर्ता (recipient) और राशि (amount) से मैसेज बनाता है, इसे डिस्ट्रीब्यूटर की key के साथ साइन करता है, और फिर TransactionInstruction वापस करने के लिए Ed25519Program.createInstructionWithPublicKey का उपयोग करता है जिसे रनटाइम verify कर सकता है।
function createEd25519Instruction(
distributorKeypair: Keypair,
recipientPubkey: PublicKey,
amount: number
): TransactionInstruction {
// Build the message: 32 bytes recipient pubkey + 8 bytes amount
const message = Buffer.alloc(40);
recipientPubkey.toBuffer().copy(message, 0);
message.writeBigUInt64LE(BigInt(amount), 32);
// Sign the message with distributor
const signature = nacl.sign.detached(message, distributorKeypair.secretKey);
// Use the helper to build the instruction
return Ed25519Program.createInstructionWithPublicKey({
publicKey: distributorKeypair.publicKey.toBytes(),
message,
signature,
});
}
हम Ed25519 Verification Instruction: Instruction 1 बनाने के लिए अपने टेस्ट केसेस में उपरोक्त फंक्शन का फिर से उपयोग करेंगे। आइए अपने पहले टेस्ट केस से शुरू करते हैं, जो एक वैध airdrop claim है जिसे सफल होना चाहिए।
हम दो instructions बनाते हैं: Ed25519 Verification Instruction: Instruction 1 और AirdropClaim Instruction: Instruction 2। जैसा कि पहले परिभाषित किया गया है, हम डिस्ट्रीब्यूटर, प्राप्तकर्ता और instruction sysvar accounts को प्रोग्राम के claim फंक्शन में पास करते हैं। फिर हम ट्रांज़ैक्शन भेजते हैं और इसकी सफलता की पुष्टि करते हैं। सफल होने पर, यह एक transaction ID लौटाता है; अन्यथा, हमें एक error मिलती है।
it("Successfully claims airdrop with valid signature", async () => {
const claimAmount = 1000000;
// Create Ed25519 Signature Verification Instruction: Instruction 1
const ed25519Ix = createEd25519Instruction(
distributorKeypair,
recipientKeypair.publicKey,
claimAmount
);
// Create the AirdropClaim Instruction: Instruction 2
const claimIx = await program.methods
.claim()
.accountsPartial({
recipient: recipientKeypair.publicKey,
expectedDistributor: distributorKeypair.publicKey,
instructionSysvar: anchor.web3.SYSVAR_INSTRUCTIONS_PUBKEY,
})
.instruction();
const tx = new Transaction();
tx.add(ed25519Ix); // Add Instruction 1 to the transaction
tx.add(claimIx); // Add Instruction 2 to the transaction
// Just expect the transaction to succeed
expect(await provider.sendAndConfirm(tx, [recipientKeypair])).to.not.be.empty;
});
विफलता के मामलों (failure cases) में भी यही प्रक्रिया शामिल होगी, हमें केवल अमान्य (invalid) डेटा जोड़ना होगा जिसके कारण वे विफल हो जाएँगे। इसलिए, यहाँ स्पष्टीकरणात्मक (explanatory) टिप्पणियों के साथ संपूर्ण टेस्ट कोड दिया गया है।
import * as anchor from "@coral-xyz/anchor";
import { Program } from "@coral-xyz/anchor";
import { Airdrop } from "../target/types/airdrop";
import { PublicKey, Keypair, SystemProgram, Transaction, TransactionInstruction, Ed25519Program } from "@solana/web3.js";
import { expect } from "chai";
import * as nacl from "tweetnacl";
describe("airdrop", () => {
// Configure the client to use the local cluster
anchor.setProvider(anchor.AnchorProvider.env());
const program = anchor.workspace.Airdrop as Program<Airdrop>;
const provider = anchor.getProvider();
// Test accounts
let distributorKeypair: Keypair;
let recipientKeypair: Keypair;
let invalidDistributorKeypair: Keypair;
before(async () => {
// Generate test keypairs
distributorKeypair = Keypair.generate();
recipientKeypair = Keypair.generate();
invalidDistributorKeypair = Keypair.generate();
});
function createEd25519Instruction(
distributorKeypair: Keypair,
recipientPubkey: PublicKey,
amount: number
): TransactionInstruction {
// Build the message: 32 bytes recipient pubkey + 8 bytes amount
const message = Buffer.alloc(40);
recipientPubkey.toBuffer().copy(message, 0);
message.writeBigUInt64LE(BigInt(amount), 32);
// Sign the message with distributor
const signature = nacl.sign.detached(message, distributorKeypair.secretKey);
// Use the helper to build the instruction
return Ed25519Program.createInstructionWithPublicKey({
publicKey: distributorKeypair.publicKey.toBytes(),
message,
signature,
});
}
it("Successfully claims airdrop with valid signature", async () => {
const claimAmount = 1000000;
const ed25519Ix = createEd25519Instruction(
distributorKeypair,
recipientKeypair.publicKey,
claimAmount
);
const claimIx = await program.methods
.claim()
.accountsPartial({
recipient: recipientKeypair.publicKey,
expectedDistributor: distributorKeypair.publicKey,
instructionSysvar: anchor.web3.SYSVAR_INSTRUCTIONS_PUBKEY,
})
.instruction();
const tx = new Transaction();
tx.add(ed25519Ix);
tx.add(claimIx); // AirdropClaim Instruction: Instruction 2
// Just expect the transaction to succeed
expect(await provider.sendAndConfirm(tx, [recipientKeypair])).to.not.be.empty;
});
it("Fails when Ed25519 instruction is not first", async () => {
const claimAmount = 1000000;
const claimIx = await program.methods
.claim()
.accountsPartial({
recipient: recipientKeypair.publicKey,
expectedDistributor: distributorKeypair.publicKey,
instructionSysvar: anchor.web3.SYSVAR_INSTRUCTIONS_PUBKEY,
})
.instruction();
const ed25519Ix = createEd25519Instruction(
distributorKeypair,
recipientKeypair.publicKey,
claimAmount
);
// Create transaction with claim first, then Ed25519 (wrong order)
const tx = new Transaction();
tx.add(claimIx);
tx.add(ed25519Ix);
try {
await provider.sendAndConfirm(tx, [recipientKeypair]);
expect.fail("Should have failed with wrong instruction order");
} catch (error) {
expect(error.message).to.include("InvalidInstructionSysvar");
}
});
it("Fails with distributor mismatch", async () => {
const claimAmount = 1000000;
// Create Ed25519 instruction with wrong distributor
const ed25519Ix = createEd25519Instruction(
invalidDistributorKeypair, // Wrong distributor signs
recipientKeypair.publicKey,
claimAmount
);
const claimIx = await program.methods
.claim()
.accountsPartial({
recipient: recipientKeypair.publicKey,
expectedDistributor: distributorKeypair.publicKey, // But we expect the correct one
instructionSysvar: anchor.web3.SYSVAR_INSTRUCTIONS_PUBKEY,
})
.instruction();
const tx = new Transaction();
tx.add(ed25519Ix);
tx.add(claimIx);
try {
await provider.sendAndConfirm(tx, [recipientKeypair]);
expect.fail("Should have failed with distributor mismatch");
} catch (error) {
expect(error.message).to.include("DistributorMismatch");
}
});
it("Fails with recipient mismatch", async () => {
const claimAmount = 1000000;
const wrongRecipient = Keypair.generate();
// Create Ed25519 instruction with wrong recipient in message
const ed25519Ix = createEd25519Instruction(
distributorKeypair,
wrongRecipient.publicKey, // Wrong recipient in signed message
claimAmount
);
const claimIx = await program.methods
.claim()
.accountsPartial({
recipient: recipientKeypair.publicKey,
expectedDistributor: distributorKeypair.publicKey,
instructionSysvar: anchor.web3.SYSVAR_INSTRUCTIONS_PUBKEY,
})
.instruction();
const tx = new Transaction();
tx.add(ed25519Ix);
tx.add(claimIx);
try {
await provider.sendAndConfirm(tx, [recipientKeypair]);
expect.fail("Should have failed with recipient mismatch");
} catch (error) {
expect(error.message).to.include("RecipientMismatch");
}
});
it("Fails when multiple claim instructions try to reuse the same Ed25519 signature", async () => {
const claimAmount = 1000000;
// Create a single Ed25519 instruction
const ed25519Ix = createEd25519Instruction(
distributorKeypair,
recipientKeypair.publicKey,
claimAmount
);
// First claim instruction (valid)
const claimIx1 = await program.methods
.claim()
.accountsPartial({
recipient: recipientKeypair.publicKey,
expectedDistributor: distributorKeypair.publicKey,
instructionSysvar: anchor.web3.SYSVAR_INSTRUCTIONS_PUBKEY,
})
.instruction();
// Second claim instruction (tries to reuse the same Ed25519)
const claimIx2 = await program.methods
.claim()
.accountsPartial({
recipient: recipientKeypair.publicKey,
expectedDistributor: distributorKeypair.publicKey,
instructionSysvar: anchor.web3.SYSVAR_INSTRUCTIONS_PUBKEY,
})
.instruction();
const tx = new Transaction();
tx.add(ed25519Ix);
tx.add(claimIx1);
tx.add(claimIx2);
try {
await provider.sendAndConfirm(tx, [recipientKeypair]);
expect.fail("Should have failed because multiple claims tried to reuse the same signature");
} catch (error) {
// The second claim fails because its immediately preceding instruction
// is not the Ed25519 verification, so the program throws
expect(error.message).to.include("BadEd25519Program");
}
});
});
आइए नीचे दी गई कमांड के साथ टेस्ट चलाएँ:
anchor test
और परिणाम ऐसा दिखना चाहिए:
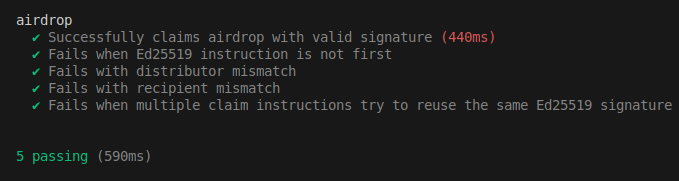
अब तक का हमारा कार्यान्वयन (implementation) signature verification पर केंद्रित रहा है। यह समझें कि यह उदाहरण सीखने के उद्देश्यों के लिए है, वास्तविक ट्रांज़ैक्शन बनाते और भेजते समय आपको मानक प्रोग्राम सुरक्षा (standard program security) की सर्वोत्तम प्रथाओं (best practices) पर विचार करना चाहिए।
ऐसे मामले सामने आए हैं जहाँ ग़लत offset implementation ने vulnerabilities (कमज़ोरियाँ) पेश की हैं। ऐसा ही एक उदाहरण लेख “Wrong Offset: Bypassing Signature Verification.” में कवर किया गया है। हालाँकि हमने इस लेख में जो सीखा है वह उस vulnerability से प्रभावित नहीं है, फिर भी संभावित जोखिम (potential risk) के बारे में जागरूक होना उचित है।
यह लेख Solana पर एक ट्यूटोरियल सीरीज़ का हिस्सा है।