Native multicall is Starknet’s ability to bundle multiple contract calls into a single atomic transaction. Some decentralized application workflows require signing multiple transactions in sequence. Token swaps are a common example. When you want to convert token A to token B on a traditional DEX, you have to sign multiple transactions:
- you sign to approve the DEX contract to spend your token A
- then sign again to swap token A for token B
That’s a two-step transaction process, with gas fees paid each time you sign. More importantly, these two transactions have no atomicity guarantee. If the approval succeeds but the swap fails, the DEX contract retains a spending access to your tokens indefinitely. That dangling approval creates an attack surface: if the DEX contract is later exploited, an attacker can use the contract’s existing transferFrom permission to drain the approved amount without any action from you.
Starknet eliminates these problems by allowing multiple contract calls to be bundled into a single atomic transaction. You sign once and pay gas fees once.
This capability is built into Starknet’s protocol through its native account abstraction architecture. In this article, we’ll explore how multicall works and demonstrate it by executing a token approval and deposit as a single atomic transaction using starknet.js.
How multicall works under the hood
As covered in the previous chapter, Starknet implements native Account Abstraction where every account is a smart contract. Each account contract has an __execute__ function that the protocol calls when you send a transaction. It takes an array of calls to execute:
fn __execute__(ref self: ContractState, calls: Array<Call>) -> Array<Span<felt252>>
The parameter calls: Array<Call> is what makes multicall possible. It allows the function to execute one or multiple operations in a single transaction.
Each Call in that array is defined as:
#[derive(Drop, Serde, Debug)]
struct Call {
to: ContractAddress, // Target contract address
selector: felt252, // Function selector
calldata: Array<felt252> // Encoded parameters
}
to: The address of the contract you want to interact with. For a token swap, this might be the DEX contract address, or for an approval, it would be the token contract address.selector: A unique identifier for the function you want to call on the target contract. For example, to calltransfer, you passsn_keccak(’transfer’)as the selector.calldata: This is an array offelt252values that represent the arguments you’re passing to the function
To approve and execute a swap using multicall, you pass the following two calls to the calls parameter:
const calls: Call[] = [
{
contractAddress: TOKEN_ADDRESS, // to: token contract
entrypoint: "approve", // selector: approve function
calldata: [DEX_ADDRESS, amount] // calldata: spender and amount
},
{
contractAddress: DEX_ADDRESS, // to: DEX contract
entrypoint: "swap", // selector: swap function
calldata: [tokenA, tokenB, amount] // calldata: swap parameters
}
];
When you send a transaction with multiple calls, the __execute__ function processes them sequentially. If all calls succeed,__execute__ returns the result of each call to the caller. If any call fails, the entire transaction reverts; none of the operations take effect.
Executing Multicalls with Starknet.js
Now let’s see how to execute multicalls using starknet.js. We’ll demonstrate this by depositing RareTokens into RareBank, two contracts we’ve built in previous chapters.
RareToken (covered in the ERC20 chapter) is a standard token contract, while RareBank (from the “Cross Contract Calls” article) allows users to deposit and withdraw these tokens. Depositing requires two steps:
- Approve
RareBankto spend your tokens - Deposit the tokens into
RareBank
Without multicall, this requires two separate transactions and gas fees paid for each. With multicall, we can execute both operations atomically in a single transaction, so you pay one transaction fee instead of two.
Deploying the Contracts
Before interacting with RareBank and RareToken contracts, we need to ensure both are deployed on Starknet. For this demo, we’ll use Starknet Sepolia. The RareToken contract was already deployed in the “Deploying Contracts” chapter. The address provided below has an unrestricted mint function. It allows anyone to mint tokens for testing the RareBank contract.
RareToken contract address:
0x03ec6283d9c7c8936991fad6523e01b60ad2bb092aa489087a3376c2ade7c09b
You can view it on Voyager.
Note: If you’re using your own token, replace the RareToken address throughout this tutorial with your token’s contract address.
We only need to deploy the RareBank contract for this chapter. Below is the RareBank contract:
use starknet::ContractAddress;
// RareToken ERC20 Interface - defines functions we can call on the token contract
#[starknet::interface]
pub trait IRareToken<TContractState> {
fn total_supply(self: @TContractState) -> u256;
fn balance_of(self: @TContractState, account: ContractAddress) -> u256;
fn allowance(self: @TContractState, owner: ContractAddress, spender: ContractAddress) -> u256;
fn transfer(ref self: TContractState, recipient: ContractAddress, amount: u256) -> bool;
fn transfer_from(ref self: TContractState, sender: ContractAddress, recipient: ContractAddress, amount: u256) -> bool;
fn approve(ref self: TContractState, spender: ContractAddress, amount: u256) -> bool;
fn name(self: @TContractState) -> ByteArray;
fn symbol(self: @TContractState) -> ByteArray;
fn decimals(self: @TContractState) -> u8;
fn mint(ref self: TContractState, recipient: ContractAddress, amount: u256) -> bool; // For testing
}
// RareBank Interface - defines the bank's functions
#[starknet::interface]
pub trait IRareBank<TContractState> {
fn deposit(ref self: TContractState, amount: u256);
fn withdraw(ref self: TContractState, amount: u256);
fn get_balance(self: @TContractState, user: ContractAddress) -> u256;
}
#[starknet::contract]
mod RareBank {
use starknet::{ContractAddress, get_caller_address, get_contract_address};
use starknet::storage::{
StoragePointerReadAccess, StoragePointerWriteAccess,
Map, StoragePathEntry
};
// import the generated dispatcher and trait for cross contract calls
use super::{IRareTokenDispatcher, IRareTokenDispatcherTrait};
#[storage]
struct Storage {
owner: ContractAddress,
rare_token: ContractAddress, // address of the RareToken contract we'll interact with
balances: Map<ContractAddress, u256>, // maps user addresses to their bank balances
}
#[event]
#[derive(Drop, starknet::Event)]
pub enum Event {
DepositSuccessful: DepositSuccessful,
WithdrawSuccessful: WithdrawSuccessful,
}
#[derive(Drop, starknet::Event)]
struct DepositSuccessful {
user: ContractAddress,
amount: u256
}
#[derive(Drop, starknet::Event)]
struct WithdrawSuccessful {
user: ContractAddress,
amount: u256
}
// constructor sets up the bank with owner and RareToken contract address
#[constructor]
fn constructor(ref self: ContractState, owner: ContractAddress, rare_token_address: ContractAddress) {
assert!(owner != 0.try_into().unwrap(), "address zero detected");
assert!(rare_token_address != 0.try_into().unwrap(), "address zero detected");
self.owner.write(owner);
self.rare_token.write(rare_token_address); // store the token contract address
}
#[abi(embed_v0)]
impl RareBankImpl of super::IRareBank<ContractState> {
fn deposit(ref self: ContractState, amount: u256) {
assert!(amount > 0, "can't deposit zero amount");
let caller = get_caller_address();
let this_contract = get_contract_address();
let rare_token_address = self.rare_token.read(); // get the stored token address
// create dispatcher instance pointing to the RareToken contract
let rare_token = IRareTokenDispatcher { contract_address: rare_token_address };
// cross contract call: transfer tokens from user to this bank contract
// this calls the transfer_from function on the RareToken contract
let success = rare_token.transfer_from(caller, this_contract, amount);
assert!(success, "transfer failed");
// update the user's balance in our bank's storage
let prev_balance = self.balances.entry(caller).read();
self.balances.entry(caller).write(prev_balance + amount);
// emit DepositSuccessful event
self.emit(DepositSuccessful { user: caller, amount });
}
fn withdraw(ref self: ContractState, amount: u256) {
let caller = get_caller_address();
let rare_token_address = self.rare_token.read();
assert!(rare_token_address != 0.try_into().unwrap(), "RareToken not set");
// check if user has sufficient balance in the bank
let user_balance = self.balances.entry(caller).read();
assert!(user_balance >= amount, "insufficient funds");
// update balance first
self.balances.entry(caller).write(user_balance - amount);
// create dispatcher instance pointing to the RareToken contract
let rare_token = IRareTokenDispatcher { contract_address: rare_token_address };
// cross contract call: transfer tokens from bank back to user
// this calls the transfer function on the RareToken contract
let success = rare_token.transfer(caller, amount);
assert!(success, "transfer failed");
// emit WithdrawSuccessful event
self.emit(WithdrawSuccessful { user: caller, amount });
}
// view function to check user's balance in the bank
fn get_balance(self: @ContractState, user: ContractAddress) -> u256 {
self.balances.entry(user).read()
}
}
}
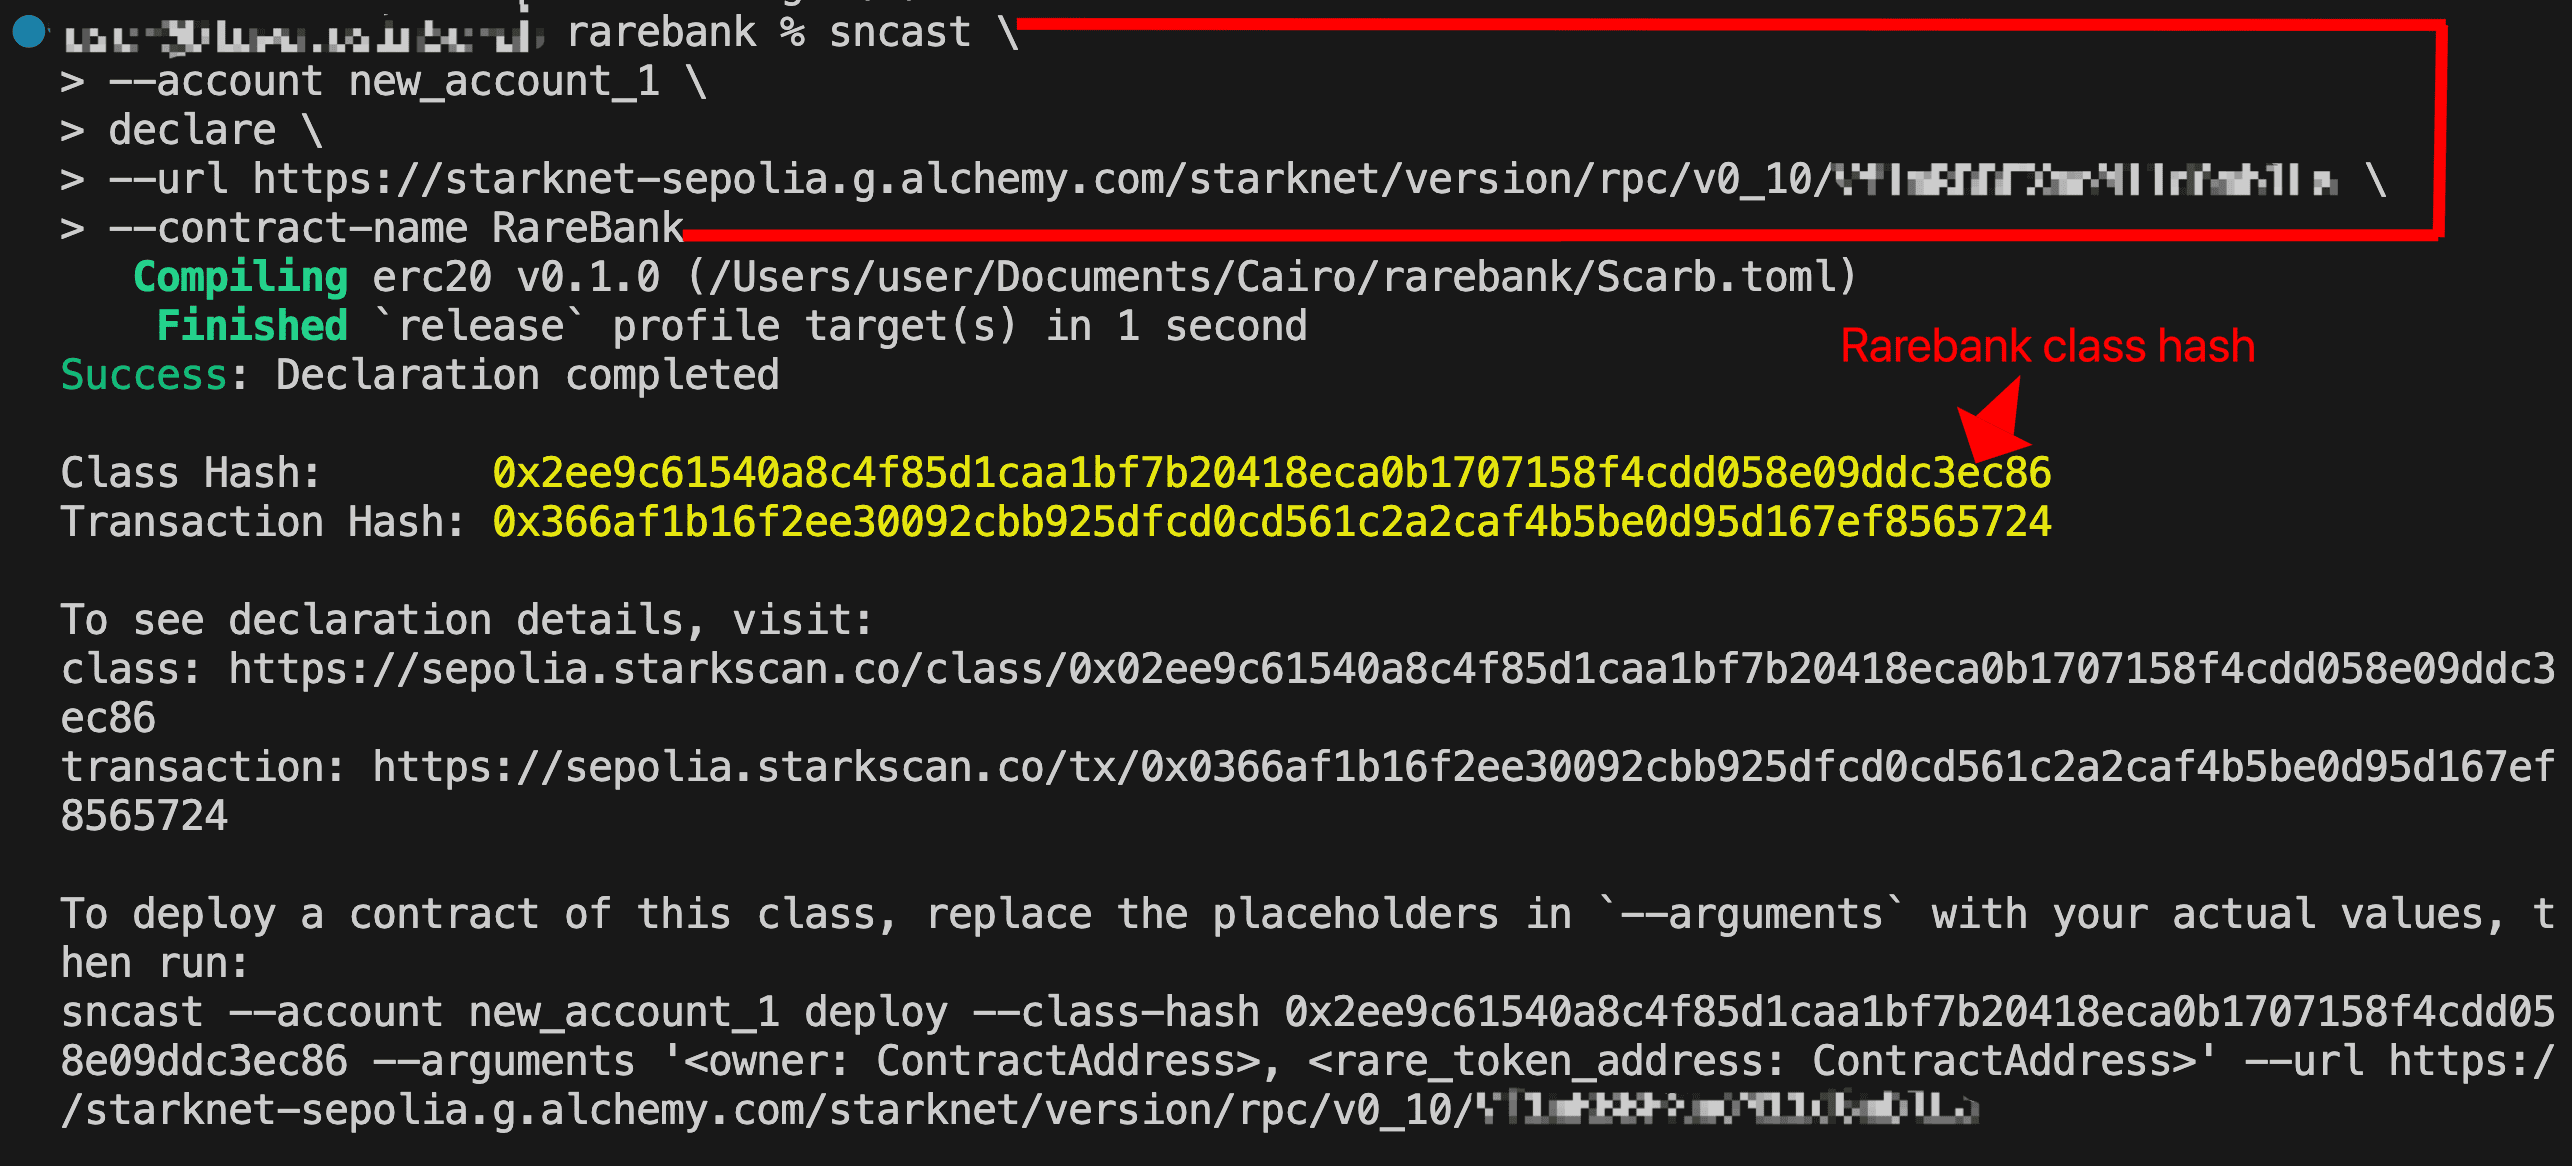
To deploy the RareBank contract, we first declare its contract class, then deploy an instance.
Declaring RareBank:
sncast \
--account <ACCOUNT_NAME> \
declare \
--url https://starknet-sepolia.g.alchemy.com/starknet/version/rpc/v0_10/<YOUR_API_KEY> \
--contract-name RareBank
Replace:
<ACCOUNT_NAME>with your account name from sncast<YOUR_API_KEY>with your API key from Alchemy.
After running this command, you’ll receive a class hash in your terminal; it will be needed for the deployment of the RareBank contract.
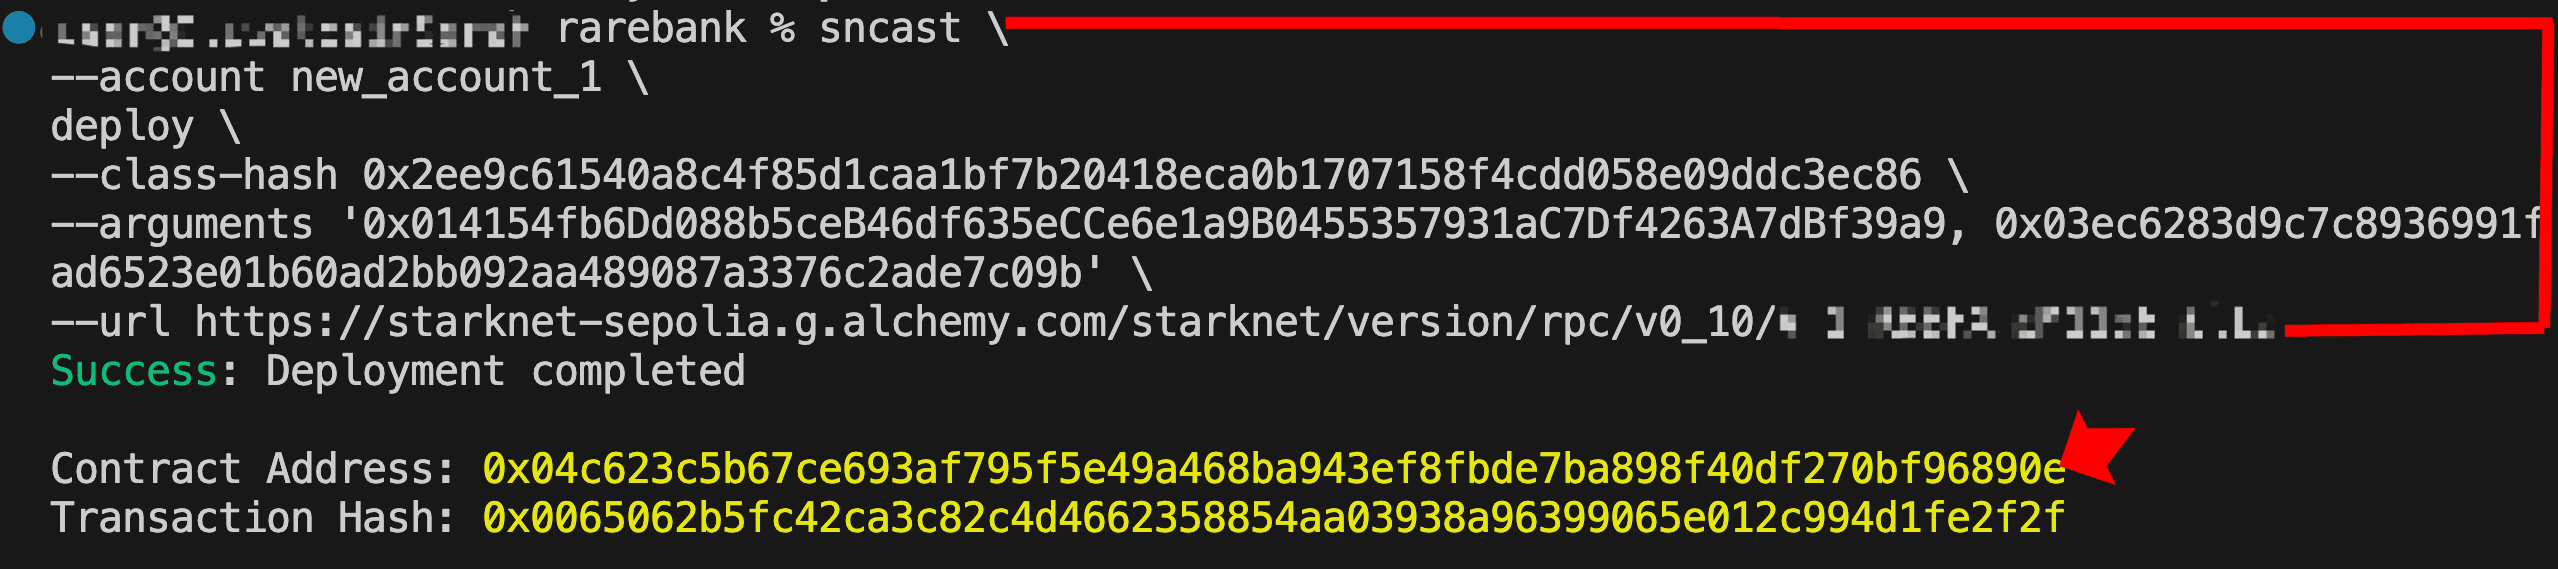
Deploying RareBank
Looking at the RareBank constructor:
#[constructor]
fn constructor(
ref self: ContractState,
owner: ContractAddress,
rare_token_address: ContractAddress
) {
assert!(owner != 0.try_into().unwrap(), "address zero detected");
assert!(rare_token_address != 0.try_into().unwrap(), "address zero detected");
self.owner.write(owner);
self.rare_token.write(rare_token_address);
}
The constructor expects two parameters:
- owner: The address that will own the
RareBankcontract - rare_token_address: The token contract address
Deploy the RareBank contract:
sncast \
--account <ACCOUNT_NAME> \
deploy \
--class-hash <CLASS_HASH> \
--arguments '<OWNER_ADDRESS>,<RARE_TOKEN_CONTRACT_ADDRESS>' \
--url https://starknet-sepolia.g.alchemy.com/starknet/version/rpc/v0_10/<YOUR_API_KEY>
Replace:
<ACCOUNT_NAME>with your account name<YOUR_API_KEY>with your Alchemy API key<CLASS_HASH>with the class hash from declaration<OWNER_ADDRESS>with your wallet address<RARE_TOKEN_CONTRACT_ADDRESS>with your deployed token contract address or0x03ec6283d9c7c8936991fad6523e01b60ad2bb092aa489087a3376c2ade7c09b
After deployment, save the contract address; it will be needed for the multicall implementation.
Setting up the Project
With the contract addresses ready, we’ll use starknet.js to execute the multicall programmatically, signing and submitting the transaction from our account. Run the command below to clone the repository with the project structure and configuration already setup:
git clone https://github.com/Sayrarh/starknet-multicall-demo.git
cd starknet-multicall-demo
Then install dependencies and set up your environment file:
npm install
cp .env.example .env
Open .env and replace the placeholder values:
ACCOUNT_ADDRESS: Your Starknet account addressPRIVATE_KEY: Your account’s private keyALCHEMY_API_KEY: Your Alchemy API keyRARE_TOKEN_ADDRESS: Use the provided address (public minting enabled) or your own token contract addressRARE_BANK_ADDRESS: Use the provided address or your ownRareBankcontract address
Writing the Multicall Code
Open src/index.ts and start by setting up the basic imports and configuration:
import { Account, Call, CallData, RpcProvider, uint256 } from "starknet";
import * as dotenv from "dotenv";
dotenv.config();
const alchemyApiKey = process.env.ALCHEMY_API_KEY;
// Initialize provider
const provider = new RpcProvider({
nodeUrl: `https://starknet-sepolia.g.alchemy.com/starknet/version/rpc/v0_10/${alchemyApiKey}`,
});
// Connect your account
const account = new Account({
provider: provider,
address: process.env.ACCOUNT_ADDRESS!,
signer: process.env.PRIVATE_KEY!,
});
We import the necessary modules from starknet.js, including Call (defines contract interactions) and CallData (encodes function parameters). Then we load environment variables, set up the RPC provider to connect to Starknet Sepolia via Alchemy, and initialize our account.
Minting Tokens
Before we can deposit tokens, we need some RareTokens in our account. The mintTokens function mints 100 RareTokens to the connected account:
async function mintTokens() {
console.log("\n>> Minting RareTokens...");
const amount = 100n * 10n ** 18n;
const amountUint256 = uint256.bnToUint256(amount);
const result = await account.execute({
contractAddress: process.env.RARE_TOKEN_ADDRESS!,
entrypoint: "mint",
calldata: CallData.compile({
recipient: process.env.ACCOUNT_ADDRESS!,
amount: amountUint256,
}),
});
console.log("Transaction submitted!");
console.log(` Hash: ${result.transaction_hash}`);
console.log(` Voyager: https://sepolia.voyager.online/tx/${result.transaction_hash}`);
console.log("Waiting for confirmation...");
await provider.waitForTransaction(result.transaction_hash);
console.log("Successfully minted 100 RareTokens!\n");
}
Minting is included in the script to ensure you have tokens before depositing.
Constructing the Calls
Since a multicall is simply an array of individual Call objects, when we specify an entrypoint (like 'approve') in starknet.js, it converts it to a selector hash, the same selector: felt252 field in the Call struct. Similarly, contractAddress in starknet.js maps to the to field in the Call struct.
Let’s build the two calls we need:
Call 1: Approve RareBank
approveCall approves RareBank to spend 10 RareTokens from the connected account.
const amount = 10n * 10n ** 18n; // 10 tokens (accounting for 18 decimals)
const amountUint256 = uint256.bnToUint256(amount);
const approveCall: Call = {
contractAddress: process.env.RARE_TOKEN_ADDRESS!,
entrypoint: 'approve',
calldata: CallData.compile({
spender: process.env.RARE_BANK_ADDRESS!,
amount: amountUint256
})
};
Note that we multiply by 10¹⁸ because RareToken has 18 decimals.
Call 2: Deposit to RareBank
depositCall deposits the approved tokens into RareBank. It relies on the approval from Call 1 having already executed within the same transaction.
const depositCall: Call = {
contractAddress: process.env.RARE_BANK_ADDRESS!,
entrypoint: 'deposit',
calldata: CallData.compile({
amount: amountUint256
})
};
Executing the Multicall
Now let’s combine both calls and execute them in a single transaction:
async function depositToRareBank() {
console.log(">> Executing multicall: Approve + Deposit");
const amount = 10n * 10n ** 18n;
const amountUint256 = uint256.bnToUint256(amount);
const multiCall: Call[] = [
{
contractAddress: process.env.RARE_TOKEN_ADDRESS!,
entrypoint: "approve",
calldata: CallData.compile({
spender: process.env.RARE_BANK_ADDRESS!,
amount: amountUint256,
}),
},
{
contractAddress: process.env.RARE_BANK_ADDRESS!,
entrypoint: "deposit",
calldata: CallData.compile({
amount: amountUint256,
}),
},
];
const result = await account.execute(multiCall);
console.log("Transaction submitted!");
console.log(` Hash: ${result.transaction_hash}`);
console.log(
` Voyager: https://sepolia.voyager.online/tx/${result.transaction_hash}`
);
console.log("Waiting for confirmation...");
await provider.waitForTransaction(result.transaction_hash);
console.log("Multicall executed successfully!");
console.log(
` Approved and deposited ${
amount / 10n ** 18n
} RareTokens in one transaction!\n`
);
}
Here’s the complete code; copy it into the src/index.ts file:
import { Account, Call, CallData, RpcProvider, uint256 } from "starknet";
import * as dotenv from "dotenv";
dotenv.config();
const alchemyApiKey = process.env.ALCHEMY_API_KEY;
// Initialize provider
const provider = new RpcProvider({
nodeUrl: `https://starknet-sepolia.g.alchemy.com/starknet/version/rpc/v0_8/${alchemyApiKey}`,
});
// initialize account
const account = new Account({
provider: provider,
address: process.env.ACCOUNT_ADDRESS!,
signer: process.env.PRIVATE_KEY!,
});
async function mintTokens() {
console.log("\n>> Minting RareTokens...");
const amount = 100n * 10n ** 18n;
const amountUint256 = uint256.bnToUint256(amount);
const result = await account.execute({
contractAddress: process.env.RARE_TOKEN_ADDRESS!,
entrypoint: "mint",
calldata: CallData.compile({
recipient: process.env.ACCOUNT_ADDRESS!,
amount: amountUint256,
}),
});
console.log("Transaction submitted!");
console.log(` Hash: ${result.transaction_hash}`);
console.log(` Voyager: https://sepolia.voyager.online/tx/${result.transaction_hash}`);
console.log("Waiting for confirmation...");
await provider.waitForTransaction(result.transaction_hash);
console.log("Successfully minted 100 RareTokens!\n");
}
async function depositToRareBank() {
console.log(">> Executing multicall: Approve + Deposit");
const amount = 10n * 10n ** 18n;
const amountUint256 = uint256.bnToUint256(amount);
const multiCall: Call[] = [
{
contractAddress: process.env.RARE_TOKEN_ADDRESS!,
entrypoint: "approve",
calldata: CallData.compile({
spender: process.env.RARE_BANK_ADDRESS!,
amount: amountUint256,
}),
},
{
contractAddress: process.env.RARE_BANK_ADDRESS!,
entrypoint: "deposit",
calldata: CallData.compile({
amount: amountUint256,
}),
},
];
const result = await account.execute(multiCall);
console.log("Transaction submitted!");
console.log(` Hash: ${result.transaction_hash}`);
console.log(` Voyager: https://sepolia.voyager.online/tx/${result.transaction_hash}`);
console.log("Waiting for confirmation...");
await provider.waitForTransaction(result.transaction_hash);
console.log("Multicall executed successfully!");
console.log(` Approved and deposited ${amount / 10n ** 18n} RareTokens in one transaction!\n`);
}
async function main() {
await mintTokens();
await depositToRareBank();
}
main()
Before running the code, make sure you have STRK tokens for gas fees on Sepolia; get them from the Starknet Sepolia Faucet.
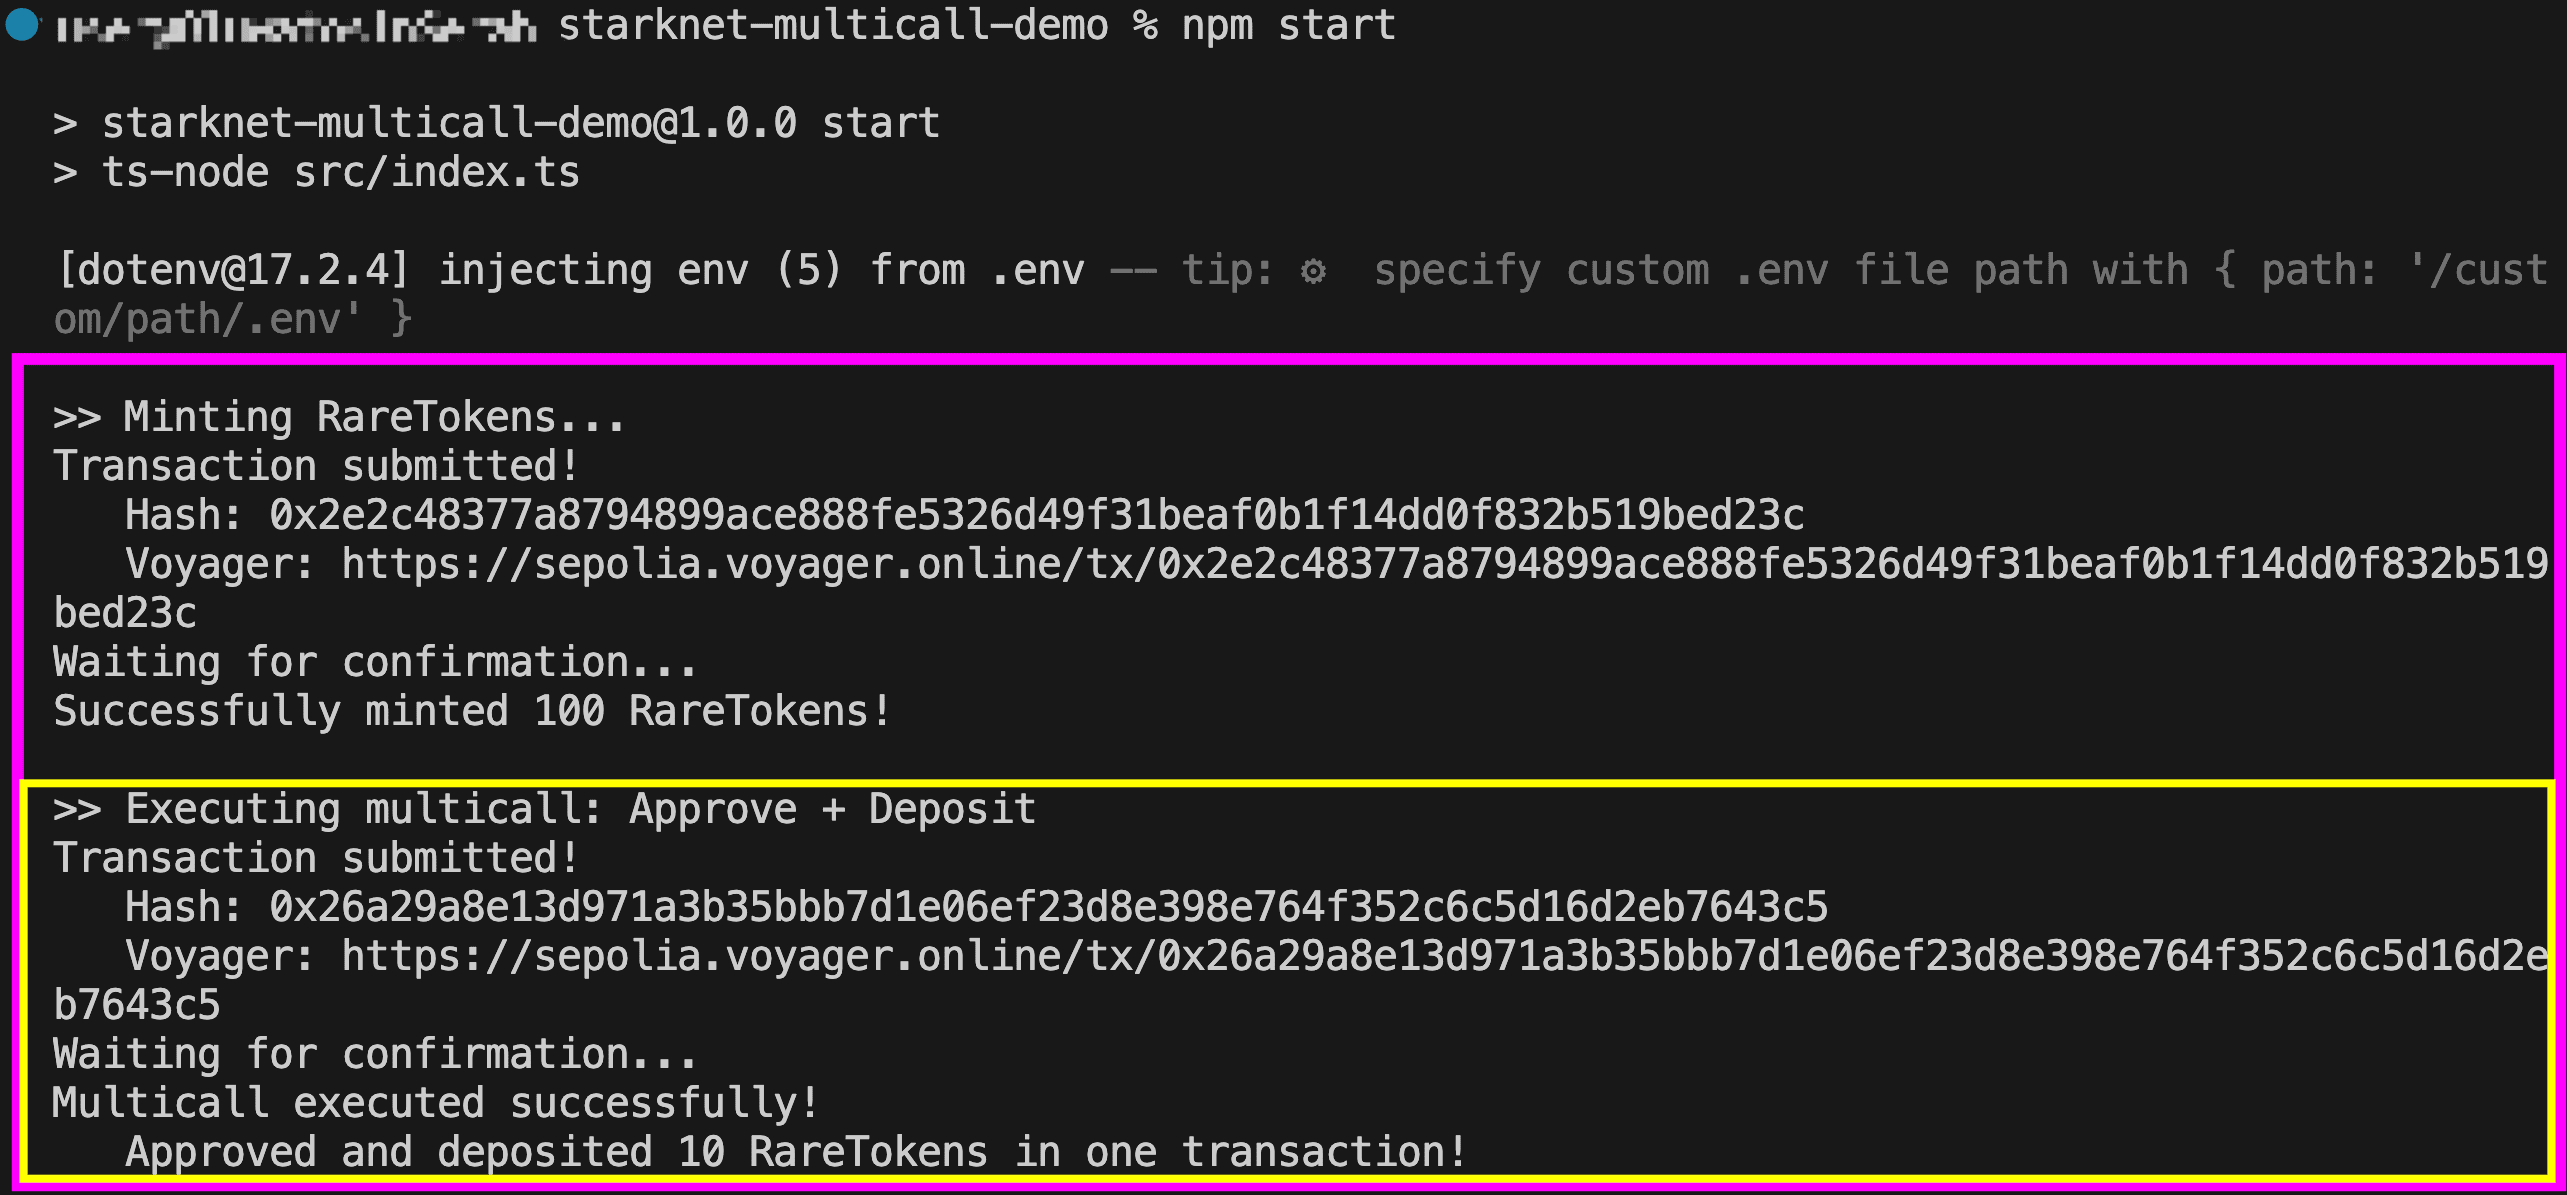
Run the code using:
npm start
You should see output similar to this:
Inspecting the Transaction Trace
To better understand what happens during the multicall, let’s examine the transaction trace. Open your transaction on Voyager, navigate to the Internal Calls section, and expand the __execute__ function; you’ll see the array of the two calls we constructed:
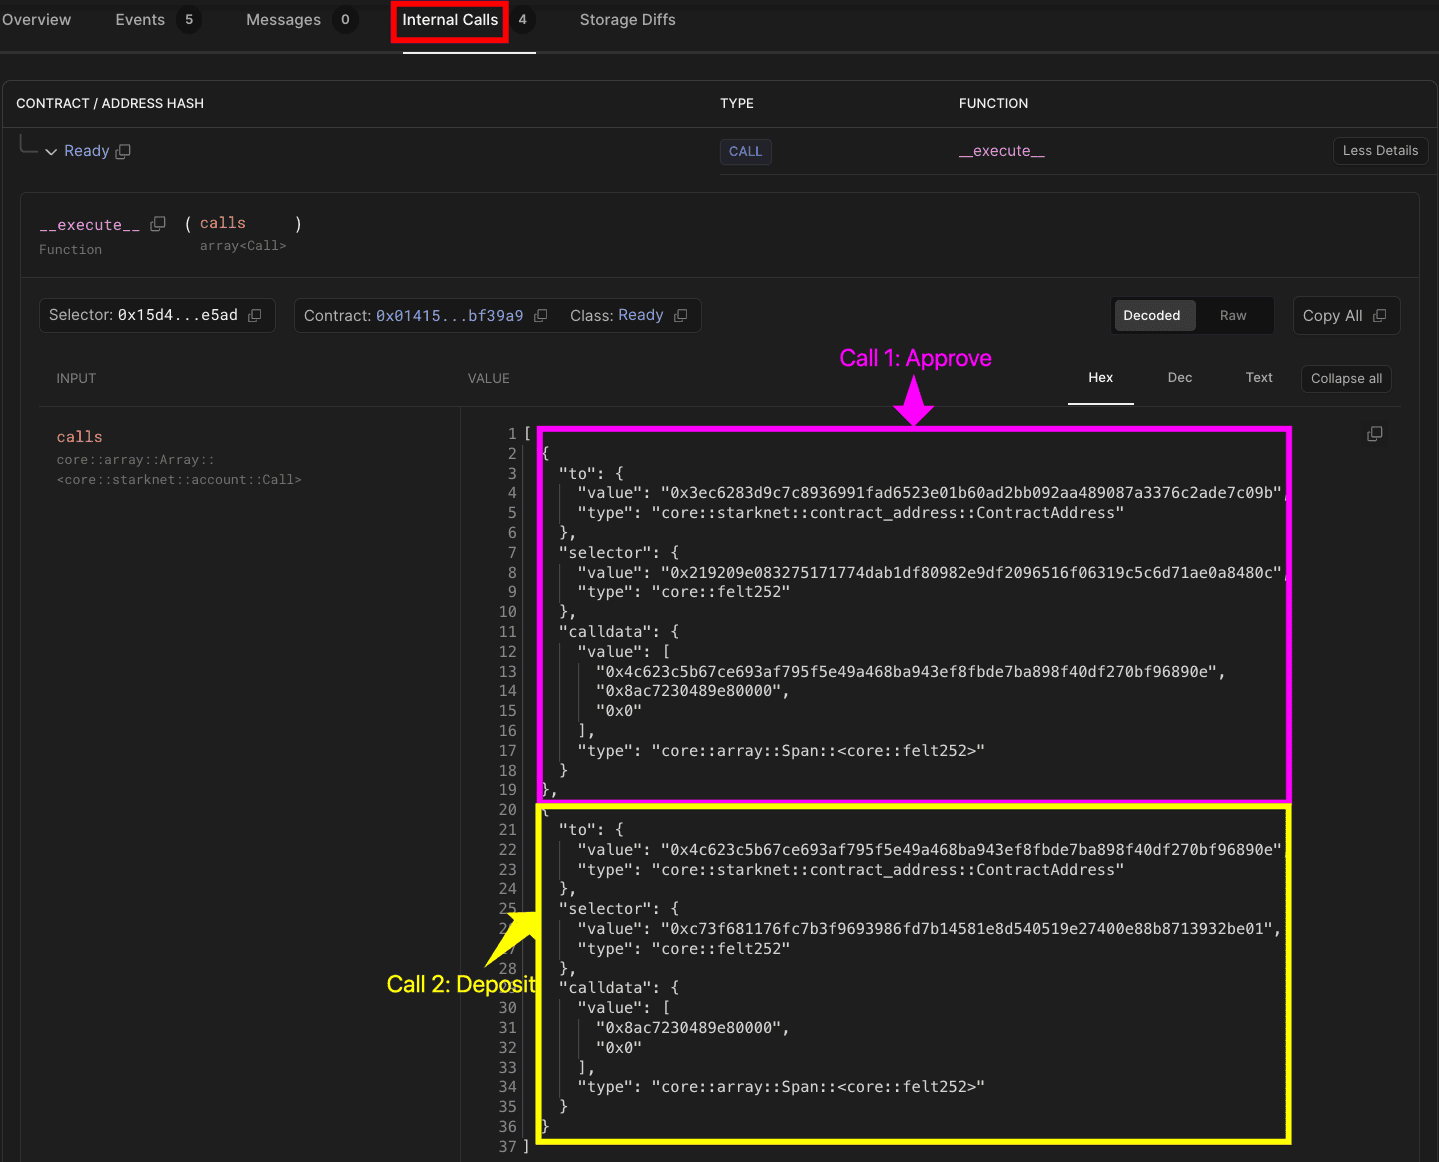
Call 1: Approve
to:0x3ec6283d9c7c8936991fad6523e01b60ad2bb092aa489087a3376c2ade7c09b(RareTokencontract)selector:0x219209e083275171774dab1df80982e9df2096516f06319c5c6d71ae0a8480c(the hash ofapprove)calldata:0x4c623c5b67ce693af795f5e49a468ba943ef8fbde7ba898f40df270bf96890e(RareBankaddress; the spender)0x8ac7230489e80000(least significant bits in hex; 10 tokens)0x0(most significant bits)
Recall that in Starknet, type
u256is split into two parts (low:u128and high:u128), which is why you see two values for the amount.
Call 2: Deposit
to:0x4c623c5b67ce693af795f5e49a468ba943ef8fbde7ba898f40df270bf96890e(RareBankcontract)selector:0xc73f681176fc7b3f9693986fd7b14581e8d540519e27400e88b8713932be01(the hash ofdeposit)calldata:0x8ac7230489e80000(least significant bits in hex; 10 tokens)0x0(most significant bits)
In the Output section, you’ll also see the call tree:
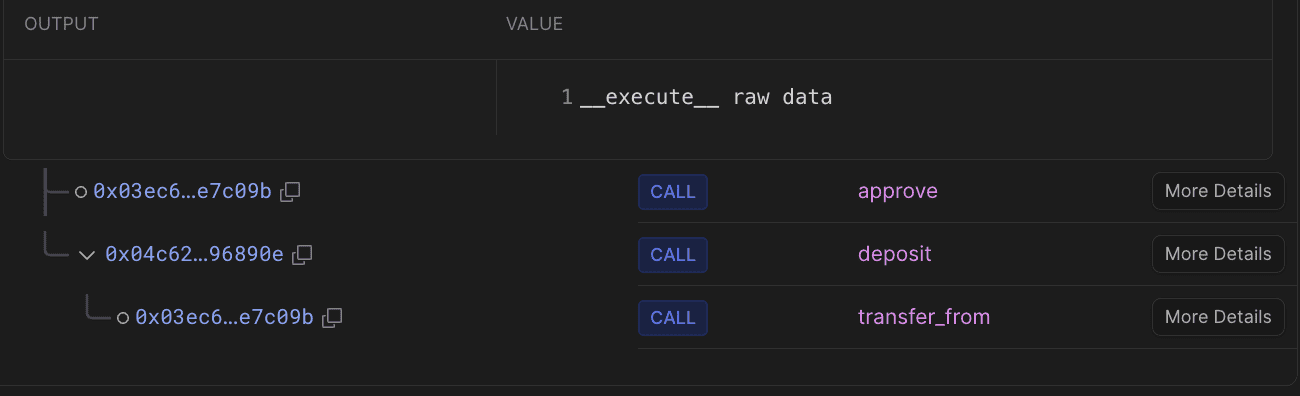
__execute__processes your multicall arrayapprovecall toRareTokendepositcall toRareBank- Internally calls
transfer_fromonRareToken
- Internally calls
Check the Events tab to see Approval and DepositSuccessful events confirming success.