在以太坊上,智能合约可以通过以下三种方式之一进行部署:
- 由外部拥有账户 (EOA) 发起交易,其中
to字段设置为null,且data字段包含合约的初始化代码。 - 智能合约调用
CREATE操作码。 - 智能合约调用
CREATE2操作码。
在本文中,我们将探讨如何在上述每种情况下预测将要创建的合约地址。
预测由 EOA 或 CREATE 部署的智能合约地址
对于由 EOA 或 CREATE 操作码(非 CREATE2)部署的合约,其地址是通过对 RLP 编码的 sender 地址和 nonce 进行 Keccak-256 哈希计算得出的。最终的合约地址是该哈希值的最后 20 个字节(160 位)。
如上式所示,这种地址计算方法仅依赖于部署者的地址及其 nonce。它不考虑合约的字节码、构造函数参数或其他任何因素。
递归长度前缀 (RLP)
从宏观层面上看,RLP 会将正在发送的数据项拼接起来。除了 [0x00, 0x7f] 范围内的单字节外,每个数据项都会加上一个或多个字节的前缀,以指示该项是字符串还是列表,以及其有效载荷的长度。感兴趣的读者可以查阅上方链接的文档。
为了解 RLP 编码是如何在合约地址预测中使用的,让我们来看一个实际示例。
RLPDemo 示例
在下方的 RLPDemo 合约中,predictContractAddress 函数实现了与 CREATE 操作码地址推导相同的逻辑。它通过对发送者地址和 nonce 应用 RLP 编码来计算预期的部署地址。
// SPDX-License-Identifier: MIT
pragma solidity ^0.8.20;
contract RLPDemo {
// Function to predict the address of a contract that would be deployed by a given address
function predictContractAddress(
address deployer,
uint nonce
) public pure returns (address) {
// This implements the same logic as the CREATE opcode's address derivation
// For the CREATE opcode, the address is derived as:
// keccak256(rlp([sender_address, sender_nonce]))
bytes memory rlpEncoded;
// RLP encoding rules:
// - For nonce = 0, the RLP encoding is [0x80] (empty byte string)
// - For nonce = 1 to 127, the RLP encoding is the single byte itself (0x01 to 0x7f)
// - For nonce = 128 to 255, the RLP encoding is [0x81, nonce]
// where 0x81 indicates a single-byte length prefix for the following byte
// Note: Full RLP spec supports encoding arbitrary-length integers using a dynamic length prefix,
// but this function only supports nonces up to 255.
if (nonce == 0) {
// For nonce = 0
rlpEncoded = abi.encodePacked(
bytes1(0xd6), // RLP prefix for a list
bytes1(0x94), // RLP prefix for a 20-byte address
deployer, // 20 bytes of the deployer's address
bytes1(0x80) // RLP encoding for the nonce 0 is 0x80
);
} else if (nonce < 128) {
// For nonce = 1-127
rlpEncoded = abi.encodePacked(
bytes1(0xd6), // RLP prefix for a list
bytes1(0x94), // RLP prefix for a 20-byte address
deployer, // 20 bytes of the deployer's address
uint8(nonce) // Single byte for nonce
);
} else if (nonce < 256) {
// For nonce = 128-255
rlpEncoded = abi.encodePacked(
bytes1(0xd7), // RLP prefix for a list (one byte longer)
bytes1(0x94), // RLP prefix for a 20-byte address
deployer, // 20 bytes of the deployer's address
bytes1(0x81), // RLP prefix for a single byte
uint8(nonce) // The nonce as a single byte
);
} else {
revert("Nonce too large for this demo");
}
bytes32 hash = keccak256(rlpEncoded);
return address(uint160(uint256(hash)));
}
}
为了验证 predictContractAddress 是否按预期工作,我们使用 EOA 0x17F6AD8Ef982297579C203069C1DbfFE4348c372 部署了 RLPDemo(即上方的同一合约),得到的合约地址为 0xE2DFC07f329041a05f5257f27CE01e4329FC64Ef。
上述部署结果如下图右侧所示:
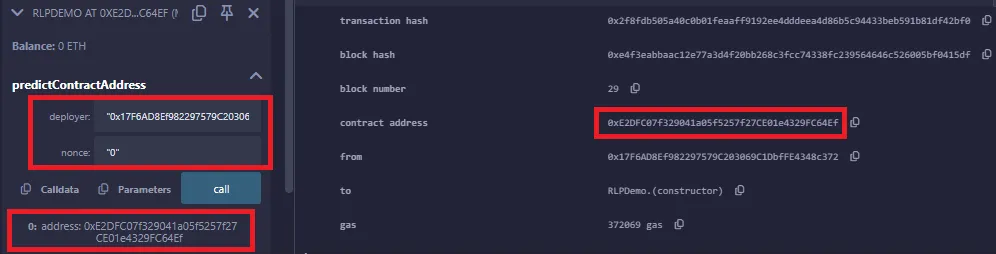
如上图左侧所示,我们使用部署者地址 0x17F6AD8Ef982297579C203069C1DbfFE4348c372 和 nonce 为 0 调用了 predictContractAddress,并成功预测了之前部署的合约地址:0xE2DFC07f329041a05f5257f27CE01e4329FC64Ef。
接下来,让我们看看 nonce 在外部拥有账户 (EOA) 和合约账户中是如何被解释的。
账户部署期间的 nonce 序列
让我们先了解一下以太坊中是如何定义 nonce 的。根据 Ethereum Yellow Paper,账户的 nonce 被定义为:
nonce: A scalar value equal to the number of transactions sent from this address or, in the case
of accounts with associated code, the number of contract-creations made by this account. For account of address a in state , this would be formally denoted .
从这个定义来看,nonce 是归属于发起交易或部署合约的地址的一个值。由于 EOA 可以直接发起并签名交易,其 nonce 计数可以反映 ETH/代币转账、合约调用和合约部署等交易。重要的是,即使交易被回退(revert),nonce 也会增加。被回退的交易仍然包含在区块中,这会被计入 nonce 的增加。
相反,智能合约不能自行发起交易;它们仅在被 EOA 或其他合约调用时才执行。因此,合约账户的 nonce 仅反映由该合约发起的合约创建操作。
注意: 交易内发生的内部调用(Internal calls)、消息调用(message calls)、事件(events)和其他操作永远不会用于增加账户的 nonce 计数。
现在,让我们看看如何初始化 nonce 并使用它来预测 EOA 和合约账户。
新 EOA 的 nonce 值从 0 开始,并且每发起一笔交易该值增加 1。如果新的 EOA 部署了一个合约,将使用 0 作为 nonce 来预测地址。然而,如果该账户已经发送过交易(例如以太币转账或之前的部署操作),则 nonce 将大于 0。
对于合约账户,如 EIP-161 所述,其 nonce 在创建时被初始化为 1。当合约使用 CREATE 或 CREATE2 创建其他合约时,其 nonce 将增加 1。
例如,假设刚刚部署了合约 A。
- 此时,合约 A 的
nonce被设置为1。如果合约 A 接着创建另一个合约(比如合约 B),此次创建将使用nonce = 1来计算合约 B 的地址。 - 一旦合约 B 创建完成,合约 A 的
nonce增加为2。 - 假设合约 A 想要创建另一个合约(比如合约 C)。它将使用
nonce = 2进行此次部署。在合约 C 创建之后,合约 A 的nonce变为3,以此类推。 - 合约 B 和合约 C 与任何新合约一样,其
nonce也从1开始。
如何获取账户的 nonce
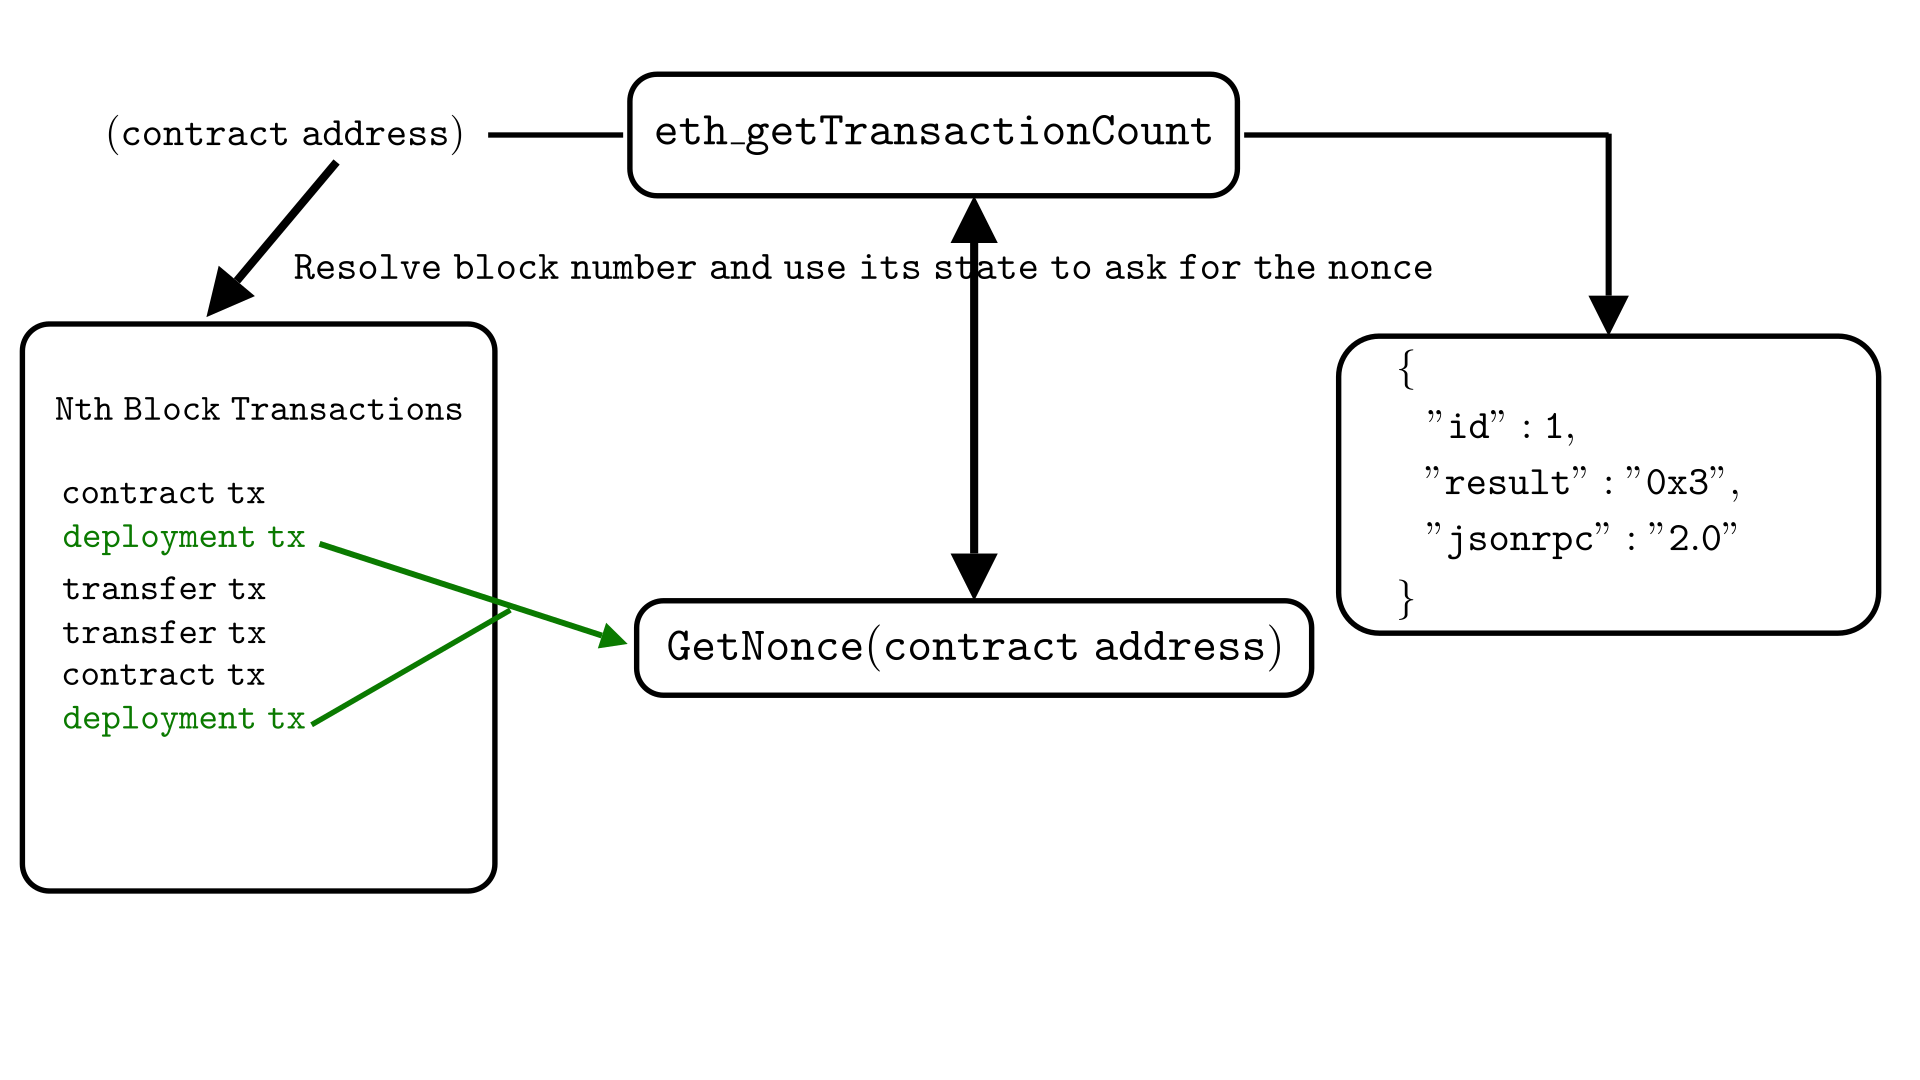
EVM 中没有用于获取账户 nonce 的操作码。不过,如上所述,eth_getTransactionCount RPC 方法可以返回给定账户的 nonce。
该方法返回从指定地址发送的 交易数量,这对应于账户的 nonce。对于 EOA,这包括 ETH/代币转账、合约调用和合约部署。对于智能合约,eth_getTransactionCount 反映了该合约地址创建的合约数量。
下图展示了为什么只有合约部署操作才会增加合约地址的 eth_getTransactionCount nonce。
以下是如何在 JavaScript 中使用 eth_getTransactionCount 方法获取 nonce 的示例。
// NECESSARY IMPORTS
import { createPublicClient, http } from 'viem';
import { mainnet } from 'viem/chains';
// CREATE A PUBLIC CLIENT
const publicClient = createPublicClient({
chain: mainnet,
transport: http()
});
// GET TRANSACTION COUNT (NONCE)
const transactionCount = await publicClient.getTransactionCount({
address: '0xYourContractAddress'
});
console.log(transactionCount);
在测试时,我们可以使用 Foundry 中的 vm.getNonce cheatcode。
Foundry 中的 getNonce 方法
在 Foundry 中,vm.getNonce cheatcode 允许我们检索 EVM 上给定账户或钱包的当前 nonce。
以下是 Foundry 环境中可用的 getNonce 方法:
// Returns the nonce of a given account.
function getNonce(address account) external returns (uint64);
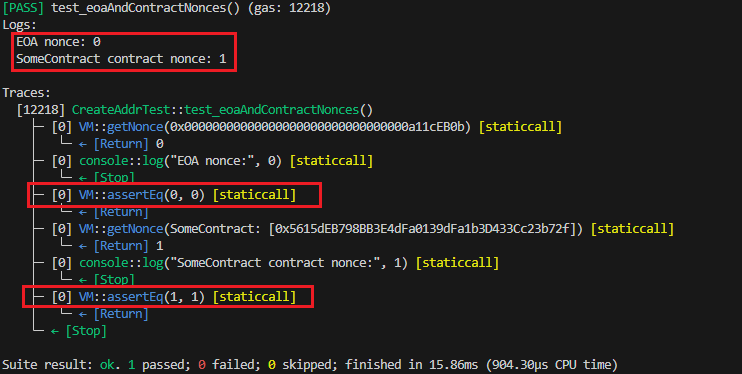
在下面展示的 test_eoaAndContractNonces() 中,我们断言 EOA (userEOA) 的 nonce 从 0 开始,且新部署的合约 SomeContract 的 nonce 从 1 开始,符合预期。
// SPDX-License-Identifier: MIT
pragma solidity ^0.8.20;
import "forge-std/Test.sol";
contract SomeContract {
// Could have logic here if needed
}
contract CreateAddrTest is Test {
address userEOA = address(0xA11CEB0B);
SomeContract public newContract;
function setUp() public {
// Fund the EOA with 10 ether
vm.deal(userEOA, 10 ether);
// Deploy SomeContract which will deploy Dummy in its constructor
newContract = new SomeContract();
}
function test_eoaAndContractNonces() public view{
// 1. EOA nonce should be 0 initially
uint256 eoaNonce = vm.getNonce(userEOA);
console.log("EOA nonce:", eoaNonce);
assertEq(eoaNonce, 0);
// 2. Contract nonce should be 1
uint256 contractNonce = vm.getNonce(address(newContract));
console.log("SomeContract contract nonce:", contractNonce);
assertEq(contractNonce, 1);
}
}
终端结果:
预测由 EOA 部署的合约地址(使用 LibRLP)
Solady 提供了一个名为 LibRLP 的实用工具,其中包含一个 computeAddress 函数,该函数使用其内部的 RLP 编码实现来计算地址。这个辅助函数抽象了编码的细节,并直接返回由 EOA 或 CREATE 部署所生成的合约地址。
function computeAddress(address deployer, uint256 nonce)
internal
pure
returns (address deployed)
{
/// @solidity memory-safe-assembly
assembly {
for {} 1 {} {
// The integer zero is treated as an empty byte string,
// and as a result it only has a length prefix, 0x80,
// computed via `0x80 + 0`.
// A one-byte integer in the [0x00, 0x7f] range uses its
// own value as a length prefix,
// there is no additional `0x80 + length` prefix that precedes it.
if iszero(gt(nonce, 0x7f)) {
mstore(0x00, deployer)
// Using `mstore8` instead of `or` naturally cleans
// any dirty upper bits of `deployer`.
mstore8(0x0b, 0x94)
mstore8(0x0a, 0xd6)
// `shl` 7 is equivalent to multiplying by 0x80.
mstore8(0x20, or(shl(7, iszero(nonce)), nonce))
deployed := keccak256(0x0a, 0x17)
break
}
let i := 8
// Just use a loop to generalize all the way with minimal bytecode size.
for {} shr(i, nonce) { i := add(i, 8) } {}
// `shr` 3 is equivalent to dividing by 8.
i := shr(3, i)
// Store in descending slot sequence to overlap the values correctly.
mstore(i, nonce)
mstore(0x00, shl(8, deployer))
mstore8(0x1f, add(0x80, i))
mstore8(0x0a, 0x94)
mstore8(0x09, add(0xd6, i))
deployed := keccak256(0x09, add(0x17, i))
break
}
}
}
为了理解这在实践中是如何工作的,我们将部署如下所示的 CreateAddressPredictor 合约。然后我们将调用 addrWithLibRLP,以测试计算结果是否与已部署的 CreateAddressPredictor 地址相同。
// SPDX-License-Identifier: MIT
pragma solidity ^0.8.4;
// Importing LibRLP, which contains the computeAddress function shown above.
import {LibRLP} from "contracts/LibRLP.sol";
contract CreateAddressPredictor {
// contract embeds Solady’s address computation logic and exposes it through addrWithLibRLP.
function addrWithLibRLP(
address _deployer,
uint256 _nonce
) public pure returns (address deployed) {
return LibRLP.computeAddress(_deployer, _nonce);
}
}
使用 EOA 0xAb8483F64d9C6d1EcF9b849Ae677dD3315835cb2,我们在 Remix 上将 CreateAddressPredictor 部署在地址 0xa131AD247055FD2e2aA8b156A11bdEc81b9eAD95。
以下是终端结果。
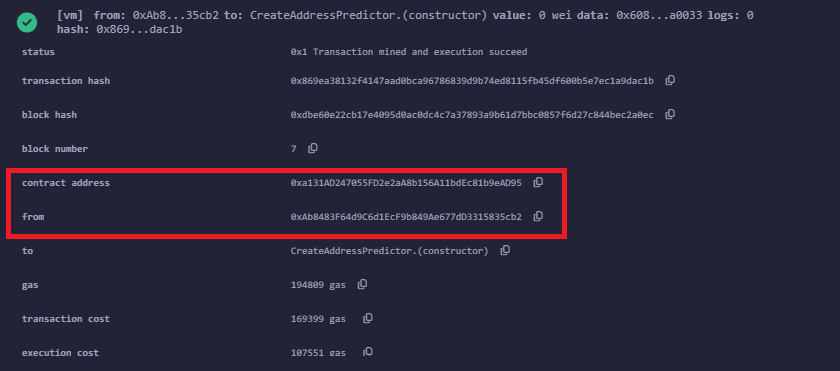
当我们调用 addrWithLibRLP,并传入用于部署 CreateAddressPredictor 的同一个 EOA 及 0 作为 nonce 时,返回的地址与实际部署的地址一致,符合预期。
如下图所示,实际部署的合约地址与这个预测的地址相符。
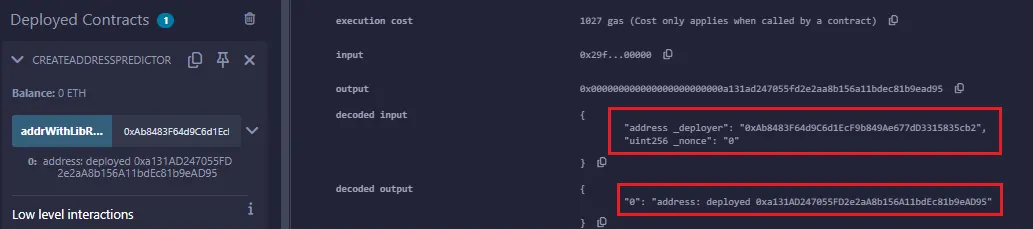
注意:如果在这个例子中将 nonce 设置为任何非零值,解码输出将会返回不正确的地址,因为我们正在使用一个全新的 EOA 账户进行测试。
预测由合约部署的合约地址
如前所述,无论部署者是 EOA 还是合约,已部署合约的地址推导过程都是相同的。我们只需正确设置部署者地址和 nonce。
在下面的测试中,Deployer 合约演示了从 computeAddress 方法返回的地址如何与由另一个合约部署的合约相对应。
// SPDX-License-Identifier: MIT
pragma solidity ^0.8.0;
import "contracts/LibRLP.sol";
contract C {}
contract Deployer {
// Note: nonce is not stored on-chain — this is just for tracking purposes
uint256 public contractNonce = 1;
function deploy() public returns (address c) {
address predicted = predictAddress(address(this), contractNonce);
c = address(new C());
require(c == predicted, "Address mismatch");
contractNonce += 1;
return c;
}
function predictAddress(
address _deployer,
uint256 _nonce
) public pure returns (address deployed) {
return LibRLP.computeAddress(_deployer, _nonce);
}
}
合约 C 由 Deployer 合约使用 new 关键字进行部署(其内部使用了 CREATE 操作码)。
在上述例子中,我们为了方便使用 contractNonce 来存储部署次数,因为从智能合约内部进行 RPC 调用需要使用预言机(oracle)。由于 contractNonce 初始化为 1 并在每次部署后更新,预测地址将始终与实际部署地址匹配。因此,deploy() 调用不会被回退。
为了方便起见,我们的示例使用 nonce 来存储部署次数,因为从智能合约进行 RPC 调用将需要预言机。
require(c == predicted, "Address mismatch");
// If this condition is not met, deploy() call will revert
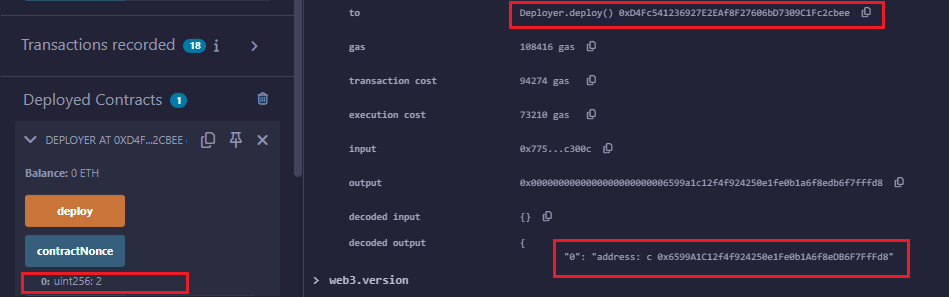
假设我们希望在部署者合约成功进行第一次部署后,再部署第二个合约。到那时,在进行第二次部署之前,contractNonce 会增加到 2。
以下是第二次部署后 deploy() 调用的结果。
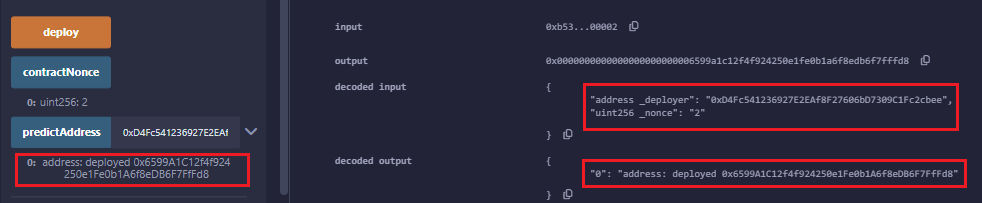
下图展示了上述部署的地址与从 predictAddress 调用(它调用了 LibRLP 中的 computeAddress)返回的地址相匹配。
如何使用 CREATE2 预测合约地址
CREATE2 是在 EIP-1014 中引入的。
当使用 CREATE2 操作码部署合约时,其地址取决于三个要素:部署合约的地址、用户提供的 salt 以及合约的 创建(初始化)字节码 的哈希值。
Create_contract_address = keccak256(0xff ++ deployer ++ salt ++ keccak256(init_code))
利用这种关系,我们可以预先计算出合约的地址,如下方的 getAddress 所示:
function getAddress(
bytes memory createCode,
uint _salt
) public view returns (address) {
bytes32 hash = keccak256(
abi.encodePacked(
bytes1(0xff),
address(this),
_salt,
keccak256(createCode)
)
);
return address(uint160(uint(hash)));
}
其中:
0xff是用于区分CREATE2与CREATE的常量。salt是用户定义的值(32 字节),用于保证唯一性。keccak256(createCode)是合约初始化代码的哈希值。
为什么 CREATE2 要前置一个 0xff 字节
keccak256 输入中的 0xff 是区分字节,它确保由 CREATE 和 CREATE2 操作码生成的地址之间不会发生冲突。
回想一下,CREATE 使用 RLP 编码包含两个元素 ([deployer, nonce]) 的列表来进行地址计算。需要说明的是,部署者的地址始终为 20 个字节,而 nonce 的字节长度可根据其值而变化(实际上是 0–8 字节,但理论上无上限)。
由于 RLP 列表前缀 由 有效载荷的总长度 决定,增加 nonce 值会增加有效载荷长度,进而影响前缀。例如,如果有效载荷长度 ≤ 55 字节,前缀将在以下范围:0xc0 + payload_length。
如果 nonce 足够大,使其经过 RLP 编码后的表示超过 34 字节,这会将整个 [deployer, nonce] 有效载荷推过 55 字节的阈值。因此,RLP 列表前缀将以范围在 [0xf8, 0xff] 之间的某个字节开头。话虽如此,这种情况在现实中永远不会发生,因为 34 字节的 nonce 意味着超过 170 亿笔交易——这个数字远远超出了任何合理的使用情况。
此外,EIP-2681 将 nonce 的硬上限定义为 8 字节(64 位),这意味着任何 nonce ≥ 2^64-1 的交易都是无效的。因此,rlp.encode([deployer, nonce]) 的列表前缀将始终落在 [0xc0, 0xf7] 范围内。
//Here, 0xd6 indicates an RLP list of length 22 bytes.
rlp.encode([deployer, nonce]) = 0xd6 94 <20-byte deployer> <nonce>
因此,如果 CREATE2 不加上 0xff 前缀,而只是对类似于 deployer ++ salt ++ keccak256(init_code) 的原始拼接进行哈希运算,那么在理论上(尽管极其罕见)将存在一种风险,即某些特定值可能会生成具有与 RLP 编码的 [deployer, nonce] 相同前缀的字节串。虽然实际上不可行,但在数学域上它们并不是可证不相交的。
通过前置一个 0xff 字节,CREATE2 确保了哈希输入始终以一个特定的值(0xff)开始,这个值绝对不会出现在具有实际 nonce 账户的有效 RLP 编码的开头。这在计算哈希之前实现了完全的域分离。
CREATE2 预计算示例
现在,让我们考虑一个示例,即使用 getAddress 方法从合约 A 计算出一个新地址。请注意,这个合约没有构造函数。
contract A {
address public owner;
function getBalance() public view returns (uint256) {
return address(this).balance;
}
}
在下方的 DeployNewAddr 合约中,getAddress 函数接受合约 A 的创建字节码和一个 salt 值,以此来计算如果使用 CREATE2 操作码将部署该合约的地址。在这种情况下,计算中使用了 DeployNewAddr 的地址(通过 address(this))。因此,生成的地址取决于 DeployNewAddr 的地址、提供的 salt 以及创建(初始化)字节码 的哈希值。
contract DeployNewAddr {
function getAddress(
bytes memory createCode,
uint _salt
) public view returns (address) {
bytes32 hash = keccak256(
abi.encodePacked(
bytes1(0xff),
address(this),
_salt,
keccak256(createCode)
)
);
return address(uint160(uint(hash)));
}
function getContractABytecode() public pure returns (bytes memory) {
bytes memory bytecode = type(A).creationCode;
return abi.encodePacked(bytecode);
}
}
注意: 只有当最终执行部署的合约是 DeployNewAddr 本身时,getAddress() 才会返回正确的 CREATE2 地址。如果由另一个不同的合约使用相同的字节码和 salt 执行部署,生成的地址将会不同,因为计算中的部署者地址(address(this))将不匹配。在实际部署上下文之外使用 getAddress() 时,请确保计算中使用的部署者地址与将执行部署的地址相匹配。
现在,让我们考虑合约 A 带有带参数的构造函数的情况。
在 getContractABytecode 方法中处理带有构造函数参数的合约
在部署合约(由 EOA 或合约部署)时,EVM 执行合约的创建代码,该代码由 creationCode(编译后的初始化字节码)与经过 ABI 编码的构造函数参数拼接而成。因此,这种行为并非 CREATE2 独有。
回想一下,在上一节中,我们选择使用一个名为 getContractABytecode 的辅助函数来获取 getAddress 的 createCode 参数。因此,对于带有一个或多个构造函数参数的合约 A,此辅助函数需要将参数以正确编码的格式追加到合约的创建字节码后。
以下是修改后的合约 A,它包含一个构造函数参数。
// SPDX-License-Identifier: MIT
pragma solidity ^0.8.0;
contract A {
address public owner;
constructor(address _owner) payable {
owner = _owner;
}
function getBalance() public view returns (uint256) {
return address(this).balance;
}
}
如果合约 A 包含如上所示的构造函数参数,getContractABytecode 函数将通过 abi.encodePacked(bytecode, abi.encode(_owner)) 的方式追加 _owner 构造函数参数的 ABI 编码。
如果合约 A 包含多个构造函数参数,如下所示,则部署字节码必须包含按正确顺序编码的所有参数,例如:abi.encodePacked(bytecode, abi.encode(arg1, arg2, ...))。
contract A {
address public owner;
address public artMaster;
constructor(address _owner, address _artMaster) payable {
owner = _owner;
artMaster = _artMaster;
}
///*************other logic*************///
}
对于如上所示包含构造函数参数 _owner 和 _artMaster 的合约 A,getContractABytecode 函数将如下所示:
function getContractAInitByteCode(
address _owner,
address _artMaster
) public pure returns (bytes memory) {
bytes memory bytecode = type(A).creationCode;
return abi.encodePacked(bytecode, abi.encode(_owner, _artMaster));
}
在测试上述 DeployNewAddr 合约中的 getAddress 方法之前,让我们来看看另一种 CREATE2 部署方法,它消除了传递创建字节码的需要。相反,它通过 Solidity 的原生合约实例化语法依赖隐式字节码部署。
不用手动传递创建字节码来部署(CREATE2)合约地址
这种 CREATE2 方法使用 Solidity 内置的 new 关键字以及一个 salt 参数来部署合约并返回其地址。编译器会自动处理创建字节码的生成以及构造函数参数的编码,因此无需手动传递或构建它们。
这种方法在下方的 DeployNewAddr1 中进行了展示。
contract DeployNewAddr1 {
// Returns the address of the newly deployed contract
//DeployNewAddr1, shows a basic deployment with no constructor arguments (A()).
function deploy(uint _salt) external returns (address x) {
A Create2NewAddr = new A{salt: bytes32(_salt)};
return address(Create2NewAddr);
}
}
当合约 A 没有构造函数参数时,上述代码中的 deploy 函数展示了该方法的变体。
下方的 DeployNewAddr2 和 DeployNewAddr3 展示了当部署的合约 A 分别有一个和两个构造函数参数时,如何处理这些构造函数参数。
contract DeployNewAddr2 {
// DeployNewAddr2 includes a single constructor argument _owner,
// passed to the constructor of contract A.
// Solidity automatically encodes constructor arguments and appends them to the creation bytecode.
function deploy(uint _salt, address _owner) external returns (address x) {
A Create2NewAddr = new A{salt: bytes32(_salt)}(_owner);
return address(Create2NewAddr);
}
}
contract DeployNewAddr3 {
// In DeployNewAddr3, two constructor arguments (msg.sender and _artMaster) are passed to contract A.
// As in DeployNewAddr2, these arguments are encoded and included in the creation bytecode.
function deploy(
uint _salt,
address _owner,
address _artMaster
) external returns (address x) {
A Create2NewAddr = new A{salt: bytes32(_salt)}(_owner, _artMaster);
return address(Create2NewAddr);
}
}
现在,让我们运行我们的代码(具有一个构造函数参数的版本)。
让我们看看 DeployNewAddr2 中的 deploy 是否会返回与 DeployNewAddr 合约中的 getAddress 相同预测地址。我们将在这两个方法中使用 salt 值 29,并且 getAddress 接受源自 getContractABytecode 函数的 bytecode 变量。
以下是调用这两种方法得到的结果:
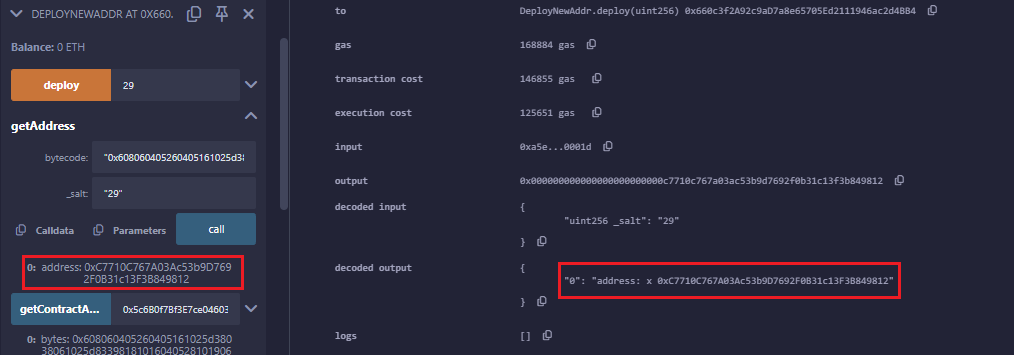
从上图可以看出,deploy 函数返回的地址 x 与 getAddress 函数返回的地址相同。
如何部署两个不可变地相互引用其地址的合约(A 和 B)
让我们通过展示一个说明地址预测如何降低合约部署成本的例子来结束本教程。
如果我们想要部署两个智能合约(A 和 B),且每个合约都需要引用彼此的地址。同时,它们的地址应永不改变(即它们必须是不可变的)。
这种设置引入了几个必须解决的挑战:
- 首先部署
A会使其无法引用尚未存在的B。 - 首先部署
B会导致相反的同一问题——B在部署前无法引用A。 - 部署后,地址必须是不可变的;不应允许使用 setter 函数或外部更新。
解决此问题的一种方法是使用工厂合约地址来预先计算 A 和 B 的地址。然后,以预先计算好的 B 的地址作为构造函数参数来部署 A——并以 A 的预先计算地址来部署 B。
尽管这种方法在技术上是正确的,但它伴随着一些权衡。工厂合约将被部署并存储在链上,这增加了整体的字节码占用空间。此外,这种方法会产生额外的 Gas 成本——既来自部署工厂本身的成本,也来自执行其逻辑以部署目标合约的成本。
为了避免这种开销,我们可以使用常规的合约部署,并利用本文讨论的技术来预测地址。
通过 Foundry 脚本使用 RLP 方法预计算合约地址
在以下步骤中,我们使用 foundry script 记录工厂账户(一个 EOA)的地址,检索其当前的 nonce,预计算合约地址(基于该 EOA 的 nonce),并在它们相互引用的同时进行部署。
步骤 1:编写一个记录工厂(部署者)地址的脚本,如下所示。
// SPDX-License-Identifier: UNLICENSED
pragma solidity ^0.8.13;
import {Script, console} from "forge-std/Script.sol";
import {A, B} from "../src/DeployAddr.sol";
contract DeployAddrScript is Script {
A public a;
function run() public {
uint256 pk = vm.envUint("PRIV_KEY");
address dep = vm.addr(pk);
//WARNING: With vm.envUint, the private key is loaded in cleartext into memory
//NEVER use this pattern in production or with private keys managing real funds.
//Assume any key kept in .env will eventually be stolen
console.log("This is the deployer's address:", dep);
vm.startBroadcast(pk);
new A(address(0));
vm.stopBroadcast();
}
}
终端返回:
$ forge script script/DeployAddr.s.sol --rpc-url http://localhost:8545
[⠒] Compiling...
No files changed, compilation skipped
Script ran successfully.
== Logs ==
This is the deployer's address: 0x8768C6FB71815b2e8Ab6dD31b67a926781aC8f1A
步骤 2:计算合约 A 和 B 的地址。
现在我们通过私钥获取了部署者的地址,我们可以使用命令 cast compute-address <address> --nonce <value> 确定性地生成地址。
查看下方部署者地址 0x8768C6FB71815b2e8Ab6dD31b67a926781aC8f1A 在 nonce 为 0 和 1 时的结果:
$ cast compute-address 0x8768C6FB71815b2e8Ab6dD31b67a926781aC8f1A --nonce 0
Computed Address: 0x9b4393C60f2408de53F04d93aD178ffBAF25b202
user@DESKTOP-QOJ9UFF MINGW64 ~/Desktop/testFile (master)
$ cast compute-address 0x8768C6FB71815b2e8Ab6dD31b67a926781aC8f1A --nonce 1
Computed Address: 0x20cf99233e5B16Fba6B0E7bA70768d6EDe75789D
注意: 使用错误的 nonce 将导致地址不正确。例如,在上述脚本中,一旦(使用 EOA)部署了 new A(address(0)),部署者的 nonce 就从 0 增加到 1。
在那次部署之后使用 nonce 0 计算地址,将导致合约地址不匹配。
或者,我们可以使用 vm.getNonce cheatcode 和 computeAddress 来确定地址 A 和 B,如下所示。
// SPDX-License-Identifier: UNLICENSED
pragma solidity ^0.8.13;
import {Script, console} from "forge-std/Script.sol";
import {A, B} from "../src/DeployAddr.sol";
import {LibRLP} from "lib/LibRLP.sol";
contract DeployAddrScript is Script {
A public a;
//B public b;
function run() public {
uint256 pk = vm.envUint("PRIV_KEY");
address dep = vm.addr(pk);
console.log("This is the deployer's address:", dep);
vm.startBroadcast(pk);
//nonce = 0,
new A(address(0));
//Deploys a new instance of contract A, passing in address(0) as a constructor argument.
// after this, nonce = 1.
// compute the current nonce for the address
uint256 currentNonce = vm.getNonce(dep);
console.log("This is the current nonce: %s", currentNonce);
address predicted_a = LibRLP.computeAddress(dep, currentNonce);
address predicted_b = LibRLP.computeAddress(dep, currentNonce + 1);
console.log("predicted_a: %s", predicted_a);
console.log("predicted_b: %s", predicted_b);
vm.stopBroadcast();
}
}
以下是运行该脚本后的终端结果:
Script ran successfully.
== Logs ==
This is the deployer's address: 0x8768C6FB71815b2e8Ab6dD31b67a926781aC8f1A
This is the current nonce: 1
predicted_a: 0x20cf99233e5B16Fba6B0E7bA70768d6EDe75789D
predicted_b: 0xca3fF2a864026daC337312142Aa71D57c7D8Dde3
步骤 3:使用它们相应的构造函数参数(即预先计算好的地址)部署这些合约。
现在,让我们部署合约(A 和 B)并将结果与 predicted_a 和 predicted_b 进行比较。
// SPDX-License-Identifier: UNLICENSED
pragma solidity ^0.8.13;
import {Script, console} from "forge-std/Script.sol";
import {A, B} from "../src/DeployAddr.sol";
import {LibRLP} from "lib/LibRLP.sol";
contract DeployAddrScript is Script {
A public a;
B public b;
function run() public {
uint256 pk = vm.envUint("PRIV_KEY");
address dep = vm.addr(pk);
console.log("This is the deployer's address:", dep);
vm.startBroadcast(pk);
// compute the current nonce for the address
uint256 currentNonce = vm.getNonce(dep);
console.log("This is the current nonce: %s", currentNonce);
address predicted_a = LibRLP.computeAddress(dep, currentNonce);
address predicted_b = LibRLP.computeAddress(dep, currentNonce + 1);
A a = new A(predicted_b);
B b = new B(predicted_a);
console.log("address(a): %s", address(a));
console.log("predicted_a: %s", predicted_a);
console.log("address(b): %s", address(b));
console.log("predicted_b: %s", predicted_b);
vm.stopBroadcast();
}
}
以下是终端结果:
Script ran successfully.
== Logs ==
This is the deployer's address: 0x8768C6FB71815b2e8Ab6dD31b67a926781aC8f1A
This is the current nonce: 1
address(a): 0x20cf99233e5B16Fba6B0E7bA70768d6EDe75789D
predicted_a: 0x20cf99233e5B16Fba6B0E7bA70768d6EDe75789D
address(b): 0xca3fF2a864026daC337312142Aa71D57c7D8Dde3
predicted_b: 0xca3fF2a864026daC337312142Aa71D57c7D8Dde3
我们可以在终端结果中看到,已部署的地址 a 和 b 分别与预测的地址 predicted_a 和 predicted_b 相对应。
结论
在本文中,我们探讨了在不同的部署方法下如何预测以太坊合约地址。对于使用 CREATE 操作码部署的合约,我们展示了生成的地址仅取决于部署者的地址和 nonce——构造函数参数和字节码不在此列。对于 CREATE2,我们解释了地址预测如何结合 salt 及包含构造函数参数的完整创建字节码的 keccak256 哈希值。最后,我们描述了如何利用 Foundry 脚本和 computeAddress 高效地在链下预计算并部署两个相互依赖的合约。
本指南中引用的 EIP
EIP-161:定义了账户创建交易,引入了“空账户(empty accounts)”的概念、nonce 处理方式及其清理规则。
EIP-1014:引入了 CREATE2 操作码。
EIP-2681:将账户 nonce 的限制定义在 0 到 2^64-1 之间。