在 Solana Anchor 程序中验证 Ed25519 签名
本教程介绍了如何在 Solana 程序中验证链下 Ed25519 签名。
在 Solana 中,自定义程序通常不会自行实现如 Ed25519 或 Secp256k1 签名验证这样的密码学原语,因为这些操作属于计算密集型,会在 SVM 中消耗过多的 计算单元。
相反,Solana 提供了 Ed25519Program 和 Secp256k1Program 作为针对签名验证进行了优化的原生程序。这类似于以太坊使用 预编译 来验证 ECDSA 签名,因为如果直接在 EVM 字节码中实现该逻辑将会消耗过多的 Gas。
尽管钱包交易也是使用 Ed25519 进行签名的,但这些签名是由 Solana 运行时本身验证的,而不是由 Ed25519Program 验证。当你需要验证包含在交易指令数据中的签名(例如空投认领中分发者的签名)时,才会使用 Ed25519Program。
在本文中,我们将展示如何在 Solana 中使用 Ed25519Program 和 指令内省 进行签名验证。我们贯穿全文的示例将是一个空投流程,其中分发者在链下对认领进行签名,接收者在链上提交这些签名后的认领以供验证,从而认领空投。
Ed25519Program 是无状态的
Solana 的 Ed25519Program 仅根据提供的输入参数执行密码学签名验证。它在调用之间不维护任何持久化数据,因此它不拥有任何账户。结果就是,它不会存储验证的结果。如果签名验证失败,整个交易将被拒绝;如果验证成功,执行将继续,下一条指令可以安全地假定该签名是有效的。
我们的贯穿示例:空投
在空投中,我们需要一种方法来知道谁有资格认领代币。一种方法是将所有符合条件的地址存储在链上,但这成本很高。
与其将所有接收者地址存储在链上,基于签名的空投使用一个受信任的分发者(例如项目团队)在链下对包含每个接收者钱包地址和代币数量 (recipient, amount) 的消息进行签名。负责分发空投的链上程序通过验证这些签名来授权代币认领,并将 amount 转移给 recipient。
验证过程是如何工作的
签名验证过程使用指令内省,即程序可以读取同一交易中的其他指令。我们之前已经讨论过指令内省,现在我们将重点关注它如何应用于签名验证。
首先,我们的空投接收者提交一笔包含两条指令的单笔交易,在本文中我们将指令 1 称为 Ed25519 Instruction,将指令 2 称为 AirdropClaim Instruction:
回想一下,一条指令包含一个程序 ID、一个账户列表以及由程序解释的任意数据。我们将在本文中贯穿使用这个指令结构体:
pub struct Instruction {
/// Pubkey of the program that executes this instruction.
pub program_id: Pubkey,
/// Metadata describing accounts that should be passed to the program.
pub accounts: Vec<AccountMeta>,
/// Opaque data passed to the program for its own interpretation.
pub data: Vec<u8>,
}
指令 1:用于签名验证的 Ed25519 Instruction
Ed25519 Instruction 是一个 Solana 指令,其 program_id 是原生 Ed25519Program 验证程序 (Ed25519SigVerify111111111111111111111111111)。它是我们空投交易中的第一条指令。
由于 Ed25519Program 是无状态的,因此该指令不需要任何账户,所有的输入都被编码在指令的 data 中。
Ed25519Program 的指令数据是如何格式化的
Ed25519program 指令中的 data 以一个 16 字节的头部开始,该头部包含指令中签名的数量以及偏移量。在我们的例子中,将只包含分发者的签名数量以及偏移量。这些偏移量指向 data 的剩余部分,以定位被验证的公钥、消息和签名。其余的数据将从第 16 个字节一直延续到第 151 个字节。
| Ed25519 Instruction | |||
|---|---|---|---|
| [bytes 0…15] 头部 (16 字节) |
[bytes 16…47] 分发者的公钥 (32 字节) |
[bytes 48…111] 分发者的签名 (64 字节) |
[bytes 112…151] 消息 - 接收者公钥 (0…31) - 空投代币数量 (32…39, 小端序) |
这是头部的 Rust 结构体:
struct Ed25519InstructionHeader {
num_signatures: u8, // 1 byte
padding: u8, // 1 byte
offsets: Ed25519SignatureOffsets, // 14 bytes
}
struct Ed25519SignatureOffsets {
signature_offset: u16, // 2 bytes
signature_instruction_index: u16, // 2 bytes
public_key_offset: u16, // 2 bytes
public_key_instruction_index: u16, // 2 bytes
message_data_offset: u16, // 2 bytes
message_data_size: u16, // 2 bytes
message_instruction_index: u16, // 2 bytes
}
请注意,Ed25519SignatureOffsets 结构体具有以下索引:signature_instruction_index、public_key_instruction_index 和 message_instruction_index。这些索引用于确定指令数据是否位于当前正在执行的指令中。在 Solana Ed25519 源码 中,当前指令数据中的索引被设置为 u16::MAX:
let offsets = Ed25519SignatureOffsets {
signature_offset: signature_offset as u16,
signature_instruction_index: u16::MAX,
public_key_offset: public_key_offset as u16,
public_key_instruction_index: u16::MAX,
message_data_offset: message_data_offset as u16,
message_data_size: message.len() as u16,
message_instruction_index: u16::MAX,
};
任何其他值都会指向交易中的另一条指令。
在我们贯穿全文的空投示例中,Ed25519 Instruction 数据的布局将如下所示。
| Ed25519 Instruction | |||
|---|---|---|---|
| 0…15 头部 (16 字节) |
16…47 分发者的公钥 |
48…111 分发者的签名 |
112…151 消息 - 接收者公钥 (0…31) - 空投代币数量 (32…39, 小端序) |
在实际操作中,你将使用链下辅助工具(如 Web3.js 或 solana-ed25519-program Crate)来构建有效的指令。下面是来自 ed25519 Crate 源码的片段,展示了构建该指令所需的输入参数,然后它会在链下返回一个有效的指令。(Typescript 版本将在后面展示)
use solana_ed25519_program::new_ed25519_instruction_with_signature;
pub fn new_ed25519_instruction_with_signature(
message: &[u8],
signature: &[u8; 64],
pubkey: &[u8; 32],
) -> Instruction
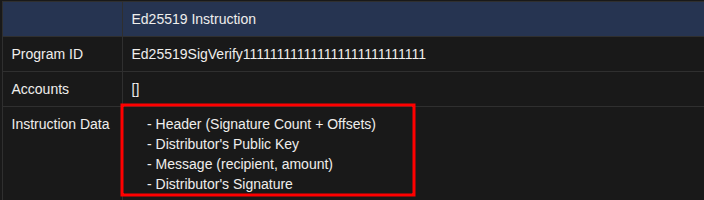
从概念上讲,反序列化版本的 Ed25519 Instruction 如下所示:
| Ed25519 Instruction | |
|---|---|
| 程序 ID | Ed25519SigVerify111111111111111111111111111 |
| 账户 | [] |
| 指令数据 | - 头部(签名数量 + 偏移量) - 分发者的公钥 - 消息(接收者,数量) - 分发者的签名 |
当交易执行时,Ed25519 Instruction 会由 Ed25519Program 处理。如果签名有效,指令执行成功。然而,如果签名无效,它将中止交易并记录错误代码,这意味着后续指令(如 AirdropClaim Instruction)将不会被执行。
我们将在本文后面演示这种验证实际上是如何工作的。
指令 2:AirdropClaim Instruction
AirdropClaim Instruction 是一个标准的 Solana 交易指令,发送给空投程序以认领空投代币。该指令包含空投程序 ID、接收者账户以及用于内省的指令 sysvar 账户。
| AirdropClaim Instruction | |
|---|---|
| 程序 ID | 空投程序 ID |
| 账户 | [接收者,指令 sysvar 账户] |
| 指令数据 | 无自定义数据 |
空投程序将首先使用指令 sysvar 对 ****Ed25519 Verification Instruction: Instruction 1 进行内省,以验证:
Ed25519 Verification Instruction: Instruction 1的程序 ID 与Ed25519Program(Ed25519SigVerify111111111111111111111111111) 相匹配。Ed25519 Verification Instruction: Instruction 1没有账户,符合无状态Ed25519Program的预期。- 该指令的数据包含正确的分发者公钥、签名和消息,且与预期值匹配。
如果内省显示 Ed25519 Verification Instruction: Instruction 1 有效,用户就可以认领他们的空投代币。
Ed25519 Verification Instruction 和 AirdropClaim Instruction 的执行流程
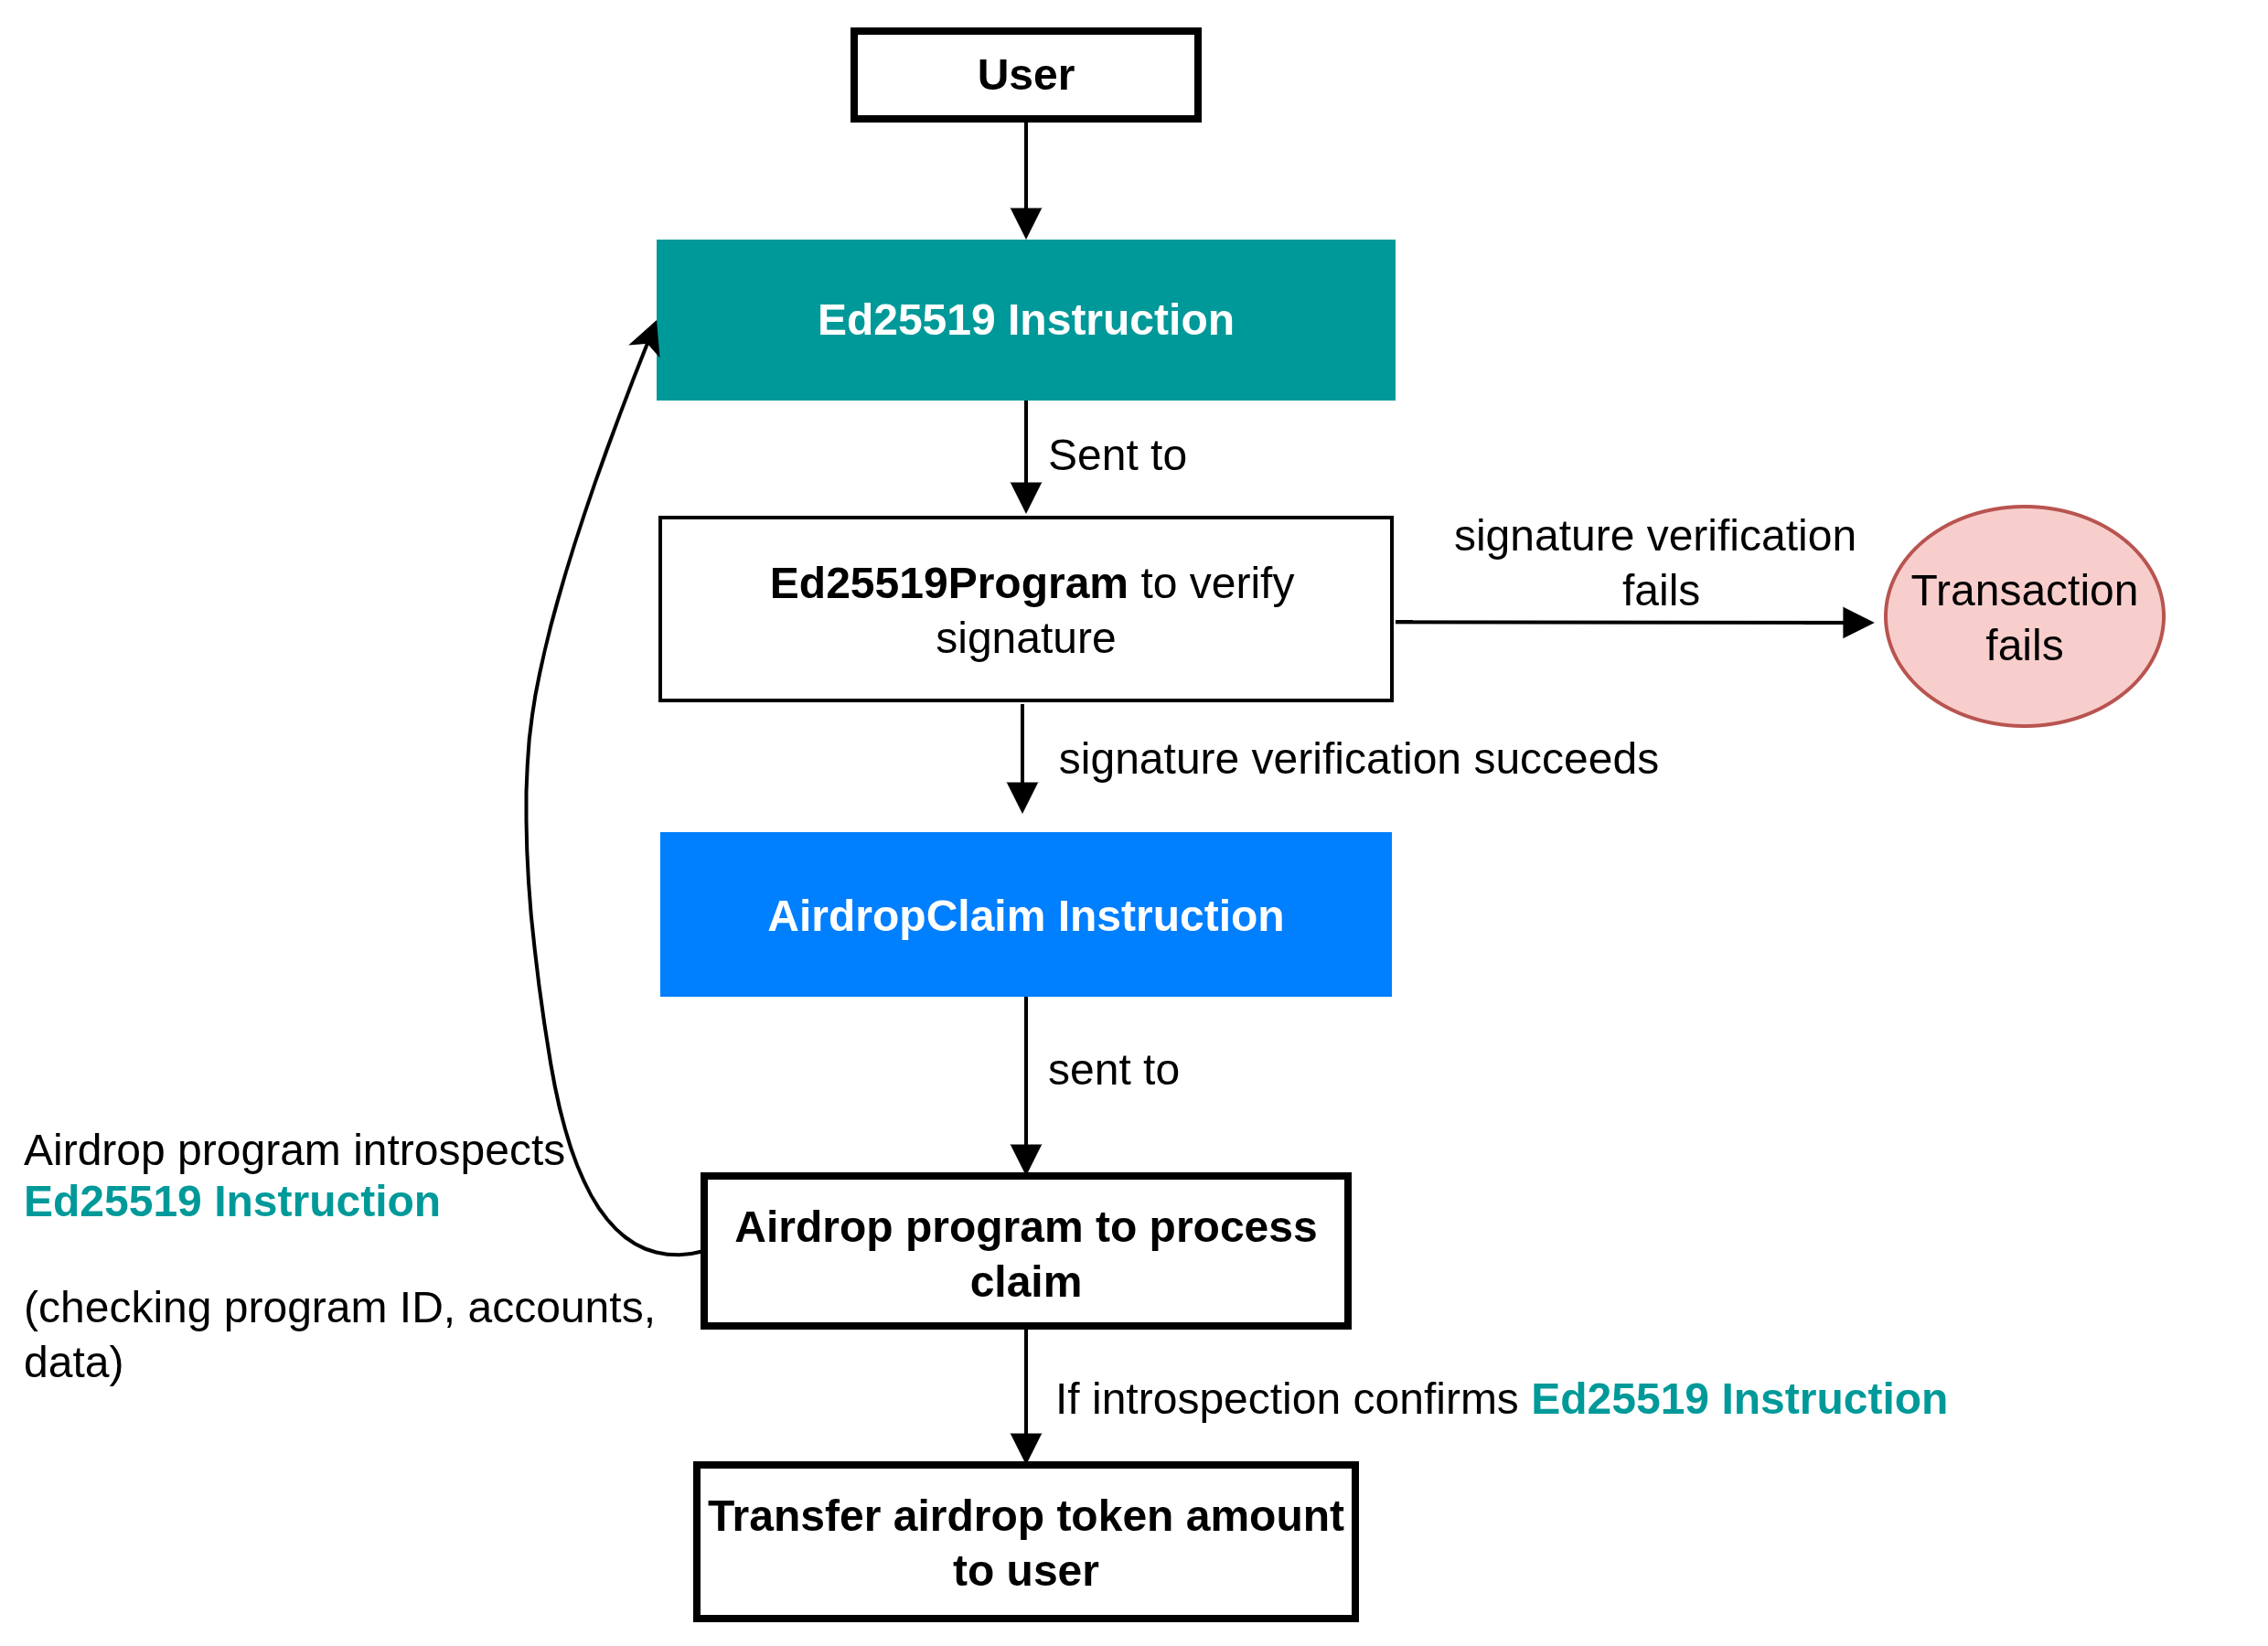
下图展示了在认领空投之前,我们程序中 Ed25519 Verification Instruction 和 AirdropClaim Instruction 的高级别执行流程。
用户发送一笔包含两条指令的交易:Ed25519 Verification Instruction 和 AirdropClaim Instruction。
Ed25519 Verification Instruction进入Ed25519Program以验证分发者的签名。- 如果签名验证失败,则整笔交易失败。如果验证成功,执行流程继续。
- 接着
AirdropClaim Instruction会被发送至 空投程序。 - 空投程序对
Ed25519 Verification Instruction进行内省,检查其程序 ID、账户和数据,以确认它是一次有效的Ed25519验证。 - 如果内省确认了
Ed25519 Verification Instruction的有效性,用户就可以认领其空投代币。
用于空投分发的签名验证程序
让我们编写实际代码,演示如何遵循我们的空投分发流程,使用指令内省来验证 Ed25519 签名。此应用程序有两个阶段:
- 客户端 构建交易,添加
Ed25519 Verification Instruction: Instruction 1和AirdropClaim Instruction: Instruction 2,然后将交易发送到网络。 - 程序逻辑 通过内省验证
Ed25519 Verification Instruction: Instruction 1,并允许用户认领其空投代币。
我们将在测试套件中实现客户端逻辑,所以让我们先从创建程序逻辑开始。
程序逻辑:认领验证
要跟随本节内容,请确保你的机器上已设置好 Solana 开发环境。否则,请阅读 本系列的第一篇文章 进行设置。
通过运行以下 Anchor 命令初始化一个 Anchor 应用程序:
anchor init airdrop-distribution
使用以下 Anchor 导入更新 programs/airdrop-distribution/lib.rs 文件中的导入。我们需要:
- 用于验证的
ed25519_program导入, - 在不同情况下所需的公钥,
- 然后我们将使用
sysvar导入进行内省。
use anchor_lang::prelude::*;
use anchor_lang::solana_program::{
ed25519_program,
pubkey::Pubkey,
sysvar::instructions as ix_sysvar,
sysvar::SysvarId
};
保留你生成的 declare_id
declare_id!("Gh2JoycvxfreSgjzhCHuRDK7sZDAbxeo7Pd8GKCoSLmS");
接下来,我们将包含程序的其余逻辑,并逐步进行讲解。
程序包含一个 claim 函数,所有逻辑都在其中。以下是该函数中发生的步骤细分:
- 加载指令
sysvar以读取完整的交易指令。 - 找到当前指令的索引,并加载紧挨着它前面的那条指令。
- 要求前面的指令是发送给原生
Ed25519程序的,并且没有账户。 - 解析
Ed25519 Verification Instruction: Instruction 1数据,然后检查头部,验证签名数量,并提取偏移量。 - 验证头部中的所有偏移量都指向同一条指令内的数据,并具体指向签名、公钥和消息。
- 从数据中重构分发者的公钥,并检查其是否与预期的分发者账户匹配。
- 重构已签名的消息
[recipient pubkey (32)][amount (u64 little-endian)],并检查签名消息中的接收者是否与AirdropClaim Instruction: Instruction 2中的接收者账户匹配。
use anchor_lang::prelude::*;
use anchor_lang::solana_program::{
ed25519_program,
pubkey::Pubkey,
sysvar::instructions as ix_sysvar,
sysvar::SysvarId
};
declare_id!("Gh2JoycvxfreSgjzhCHuRDK7sZDAbxeo7Pd8GKCoSLmS");
#[program]
pub mod airdrop {
use super::*;
pub fn claim(ctx: Context<Claim>) -> Result<()> {
// --- constants for parsing Ed25519 instruction data ---
const HEADER_LEN: usize = 16; // fixed-size instruction header
const PUBKEY_LEN: usize = 32; // size of an Ed25519 public key
const SIG_LEN: usize = 64; // size of an Ed25519 signature
const MSG_LEN: usize = 40; // expected message length: [recipient(32) + amount(8)]
// Load the instruction sysvar account (holds all tx instructions)
let ix_sysvar_account = ctx.accounts.instruction_sysvar.to_account_info();
// Index of the current instruction in the transaction
let current_ix_index = ix_sysvar::load_current_index_checked(&ix_sysvar_account)
.map_err(|_| error!(AirdropError::InvalidInstructionSysvar))?;
// The Ed25519 verification must have run just before this instruction
require!(current_ix_index > 0, AirdropError::InvalidInstructionSysvar);
// Load the immediately preceding instruction (the Ed25519 ix)
let ed_ix = ix_sysvar::load_instruction_at_checked(
(current_ix_index - 1) as usize,
&ix_sysvar_account,
)
.map_err(|_| error!(AirdropError::InvalidInstructionSysvar))?;
// Ensure it is the Ed25519 program and uses no accounts (stateless check)
require!(ed_ix.program_id == ed25519_program::id(), AirdropError::BadEd25519Program);
require!(ed_ix.accounts.is_empty(), AirdropError::BadEd25519Accounts);
// Ed25519 Verification Instruction data
let data = &ed_ix.data;
// --- parse Ed25519 instruction format ---
// First byte: number of signatures (must be 1)
// Rest of header: offsets describing where signature, pubkey, and message are
require!(data.len() >= HEADER_LEN, AirdropError::InvalidInstructionSysvar);
let sig_count = data[0] as usize;
require!(sig_count == 1, AirdropError::InvalidInstructionSysvar);
// helper to read u16 offsets from the header (little-endian)
let read_u16 = |i: usize| -> Result<u16> {
let start = 2 + 2 * i;
let end = start + 2;
let src = data
.get(start..end)
.ok_or(error!(AirdropError::InvalidInstructionSysvar))?;
let mut arr = [0u8; 2];
arr.copy_from_slice(src);
Ok(u16::from_le_bytes(arr))
};
// Extract the offsets for signature, pubkey, and message
let signature_offset = read_u16(0)? as usize;
let signature_ix_idx = read_u16(1)? as usize;
let public_key_offset = read_u16(2)? as usize;
let public_key_ix_idx = read_u16(3)? as usize;
let message_offset = read_u16(4)? as usize;
let message_size = read_u16(5)? as usize;
let message_ix_idx = read_u16(6)? as usize;
// Enforce that all offsets point to the current instruction's data.
// The Ed25519 program uses u16::MAX as a sentinel value for "current instruction".
// This prevents the program from accidentally reading signature, public key,
// or message bytes from some other instruction in the transaction.
let this_ix = u16::MAX as usize;
require!(
signature_ix_idx == this_ix
&& public_key_ix_idx == this_ix
&& message_ix_idx == this_ix,
AirdropError::InvalidInstructionSysvar
);
// Ensure all offsets point beyond the 16-byte header,
// i.e. into the region containing the signature, public key, and message
require!(
signature_offset >= HEADER_LEN
&& public_key_offset >= HEADER_LEN
&& message_offset >= HEADER_LEN,
AirdropError::InvalidInstructionSysvar
);
// Bounds checks for signature, pubkey, and message slices
require!(data.len() >= signature_offset + SIG_LEN, AirdropError::InvalidInstructionSysvar);
require!(data.len() >= public_key_offset + PUBKEY_LEN, AirdropError::InvalidInstructionSysvar);
require!(data.len() >= message_offset + message_size, AirdropError::InvalidInstructionSysvar);
require!(message_size == MSG_LEN, AirdropError::InvalidInstructionSysvar);
// --- reconstruct and validate the distributor's pubkey ---
let pk_slice = &data[public_key_offset..public_key_offset + PUBKEY_LEN];
let mut pk_arr = [0u8; 32];
pk_arr.copy_from_slice(pk_slice);
let distributor_pubkey = Pubkey::new_from_array(pk_arr);
if distributor_pubkey != ctx.accounts.expected_distributor.key() {
return err!(AirdropError::DistributorMismatch);
}
// --- reconstruct and validate the signed message ---
// Format: [recipient pubkey (32 bytes)][amount (u64 little-endian)]
let msg = &data[message_offset..message_offset + message_size];
let mut rec_arr = [0u8; 32];
rec_arr.copy_from_slice(&msg[0..32]);
let recipient_from_msg = Pubkey::new_from_array(rec_arr);
if recipient_from_msg != ctx.accounts.recipient.key() {
return err!(AirdropError::RecipientMismatch);
}
let mut amount_bytes = [0u8; 8];
amount_bytes.copy_from_slice(&msg[32..40]);
let amount = u64::from_le_bytes(amount_bytes);
// User can now claim the airdrop token.
// The airdrop transfer can now be implemented here.
Ok(())
}
}
#[derive(Accounts)]
pub struct Claim<'info> {
/// The recipient of the airdrop (must match the recipient in the signed message)
#[account(mut)]
pub recipient: Signer<'info>,
/// Expected distributor pubkey (checked against signed message, not Anchor)
/// CHECK: Validated manually against the parsed message
pub expected_distributor: UncheckedAccount<'info>,
/// The sysvar containing the full transaction's instructions
/// CHECK: Validated by requiring its well-known address
#[account(address = ix_sysvar::Instructions::id())]
pub instruction_sysvar: AccountInfo<'info>,
/// System program used for the transfer
pub system_program: Program<'info, System>,
}
#[error_code]
pub enum AirdropError {
#[msg("Invalid instruction sysvar")]
InvalidInstructionSysvar,
#[msg("Expected Ed25519 program id")]
BadEd25519Program,
#[msg("Bad Ed25519 accounts")]
BadEd25519Accounts,
#[msg("Distributor public key mismatch")]
DistributorMismatch,
#[msg("Recipient mismatch in message")]
RecipientMismatch,
}
让我们解释一下上述代码的关键部分。我们将涵盖:
- 上述代码如何使用 Solana Rust SDK 提供的相对指令索引辅助函数从 sysvar 账户加载
Ed25519 Verification Instruction: Instruction 1 - 访问并验证
Ed25519 Verification Instruction: Instruction 1数据 - 检索头部区域中的签名数量和偏移量
- 进行验证以确保我们正在访问当前交易中准确的签名、公钥和消息
- 访问指令数据中分发者的签名、公钥和消息
我们将分享上述程序代码各个关键部分的屏幕截图,并在接下来的小节中进行讨论。
1. 内省:加载并验证 Ed25519 Verification Instruction: Instruction 1
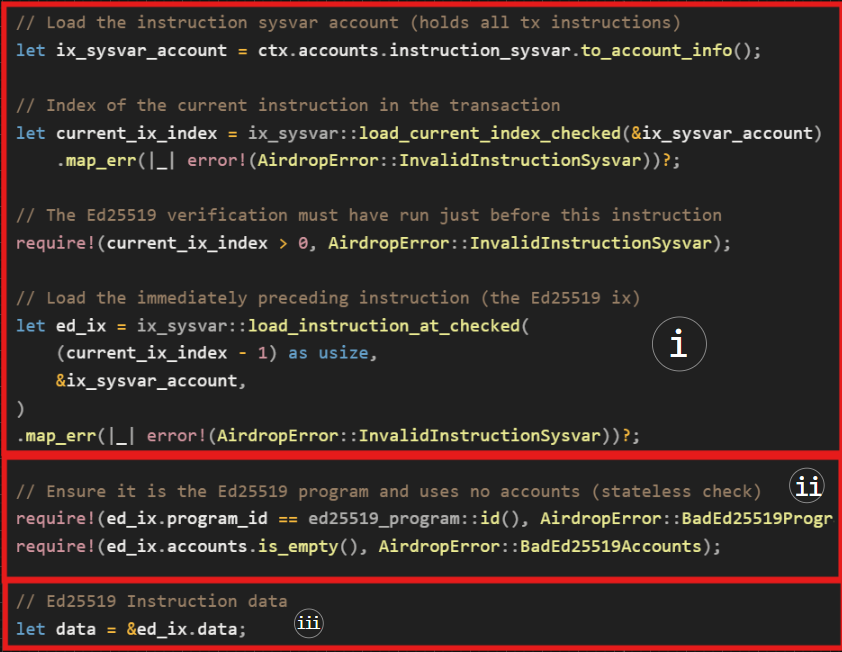
下面我们程序代码的截图展示了我们如何通过指令 sysvar 使用指令内省来验证 Ed25519 Verification Instruction: Instruction 1。
- 我们调用
load_current_index_checked()获取当前指令的索引,并调用load_instruction_at_checked()加载紧邻的前一条指令。 - 一旦我们获取了前一条指令(
Ed25519 Verification Instruction: Instruction 1),我们将:- 验证其程序 ID 是否与
Ed25519Program匹配。这可以确保该指令确实是 Ed25519 签名验证。 - 并确认指令的账户列表为空。
- 验证其程序 ID 是否与
- 一旦这些检查成功,我们将提取指令的数据,它是一个向量并将其绑定到变量
data上。
现在,我们已经成功验证了顶层 ed2559Program 指令信息:ID 和账户。我们还获取了 Ed25519 Verification Instruction: Instruction 1 数据,因此,下一步是验证数据的内容。该数据是 u8 数据类型的向量。
2. 访问并验证 Ed25519 Verification Instruction: Instruction 1 数据
我们预期指令数据按以下顺序编码:一个指定签名数量和后续字段偏移量的头部;分发者的公钥;消息;以及分发者的 Ed25519 签名。
现在,我们将逐步查看代码的下一部分,以了解空投程序如何访问并验证 Ed25519 Verification Instruction: Instruction 1 数据。
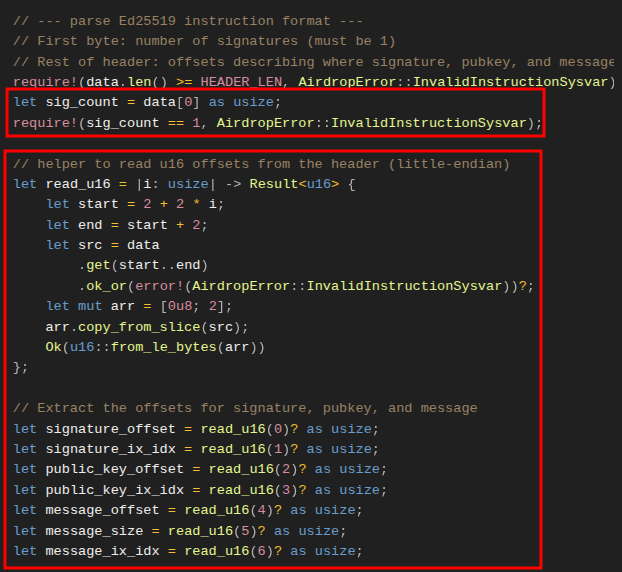
3. 检索头部区域中的签名数量和偏移量
下方截图中的代码提取了签名数量、偏移量以及指向每个元素在 Ed25519 Verification Instruction: Instruction 1 数据向量中位置的索引。
在头部中,签名数量应位于第一个索引处,我们通过 data[0] 获取它。预期该数量为 1,因为应该只有一个分发者签名。我们使用 require 语句来强制执行这一点。
之后,头部包含偏移量和索引值,这些值告诉我们在指令数据中的何处可以找到分发者的公钥、签名和消息。
为了解析它们,我们定义了一个闭包 read_u16,它每次步进两个字节来遍历数据缓冲区,并将每个偏移量作为 u16 返回。这使得重建一致的指令数据布局变得更加容易。
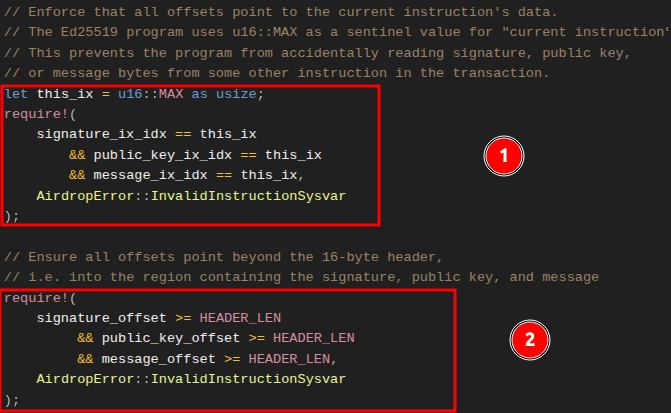
4. 进行验证以确保我们正在访问当前指令中准确的签名、公钥和消息
到目前为止,我们已经获得了签名数量和偏移量,但我们需要确保:
- 我们正在与之交互的指令是我们从 sysvar 加载的作为当前指令的指令。回想一下,在 Ed25519 源码中,当前指令数据中签名 (
signature_ix_idx)、公钥 (public_key_ix_idx) 和消息 (message_ix_idx) 的索引被设置为u16::MAX。任何其他值都会指向交易中的另一条指令。 - 偏移量指向了 16 字节头部之后,进入到包含签名、公钥和消息的向量部分。
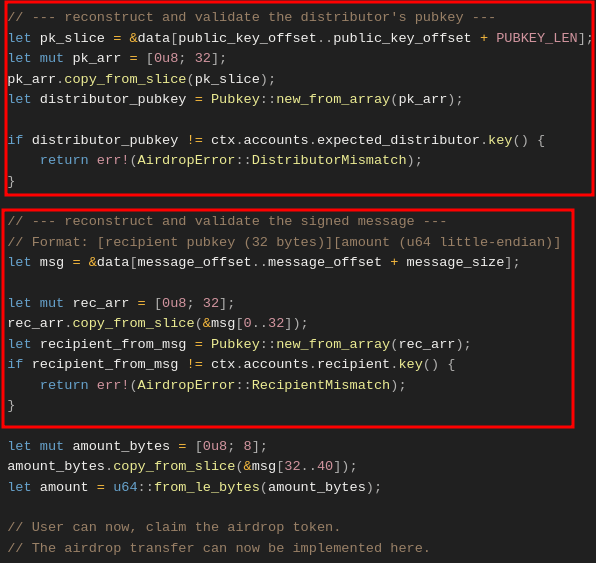
5. 访问指令数据向量中分发者的签名、公钥和消息
下方的截图展示了我们如何使用从 Ed25519 Verification Instruction: Instruction 1 数据头部解析出的偏移量,来定位指令数据中的分发者公钥和消息内容(接收者和数量),并针对用户在 AirdropClaim Instruction: Instruction 2 中提供的版本对它们进行验证。
- 第一个标记区域展示了我们如何从
Ed25519 Instruction数据中切片出分发者的公钥,将其重构为一个 32 字节的Pubkey,并将其与AirdropClaim Instruction: Instruction 2中分发者账户的expected_distributor公钥进行比较。 - 第二个标记区域展示了我们如何切片出已签名的消息(接收者 + 数量),重构接收者公钥,并验证其是否与
AirdropClaim Instruction: Instruction 2中的recipient账户相匹配。
如果两项检查均成功,则签名验证完成。此时你可以实现向接收者的代币转移。由于本文的重点在于验证,我们没有实现具体的代币转移逻辑。
客户端:在链下构建交易
我们已经了解了签名验证是如何工作的。现在,让我们通过创建包含两条指令(Ed25519 Verification Instruction: Instruction 1 和 AirdropClaim Instruction: Instruction 2)的交易来对其进行测试。
依赖项
我们将使用 tweetnacl 密码学库来创建分发者签名,因此通过运行以下命令安装它:
yarn add tweetnacl
完成此操作后,将 tweetnacl 与下方所示的后续导入一起添加到 tests/airdrop-distribution.ts 中的导入列表中。我们将使用 Ed25519Program 依赖项来创建用于验证的第一条指令,而 TransactionInstruction 是预期的标准交易指令类型。
import * as anchor from "@coral-xyz/anchor";
import { Program } from "@coral-xyz/anchor";
import { expect } from "chai";
// Add the following
import { Airdrop } from "../target/types/airdrop"; // The IDL
import {
PublicKey,
Keypair,
SystemProgram,
Transaction,
**TransactionInstruction,
Ed25519Program**
} from "@solana/web3.js";
import * as nacl from "tweetnacl";
我们将有四个测试用例场景:
- 有效认领 (Valid claim):分发者对正确的接收者和数量进行签名,
Ed25519Program指令在claim指令之前运行,然后交易成功。 - 错误顺序 (Wrong order):
claim指令出现在Ed25519Program之前,交易失败并返回InvalidInstructionSysvar。 - 错误分发者 (Wrong distributor):签名与
expectedDistributor签名不匹配,交易失败并返回DistributorMismatch。 - 错误接收者 (Wrong recipient):签名的接收者与试图认领空投的用户的签名不同,交易失败并返回
RecipientMismatch。 - 多次认领 (Multiple claims):一个测试用例,用于显示通过构建多个
AirdropClaim Instruction来试图欺骗系统的行为将会失败。这是因为程序的内省逻辑仅查看紧邻前面的Ed25519 Verification Instruction: Instruction 1,因此第二个AirdropClaim Instruction将会失败。
首先从设置测试开始,使其使用本地集群,并为分发者、接收者以及用于负面测试用例的无效分发者账户设置测试账户。
// ...
describe("airdrop", () => {
// Configure the client to use the local cluster
anchor.setProvider(anchor.AnchorProvider.env());
const program = anchor.workspace.Airdrop as Program<Airdrop>;
const provider = anchor.getProvider();
// Test accounts
let distributorKeypair: Keypair;
let recipientKeypair: Keypair;
let invalidDistributorKeypair: Keypair;
before(async () => {
// Generate test keypairs
distributorKeypair = Keypair.generate();
recipientKeypair = Keypair.generate();
invalidDistributorKeypair = Keypair.generate();
});
接下来,我们将添加一个辅助函数来构建 Ed25519 Verification Instruction: Instruction 1。它从接收者和数量构造消息,使用分发者的密钥进行签名,然后使用 Ed25519Program.createInstructionWithPublicKey 返回一个运行时可以验证的 TransactionInstruction。
function createEd25519Instruction(
distributorKeypair: Keypair,
recipientPubkey: PublicKey,
amount: number
): TransactionInstruction {
// Build the message: 32 bytes recipient pubkey + 8 bytes amount
const message = Buffer.alloc(40);
recipientPubkey.toBuffer().copy(message, 0);
message.writeBigUInt64LE(BigInt(amount), 32);
// Sign the message with distributor
const signature = nacl.sign.detached(message, distributorKeypair.secretKey);
// Use the helper to build the instruction
return Ed25519Program.createInstructionWithPublicKey({
publicKey: distributorKeypair.publicKey.toBytes(),
message,
signature,
});
}
我们将在测试用例中重用上述函数来创建 Ed25519 Verification Instruction: Instruction 1。让我们从第一个测试用例开始,这是一个应该成功的有效空投认领。
我们创建两条指令:Ed25519 Verification Instruction: Instruction 1 和 AirdropClaim Instruction: Instruction 2。我们将分发者、接收者和指令 sysvar 账户传递给程序的 claim 函数(如前所述)。然后我们发送交易并确认其成功。如果成功,它会返回一个交易 ID;否则,我们将收到一个错误。
it("Successfully claims airdrop with valid signature", async () => {
const claimAmount = 1000000;
// Create Ed25519 Signature Verification Instruction: Instruction 1
const ed25519Ix = createEd25519Instruction(
distributorKeypair,
recipientKeypair.publicKey,
claimAmount
);
// Create the AirdropClaim Instruction: Instruction 2
const claimIx = await program.methods
.claim()
.accountsPartial({
recipient: recipientKeypair.publicKey,
expectedDistributor: distributorKeypair.publicKey,
instructionSysvar: anchor.web3.SYSVAR_INSTRUCTIONS_PUBKEY,
})
.instruction();
const tx = new Transaction();
tx.add(ed25519Ix); // Add Instruction 1 to the transaction
tx.add(claimIx); // Add Instruction 2 to the transaction
// Just expect the transaction to succeed
expect(await provider.sendAndConfirm(tx, [recipientKeypair])).to.not.be.empty;
});
失败案例将涉及相同的过程,我们只需要添加会导致它们失败的无效数据。因此,下面是带有解释性注释的完整测试代码。
import * as anchor from "@coral-xyz/anchor";
import { Program } from "@coral-xyz/anchor";
import { Airdrop } from "../target/types/airdrop";
import { PublicKey, Keypair, SystemProgram, Transaction, TransactionInstruction, Ed25519Program } from "@solana/web3.js";
import { expect } from "chai";
import * as nacl from "tweetnacl";
describe("airdrop", () => {
// Configure the client to use the local cluster
anchor.setProvider(anchor.AnchorProvider.env());
const program = anchor.workspace.Airdrop as Program<Airdrop>;
const provider = anchor.getProvider();
// Test accounts
let distributorKeypair: Keypair;
let recipientKeypair: Keypair;
let invalidDistributorKeypair: Keypair;
before(async () => {
// Generate test keypairs
distributorKeypair = Keypair.generate();
recipientKeypair = Keypair.generate();
invalidDistributorKeypair = Keypair.generate();
});
function createEd25519Instruction(
distributorKeypair: Keypair,
recipientPubkey: PublicKey,
amount: number
): TransactionInstruction {
// Build the message: 32 bytes recipient pubkey + 8 bytes amount
const message = Buffer.alloc(40);
recipientPubkey.toBuffer().copy(message, 0);
message.writeBigUInt64LE(BigInt(amount), 32);
// Sign the message with distributor
const signature = nacl.sign.detached(message, distributorKeypair.secretKey);
// Use the helper to build the instruction
return Ed25519Program.createInstructionWithPublicKey({
publicKey: distributorKeypair.publicKey.toBytes(),
message,
signature,
});
}
it("Successfully claims airdrop with valid signature", async () => {
const claimAmount = 1000000;
const ed25519Ix = createEd25519Instruction(
distributorKeypair,
recipientKeypair.publicKey,
claimAmount
);
const claimIx = await program.methods
.claim()
.accountsPartial({
recipient: recipientKeypair.publicKey,
expectedDistributor: distributorKeypair.publicKey,
instructionSysvar: anchor.web3.SYSVAR_INSTRUCTIONS_PUBKEY,
})
.instruction();
const tx = new Transaction();
tx.add(ed25519Ix);
tx.add(claimIx); // AirdropClaim Instruction: Instruction 2
// Just expect the transaction to succeed
expect(await provider.sendAndConfirm(tx, [recipientKeypair])).to.not.be.empty;
});
it("Fails when Ed25519 instruction is not first", async () => {
const claimAmount = 1000000;
const claimIx = await program.methods
.claim()
.accountsPartial({
recipient: recipientKeypair.publicKey,
expectedDistributor: distributorKeypair.publicKey,
instructionSysvar: anchor.web3.SYSVAR_INSTRUCTIONS_PUBKEY,
})
.instruction();
const ed25519Ix = createEd25519Instruction(
distributorKeypair,
recipientKeypair.publicKey,
claimAmount
);
// Create transaction with claim first, then Ed25519 (wrong order)
const tx = new Transaction();
tx.add(claimIx);
tx.add(ed25519Ix);
try {
await provider.sendAndConfirm(tx, [recipientKeypair]);
expect.fail("Should have failed with wrong instruction order");
} catch (error) {
expect(error.message).to.include("InvalidInstructionSysvar");
}
});
it("Fails with distributor mismatch", async () => {
const claimAmount = 1000000;
// Create Ed25519 instruction with wrong distributor
const ed25519Ix = createEd25519Instruction(
invalidDistributorKeypair, // Wrong distributor signs
recipientKeypair.publicKey,
claimAmount
);
const claimIx = await program.methods
.claim()
.accountsPartial({
recipient: recipientKeypair.publicKey,
expectedDistributor: distributorKeypair.publicKey, // But we expect the correct one
instructionSysvar: anchor.web3.SYSVAR_INSTRUCTIONS_PUBKEY,
})
.instruction();
const tx = new Transaction();
tx.add(ed25519Ix);
tx.add(claimIx);
try {
await provider.sendAndConfirm(tx, [recipientKeypair]);
expect.fail("Should have failed with distributor mismatch");
} catch (error) {
expect(error.message).to.include("DistributorMismatch");
}
});
it("Fails with recipient mismatch", async () => {
const claimAmount = 1000000;
const wrongRecipient = Keypair.generate();
// Create Ed25519 instruction with wrong recipient in message
const ed25519Ix = createEd25519Instruction(
distributorKeypair,
wrongRecipient.publicKey, // Wrong recipient in signed message
claimAmount
);
const claimIx = await program.methods
.claim()
.accountsPartial({
recipient: recipientKeypair.publicKey,
expectedDistributor: distributorKeypair.publicKey,
instructionSysvar: anchor.web3.SYSVAR_INSTRUCTIONS_PUBKEY,
})
.instruction();
const tx = new Transaction();
tx.add(ed25519Ix);
tx.add(claimIx);
try {
await provider.sendAndConfirm(tx, [recipientKeypair]);
expect.fail("Should have failed with recipient mismatch");
} catch (error) {
expect(error.message).to.include("RecipientMismatch");
}
});
it("Fails when multiple claim instructions try to reuse the same Ed25519 signature", async () => {
const claimAmount = 1000000;
// Create a single Ed25519 instruction
const ed25519Ix = createEd25519Instruction(
distributorKeypair,
recipientKeypair.publicKey,
claimAmount
);
// First claim instruction (valid)
const claimIx1 = await program.methods
.claim()
.accountsPartial({
recipient: recipientKeypair.publicKey,
expectedDistributor: distributorKeypair.publicKey,
instructionSysvar: anchor.web3.SYSVAR_INSTRUCTIONS_PUBKEY,
})
.instruction();
// Second claim instruction (tries to reuse the same Ed25519)
const claimIx2 = await program.methods
.claim()
.accountsPartial({
recipient: recipientKeypair.publicKey,
expectedDistributor: distributorKeypair.publicKey,
instructionSysvar: anchor.web3.SYSVAR_INSTRUCTIONS_PUBKEY,
})
.instruction();
const tx = new Transaction();
tx.add(ed25519Ix);
tx.add(claimIx1);
tx.add(claimIx2);
try {
await provider.sendAndConfirm(tx, [recipientKeypair]);
expect.fail("Should have failed because multiple claims tried to reuse the same signature");
} catch (error) {
// The second claim fails because its immediately preceding instruction
// is not the Ed25519 verification, so the program throws
expect(error.message).to.include("BadEd25519Program");
}
});
});
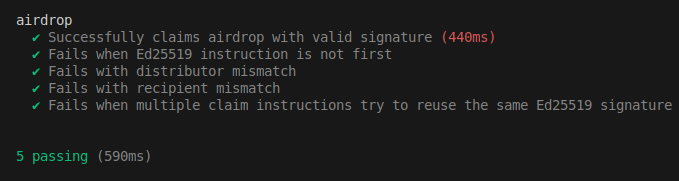
让我们使用以下命令运行测试:
anchor test
结果应如下所示:
到目前为止,我们的实现一直专注于签名验证。请理解,此示例仅用于学习目的,在创建和发送实际交易时,你应该考虑标准的程序安全最佳实践。
曾经发生过因错误的偏移量实现引入漏洞的案例。文章 “Wrong Offset: Bypassing Signature Verification.” 中介绍了一个这样的例子。虽然我们在本文中学到的内容不受该漏洞的影响,但意识到这种潜在风险是很有价值的。
本文是 Solana 教程系列 的一部分。