Instruction introspection एक Solana प्रोग्राम को उसी transaction के भीतर अपने स्वयं के अलावा किसी अन्य instruction को पढ़ने में सक्षम बनाता है।
आम तौर पर, एक प्रोग्राम केवल उसी instruction को पढ़ सकता है जो उसे टारगेट करता है। Solana रनटाइम प्रत्येक instruction को उस प्रोग्राम तक रूट करता है जो instruction में निर्दिष्ट होता है।
एक Solana transaction में कई instructions हो सकते हैं, जिनमें से प्रत्येक एक अलग प्रोग्राम को टारगेट करता है। उदाहरण के लिए, एक ही transaction में प्रोग्राम A को instruction Ax और प्रोग्राम B को instruction Bx प्राप्त हो सकता है। introspection के माध्यम से, प्रोग्राम B दोनों instruction Ax और Bx की सामग्री को पढ़ सकता है।
उदाहरण के लिए, मान लीजिए कि आप यह सुनिश्चित करना चाहते हैं कि आपके DeFi प्रोग्राम के साथ किसी भी इंटरैक्शन से पहले, उसी transaction के भीतर आपकी ट्रेजरी में 0.5 SOL का ट्रांसफर होना चाहिए। आप instructions को introspect करके और पूरी transaction को अस्वीकार करके इस नियम को लागू कर सकते हैं, यदि आपके प्रोग्राम के साथ इंटरैक्ट करने वाले instruction से पहले आवश्यक 0.5 SOL ट्रांसफर instruction शामिल नहीं है।
इस लेख में, हम सीखेंगे कि introspection कैसे काम करता है और इसे अपने Solana प्रोग्राम में कैसे लागू करें।
Transaction और instructions
Instruction introspection पर नज़र डालने से पहले, आइए transactions और instructions की विस्तार से समीक्षा करें।
Solana transaction एक struct है जिसमें दो फ़ील्ड होते हैं: एक मैसेज और वे सिग्नेचर जिन्होंने इसे साइन किया है। मैसेज में क्रमिक रूप से निष्पादित (execute) किए जाने वाले instructions का एक array होता है।
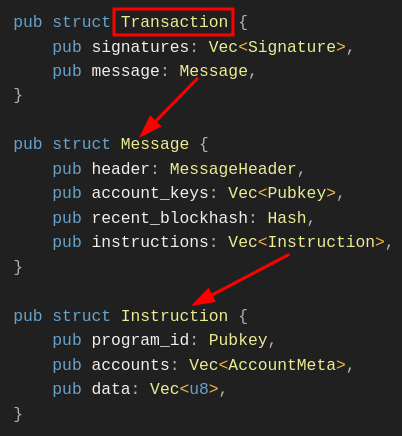
नीचे दिया गया कोड (जो सीधे Solana SDK से आता है) एक transaction का struct प्रतिनिधित्व दिखाता है:
pub struct Transaction {
pub signatures: Vec<Signature>,
pub message: Message,
}
Transaction मैसेज
Transaction मैसेज में instructions की सूची, और उन सभी अकाउंट कुंजियों (account keys) का संघ (union) होता है जिन्हें instructions सामूहिक रूप से एक्सेस करेंगे। इसमें कुछ अतिरिक्त डेटा भी होता है जिसकी रनटाइम को आवश्यकता होती है जैसे कि हालिया ब्लॉक हैश (recent block hash) और मैसेज हेडर।
pub struct Message {
pub instructions: Vec<Instruction>,
pub account_keys: Vec<Address>,
pub recent_blockhash: Hash,
pub header: MessageHeader,
}
यहां प्रत्येक घटक का विस्तृत विवरण दिया गया है:
- Instructions: प्रत्येक instruction एक ऑन-चेन प्रोग्राम के लिए एक कॉल है। एक instruction में तीन घटक होते हैं:
- Program ID: उस प्रोग्राम का एड्रेस जिसमें कॉल किए जा रहे instruction के लिए व्यावसायिक तर्क (business logic) होता है।
- Accounts: transaction account keys में इंडेक्स। इंडेक्स instruction को उन विशिष्ट अकाउंट्स से मैप करते हैं जिन्हें इसे पढ़ने (read) या लिखने (write) की आवश्यकता होती है।
- Instruction data: एक बाइट ऐरे जो यह निर्दिष्ट करता है कि प्रोग्राम पर कौन सा फ़ंक्शन कॉल करना है और instruction के लिए आवश्यक कोई भी आर्गुमेंट।
- Account keys: यह प्रत्येक instructions में सूचीबद्ध सभी अकाउंट्स का संघ (union) है।
- Recent blockhash: एक हालिया ब्लॉक हैश जो transaction को स्लॉट की एक छोटी विंडो से बांधता है और रीप्ले (replay) को रोकता है।
- Message header: यह निर्दिष्ट करता है कि कितने अकाउंट्स ने transaction को साइन किया है, और कौन से अकाउंट्स रीड-ओनली बनाम राइटेबल (writable) हैं।
Instruction struct
नीचे Instruction struct की परिभाषा दी गई है, जो GitHub पर Solana सोर्स कोड से ली गई है:
pub struct Instruction {
/// Pubkey of the program that executes this instruction.
pub program_id: Pubkey,
/// Metadata describing accounts that should be passed to the program.
pub accounts: Vec<AccountMeta>,
/// Opaque data passed to the program for its own interpretation.
pub data: Vec<u8>,
}
pub struct AccountMeta {
/// An account's public key.
pub pubkey: Pubkey,
// True if the instruction requires a signature for this pubkey
/// in the transaction's signatures list.
pub is_signer: bool,
/// True if the account data or metadata may be mutated during program execution.
pub is_writable: bool,
}
एक instruction जिन अकाउंट्स का उपयोग करता है, उनमें से प्रत्येक को AccountMeta प्रकार द्वारा दर्शाया जाता है, जो अकाउंट की पब्लिक की (public key) को साइनर और राइटेबल फ़्लैग्स के साथ स्टोर करता है।
transactions और instructions के बीच संबंध का सारांश
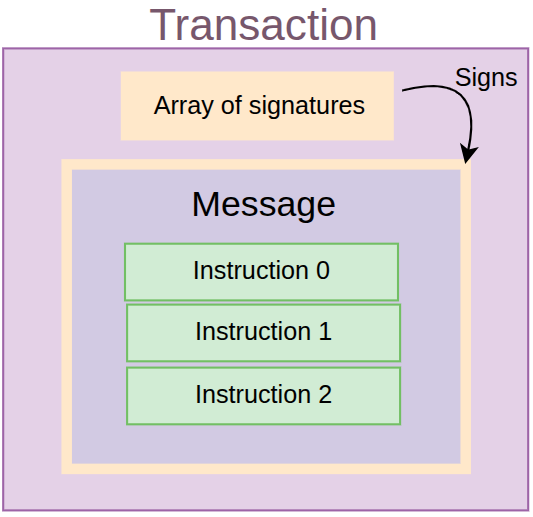
सभी चीज़ों को एक साथ समझने के लिए, नीचे दी गई छवि एक transaction, एक मैसेज और instructions के बीच संबंधों को दर्शाती है।
एक Transaction में सिग्नेचर की एक सूची और एक मैसेज होता है। एक Message में एक हेडर, अकाउंट कुंजियों की सूची, एक हालिया ब्लॉक हैश और instructions की एक सूची होती है। एक Instruction में एक प्रोग्राम आईडी, वे अकाउंट्स जिनका वह उपयोग करता है (यह Message struct में account keys सूची को इंडेक्स करता है), और instruction डेटा होता है।
instruction Sysvar के साथ Instruction introspection
आइए पहले Solana Sysvar अकाउंट की जांच करके चर्चा करें कि introspection कैसे काम करता है।
एक sysvar एक विशेष रीड-ओनली अकाउंट है जिसमें Solana रनटाइम द्वारा बनाए रखा गया गतिशील रूप से अपडेट किया गया डेटा होता है और यह प्रोग्राम्स को आंतरिक नेटवर्क स्थिति (state) उजागर करता है। हम सचमुच इस अकाउंट से डेटा पढ़ रहे हैं — हम किसी प्रोग्राम में CPI नहीं कर रहे हैं।
हमने इस श्रृंखला के पिछले लेख में विभिन्न प्रकार के Sysvars पर चर्चा की है। उनके बारे में अधिक जानने के लिए, “Solana Sysvars Explained” लेख पढ़ें।
Instruction introspection वर्तमान transaction के instructions (program_id, accounts, और data) के सीरियलाइज्ड वेक्टर तक पहुंचने के लिए instruction Sysvar अकाउंट का उपयोग करता है। उदाहरण के लिए, कई instructions वाले transaction में, एक प्रोग्राम केवल वर्तमान instruction ही नहीं, बल्कि किसी भी instruction को पढ़ और विश्लेषित कर सकता है।
यह एनीमेशन एक instruction introspection परिदृश्य दिखाता है जहां, Instruction 1 निष्पादित (execute) होते समय, प्रोग्राम Instruction 2 और Instruction 3 की सामग्री को पढ़ सकता है।
Solana में नियमित अकाउंट्स के विपरीत, instruction Sysvar अकाउंट डेटा को स्थायी रूप से (persist) नहीं रखता है; यह केवल transaction के जीवनकाल के लिए पॉप्युलेट होता है और निष्पादन (execution) पूरा होने के बाद साफ़ हो जाता है।
instruction Sysvar अकाउंट एड्रेस Sysvar1nstructions1111111111111111111111111 है। इसमें वर्तमान transaction के सभी instructions की सीरियलाइज्ड सूची होती है। प्रत्येक प्रविष्टि (entry) में प्रोग्राम आईडी, अकाउंट्स और instruction डेटा शामिल होता है, जैसा कि हमने पहले देखा था। नीचे प्रत्येक डीसीरियलाइज्ड instruction का Rust struct दिया गया है, जिसे पहले से दोहराया गया है:
pub struct Instruction {
/// Pubkey of the program that executes this instruction
pub program_id: Pubkey,
/// Metadata describing accounts that should be passed to the program
pub accounts: Vec<AccountMeta>,
/// Opaque data passed to the program for its own interpretation
pub data: Vec<u8>,
}
Solana Rust SDK instruction sysvar अकाउंट में सीरियलाइज्ड instructions तक पहुंचने के लिए कई हेल्पर फ़ंक्शंस प्रदान करता है। हालाँकि, SDK कोई ऐसा एकल फ़ंक्शन प्रदान नहीं करता है जो सभी instructions लौटाता हो; इसके बजाय, यह केवल ऐसे फ़ंक्शंस प्रदान करता है जो किसी विशिष्ट इंडेक्स पर एकल instruction को डीसीरियलाइज़ करते हैं।
आप अभी भी sysvar अकाउंट में instructions की सूची को मैन्युअल रूप से पढ़ और डीसीरियलाइज़ कर सकते हैं, लेकिन ऐसा करने में त्रुटि (error) होने की संभावना होती है, इसलिए, instructions को डीसीरियलाइज़ करने के लिए SDK का उपयोग करना चाहिए…
यहां दो प्रमुख हेल्पर फ़ंक्शंस दिए गए हैं जो Solana Rust SDK introspection के लिए प्रदान करता है:
load_current_index_checked– प्रोग्राम transaction सूची के भीतर अपने स्वयं के इंडेक्स को जानने के लिए इस हेल्पर फ़ंक्शन का उपयोग कर सकते हैं, फिर उनकी सापेक्ष स्थिति (relative position) के अनुसार कोई अन्य instruction खोज सकते हैं।load_instruction_at_checked– एक विशिष्ट इंडेक्स पर instruction को लोड करता है और इसेInstructionstruct में डीसीरियलाइज़ करता है। एक बार जब आपload_current_index_checkedफ़ंक्शन का उपयोग करके वर्तमान इंडेक्स प्राप्त कर लेते हैं, तो आप इस फ़ंक्शन का उपयोग पहले या बाद के instructions को introspect करने के लिए कर सकते हैं। हम इस लेख के बाद के भाग में देखेंगे कि इसे कैसे करना है।
सबसे पहले, यह समझने के लिए कि ये हेल्पर फ़ंक्शंस कैसे काम करते हैं, आइए instruction sysvar अकाउंट के लेआउट को देखें। इसे तीन क्षेत्रों में व्यवस्थित किया गया है:
- हेडर
- Instructions
- और वर्तमान में निष्पादित हो रहे instruction का इंडेक्स
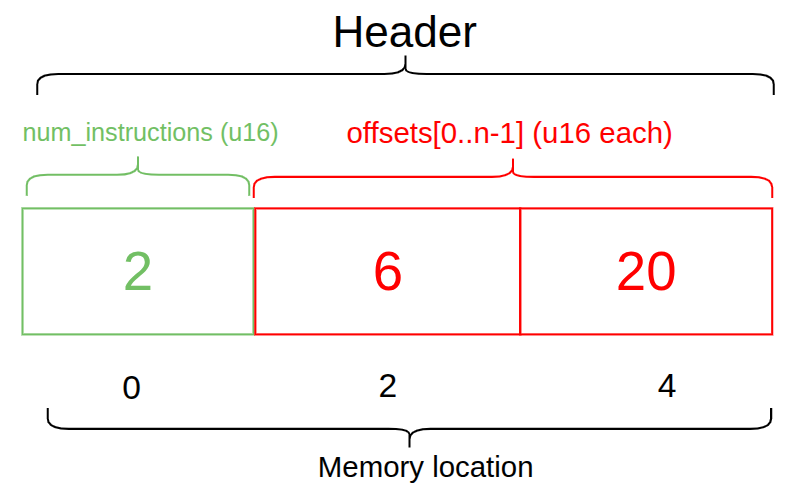
1. हेडर क्षेत्र (The header region)
हेडर transaction में instructions की संख्या और instruction ऑफ़सेट्स को निर्दिष्ट करता है (जो इंगित करते हैं कि instructions कहाँ से शुरू होते हैं)। नीचे दिया गया आरेख 2 instructions वाले transaction के लिए एक हेडर दिखाता है, इसलिए दो ऑफ़सेट हैं: एक मेमोरी लोकेशन 6 से शुरू होता है और दूसरा मेमोरी लोकेशन 20 पर।
2. instruction क्षेत्र (The instruction region)
instruction क्षेत्र ऑफ़सेट द्वारा दर्शाई गई बाइट स्थिति (byte position) से शुरू होता है (नीचे दिए गए आरेख में लाल बॉक्स ऑफ़सेट के लिए केवल एक दृश्य मार्कर है, वास्तविक मेमोरी लोकेशन नहीं)। उस स्थिति से, इसमें अकाउंट मेटाडेटा, प्रोग्राम आईडी, instruction डेटा की लंबाई और अंत में स्वयं instruction डेटा होता है। यदि हमारे पास एक से अधिक instruction हैं, तो यह संरचना प्रत्येक के लिए दोहराई जाती है।

3. वर्तमान में निष्पादित हो रहे instruction का इंडेक्स
और अंत में, वर्तमान में निष्पादित हो रहे instruction का इंडेक्स Sysvar लेआउट के अंत में संग्रहीत किया जाता है।

यदि प्रोग्राम को वर्तमान में निष्पादित हो रहे instruction का इंडेक्स पता है, तो वह इसके सापेक्ष अन्य instructions प्राप्त कर सकता है।
instructions को एक्सेस करना
अब जब हमने देख लिया है कि Sysvar अकाउंट में डेटा कैसे व्यवस्थित किया जाता है, तो आइए एक व्यावहारिक उदाहरण देखें। हम transaction में instructions तक पहुँचने के लिए introspection के लिए दो हेल्पर मेथड्स का उपयोग करेंगे: load_current_index_checked और load_instruction_at_checked। इस लेख के उद्देश्य के लिए, हम एक बेसिक ट्रांसफर transaction का उपयोग करेंगे।
हमारा उदाहरण प्रोग्राम यह सत्यापित करेगा कि एक सिस्टम ट्रांसफर instruction उसके अपने instruction से पहले आता है। transaction तभी सफल होगा जब यह शर्त पूरी होगी।
Transaction:
├── Instruction 0: System Transfer (user pays X lamports)
└── Instruction 1: This program (verifies the payment)
प्रोग्राम सेट अप करना
साथ-साथ अभ्यास करने के लिए, आपके पास एक Solana डेवलपमेंट एन्वायर्नमेंट सेटअप होना चाहिए, यदि आपके पास नहीं है, तो इस श्रृंखला में हमारा पहला लेख पढ़ें।
एक नया Anchor एप्लिकेशन इनिशियलाइज़ करें:
anchor init instruction-introspection
bincode (bincode=1.3.3) को शामिल करने के लिए अपनी निर्भरता (dependency) को program/src/Cargo.toml में अपडेट करें। हम सिस्टम instruction को डीसीरियलाइज़ करने के लिए bincode लाइब्रेरी का उपयोग करेंगे:
//... rest of toml file content
[dependencies]
anchor-lang = "0.31.1"
**bincode = "1.3.3" # add this**
हम इस प्रोजेक्ट के लिए Devnet का उपयोग करेंगे। अपनी रूट डायरेक्टरी में एक .env फ़ाइल बनाएँ और नीचे दिए गए प्रोवाइडर और वॉलेट एक्सपोर्ट्स को जोड़ें:
export ANCHOR_PROVIDER_URL=https://api.devnet.solana.com
export ANCHOR_WALLET=~/.config/solana/id.json
devnet प्रोवाइडर और वॉलेट का उपयोग करने के लिए Anchor.toml फ़ाइल को भी अपडेट करें।
[provider]
cluster = "https://api.devnet.solana.com"
wallet = "~/.config/solana/id.json"
साथ ही, क्योंकि आपको Devnet पर फीस का भुगतान करने के लिए कुछ SOL की आवश्यकता होगी, 2 SOL प्राप्त करने के लिए solana airdrop 2 चलाएँ जो इस उदाहरण के लिए पर्याप्त से अधिक होगा।
Imports
अब, हम उन Anchor निर्भरताओं (dependencies) को आयात (import) करेंगे जिनका उपयोग हम इस उदाहरण के लिए program/src/lib.rs फ़ाइल में कोड को बदलने के लिए करेंगे। महत्वपूर्ण रूप से, हम sysvar::instructions से load_instruction_at_checked और load_current_index_checked आयात करते हैं:
use anchor_lang::prelude::*;
use anchor_lang::solana_program::{
system_program,
sysvar::instructions::{
load_instruction_at_checked,
load_current_index_checked
},
system_instruction::SystemInstruction,
};
और फिर हम प्रोग्राम ID घोषित करेंगे और एक verify_transfer फ़ंक्शन जोड़ेंगे, जो:
- वर्तमान में निष्पादित हो रहे transaction की स्थिति को समझने के लिए वर्तमान instruction इंडेक्स प्राप्त करेगा।
- ऑन-चेन Solana Rust SDK का उपयोग करके sysvar अकाउंट में instructions की सूची को डीसीरियलाइज़ करके पिछले instruction को लोड करेगा।
- यह जाँच कर कि प्रोग्राम ID सिस्टम प्रोग्राम से मेल खाता है, यह सत्यापित करेगा कि लोड किया गया instruction एक सिस्टम ट्रांसफर instruction है, फिर यह पुष्टि करने के लिए instruction डेटा को पार्स करेगा कि ट्रांसफर राशि अपेक्षित राशि (expected amount) से मेल खाती है।
- सत्यापित करेगा कि instruction में शामिल अकाउंट्स की संख्या 2 है।
- और अंत में, हम sysvar अकाउंट के लिए struct को परिभाषित करेंगे।
नीचे पूरा कोड देखें। हमने ऊपर सूचीबद्ध चरणों को एनोटेट करने के लिए कमेंट्स जोड़े हैं:
use anchor_lang::prelude::*;
use anchor_lang::solana_program::{
system_program,
sysvar::instructions::{load_instruction_at_checked, load_current_index_checked},
system_instruction::SystemInstruction,
};
declare_id!("BxQuawTcvJkT2JM1qKeW6wyM4i5VCuM122v9tVsSrmwm");
#[program]
pub mod check_transfer {
use super::*;
pub fn verify_transfer(ctx: Context<VerifyTransfer>, expected_amount: u64) -> Result<()> {
// Step 1: Get current instruction index to understand our position
**let current_ix_index = load_current_index_checked(&ctx.accounts.instruction_sysvar)?;**
msg!("Currently executing instruction index: {}", current_ix_index);
// Step 2: Load the previous instruction
let transfer_ix = load_instruction_at_checked(
(current_ix_index - 1) as usize,
&ctx.accounts.instruction_sysvar
).map_err(|_| error!(ErrorCode::MissingInstruction))?;
// Step 3: Verify it's a system program instruction
require_keys_eq!(transfer_ix.program_id, system_program::ID, ErrorCode::NotSystemProgram);
// Step 4: Parse the system instruction data
let system_ix = bincode::deserialize(&transfer_ix.data)
.map_err(|_| error!(ErrorCode::InvalidInstructionData))?;
match system_ix {
SystemInstruction::Transfer { lamports } => {
require_eq!(lamports, expected_amount, ErrorCode::IncorrectAmount);
msg!("✅ Verified transfer of {} lamports", lamports);
}
_ => return Err(error!(ErrorCode::NotTransferInstruction)),
}
// Step 5: Verify accounts involved in the transfer
require_gte!(transfer_ix.accounts.len(), 2, ErrorCode::InsufficientAccounts);
let from_account = &transfer_ix.accounts[0];
let to_account = &transfer_ix.accounts[1];
require!(from_account.is_signer, ErrorCode::FromAccountNotSigner);
require!(from_account.is_writable, ErrorCode::FromAccountNotWritable);
require!(to_account.is_writable, ErrorCode::ToAccountNotWritable);
msg!("✅ Transfer accounts properly configured");
msg!("From: {}", from_account.pubkey);
msg!("To: {}", to_account.pubkey);
Ok(())
}
}
#[derive(Accounts)]
pub struct VerifyTransfer<'info> {
/// CHECK: This is the instruction sysvar account
#[account(address = anchor_lang::solana_program::sysvar::instructions::ID)]
pub instruction_sysvar: AccountInfo<'info>,
}
यहाँ वे error codes दिए गए हैं जिनका हमने उपयोग किया है, आपको इन्हें उसी फ़ाइल में जोड़ना चाहिए:
#[error_code]
pub enum ErrorCode {
/// Thrown when attempting to load an instruction at an index that doesn't exist
/// in the transaction (e.g., trying to access index -1 when current is 0)
#[msg("Missing required instruction in transaction")]
MissingInstruction,
/// Thrown when the previous instruction's program_id doesn't match the System Program
/// Ensures we're only validating actual system program instructions
#[msg("Instruction is not from System Program")]
NotSystemProgram,
/// Thrown when bincode fails to deserialize the instruction data into SystemInstruction
/// Indicates malformed or corrupted instruction data
#[msg("Invalid instruction data format")]
InvalidInstructionData,
/// Thrown when the SystemInstruction variant is not Transfer
/// (e.g., it's CreateAccount, Allocate, or another system instruction type)
#[msg("Instruction is not a transfer")]
NotTransferInstruction,
/// Thrown when the actual lamports amount in the transfer doesn't equal expected_amount
/// Protects against front-running or incorrect payment amounts
#[msg("Transfer amount does not match expected amount")]
IncorrectAmount,
/// Thrown when the transfer instruction has fewer than 2 accounts
/// A valid transfer requires at least [from, to] accounts
#[msg("Transfer instruction has insufficient accounts")]
InsufficientAccounts,
/// Thrown when the 'from' account in the transfer didn't sign the transaction
/// Prevents unauthorized transfers
#[msg("From account is not a signer")]
FromAccountNotSigner,
/// Thrown when the 'from' account is not marked as writable
/// Required because the account balance will be debited
#[msg("From account is not writable")]
FromAccountNotWritable,
/// Thrown when the 'to' account is not marked as writable
/// Required because the account balance will be credited
#[msg("To account is not writable")]
ToAccountNotWritable,
}
उपरोक्त कोड में, हमने अपना वर्तमान instruction इंडेक्स प्राप्त किया, निरीक्षण (inspection) के लिए पिछले instruction को लोड करने के लिए ID का उपयोग किया। हम वर्तमान इंडेक्स में से 1 घटाकर इसे लोड करने में सक्षम हैं क्योंकि instructions एक क्रमिक (sequential) क्रम में हैं।
अब, आइए प्रोग्राम को बिल्ड करें, डिप्लॉय करें और JavaScript का उपयोग करके इसके साथ इंटरैक्ट करें।
प्रोजेक्ट को बिल्ड और डिप्लॉय करने के लिए anchor build && anchor deploy चलाएँ। आपको यह दिखाने के लिए इस तरह का आउटपुट देखना चाहिए कि इसे सफलतापूर्वक डिप्लॉय किया गया था:

Typescript का उपयोग करके प्रोग्राम कोड के साथ इंटरैक्ट करना
हमारे प्रोग्राम के साथ एक एड्रेस पर 1 SOL ट्रांसफर करने के लिए एक सरल Typescript स्क्रिप्ट बनाएँ।
Typescript फ़ाइलों को सीधे चलाने के लिए, आप bun.js का उपयोग करेंगे। यदि आपने इसे पहले से इंस्टॉल नहीं किया है, तो आप अपने टर्मिनल पर curl -fsSL [https://bun.sh/install](https://bun.sh/install) | bash चलाकर इसे इंस्टॉल कर सकते हैं।
एक scripts/ फ़ोल्डर बनाएँ, एक introspect.ts फ़ाइल जोड़ें, और नीचे दिए गए कोड को उसमें पेस्ट करें। मैंने कोड में विचारों के प्रवाह को समझने में आपकी मदद करने के लिए कमेंट्स जोड़े हैं।
import * as anchor from "@coral-xyz/anchor";
import { Program } from "@coral-xyz/anchor";
import { SystemProgram, SYSVAR_INSTRUCTIONS_PUBKEY, Transaction, Keypair } from "@solana/web3.js";
import { CheckTransfer } from "../target/types/check_transfer";
async function main() {
console.log("🚀 Starting verification script...");
// --- Setup Connection and Program ---
// Configure the client to use the local cluster.
const provider = anchor.AnchorProvider.env();
anchor.setProvider(provider);
// Load the Anchor program from the workspace.
const program = anchor.workspace.CheckTransfer as Program<CheckTransfer>;
// --- Prepare Accounts and Data ---
// The 'payer' is the wallet that signs and pays for the transaction.
const payer = provider.wallet.publicKey;
// A new, random keypair to act as the recipient.
const recipient = Keypair.generate().publicKey;
// Define the transfer amount using anchor.BN for u64 safety.
const transferAmount = new anchor.BN(1_000_000_000); // 1 SOL
console.log(`- Payer: ${payer}`);
console.log(`- Recipient: ${recipient}`);
console.log(`- Amount: ${transferAmount.toString()} lamports`);
// --- Build the Transaction ---
// A transaction is a container for one or more instructions.
const tx = new Transaction();
// Instruction 0: The System Program Transfer.
// This must immediately precede our program's instruction.
tx.add(
SystemProgram.transfer({
fromPubkey: payer,
toPubkey: recipient,
lamports: transferAmount.toNumber(), // Safe for 1 SOL
})
);
// Instruction 1: Our program's verification instruction.
tx.add(
await program.methods
.verifyTransfer(transferAmount)
.accounts({
instructionSysvar: SYSVAR_INSTRUCTIONS_PUBKEY,
})
.instruction()
);
// --- Send Transaction and Verify Outcome ---
try {
const sig = await provider.sendAndConfirm(tx);
console.log("\n✅ Transaction confirmed!");
console.log(`Signature: ${sig}`);
// Fetch the transaction details to inspect the logs.
const txInfo = await provider.connection.getTransaction(sig, {
commitment: "confirmed",
maxSupportedTransactionVersion: 0,
});
console.log("\n📄 Program Logs:");
console.log(txInfo?.meta?.logMessages?.join("\n"));
// Check for the success message in the logs.
const logs = txInfo?.meta?.logMessages;
if (!logs || !logs.some(log => log.includes(`Verified transfer of ${transferAmount} lamports`))) {
throw new Error("Verification log message not found!");
}
console.log("\n✅ Verification successful!");
} catch (error) {
console.error("\n❌ Transaction failed!");
console.error(error);
process.exit(1); // Exit with a non-zero error code
}
}
// --- Script Entrypoint ---
main().then(
() => process.exit(0),
err => {
console.error(err);
process.exit(1);
}
);
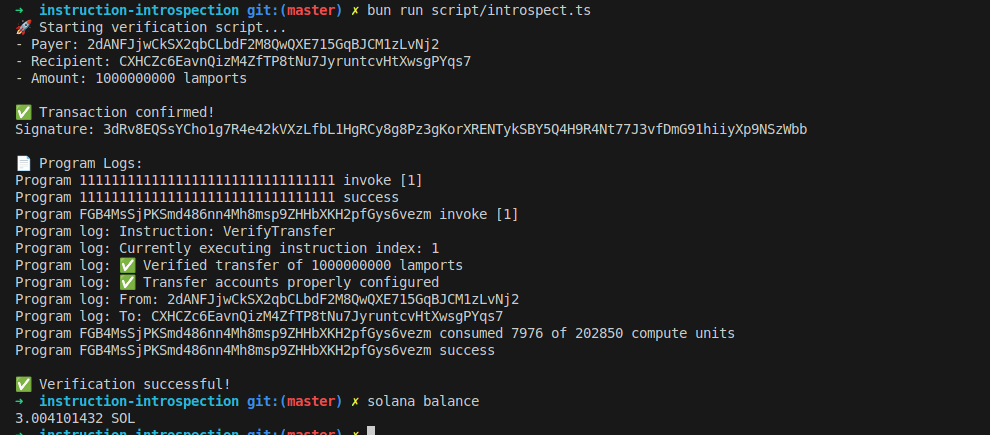
जब हम क्लाइंट कोड को bun run script/introspect.ts के साथ चलाते हैं, तो हमें देखना चाहिए कि यह इस तरह के आउटपुट के साथ काम करता है:
Instruction introspection के लिए सावधानी: निरीक्षण (inspection) के दौरान absolute इंडेक्स का उपयोग करने से बचें
sysvar अकाउंट से 0 जैसे absolute इंडेक्स से एक instruction लोड करने से एक हमलावर (attacker) कई कॉल्स में उस instruction का पुन: उपयोग कर सकता है।
उदाहरण के लिए, यदि आपके प्रोग्राम को एक ही transaction में विथड्रा (withdraw) करने से पहले उपयोगकर्ता को आपकी ट्रेजरी में फंड ट्रांसफर करने की आवश्यकता होती है, तो एक absolute इंडेक्स का उपयोग करने से एक हमलावर इंडेक्स 0 पर एक सिंगल ट्रांसफर कर सकता है और फिर कई विथड्रॉल (withdrawals) कर सकता है जो सभी उसी ट्रांसफर के खिलाफ वैलिडेट (validate) होते हैं।
इसके बजाय, रिलेटिव (relative) instruction इंडेक्सिंग का उपयोग करें ताकि यह सुनिश्चित हो सके कि ट्रांसफर विथड्रॉल instruction से ठीक पहले होता है जैसा कि हमने पहले अपने उदाहरण में दिखाया था।
let transfer_ix = load_instruction_at_checked(
(current_ix_index - 1) as usize,
&ctx.accounts.instruction_sysvar
)
यह सुनिश्चित करता है कि निरीक्षण (inspected) किया गया instruction वर्तमान विथड्रॉल के लिए सही ट्रांसफर है, न कि transaction में पहले से पुन: उपयोग किया गया ट्रांसफर।
यह लेख Solana पर ट्यूटोरियल श्रृंखला का हिस्सा है।