我们在上一篇教程中介绍了 Metaplex 元数据标准。在本教程中,我们将创建一个 SPL 代币,并使用 Metaplex 标准为其附加元数据。
我们将构建一个 Anchor 程序,使用 Metaplex 标准创建附带元数据的 SPL 代币。这使我们能够向代币中添加信息,如名称、符号、图像和其他属性。
在开始构建之前,让我们先了解一下规定代币元数据结构的 Metaplex 标准。
Metaplex 代币标准与 URI 格式
在为代币创建元数据时,我们需要遵循 Metaplex 定义的特定 JSON 格式。其结构取决于我们创建的代币类型(NFT、同质化代币等)。
主要有三种标准:
同质化标准(元数据账户 token_standard = 2)
这是带有元数据的常规 SPL 代币。这也是我们将在本文后面创建的示例。
其元数据 JSON 结构(schema)定义如下:
{
"name": "Example Token",
"symbol": "EXT",
"description": "A basic fungible SPL token with minimal metadata.",
"image": "https://example.com/images/ext-logo.png"
}
同质化资产标准(token_standard = 1)
这类似于以太坊上的 ERC-1155,用于游戏内货币或物品。它被定义为供应量大于 1 但精度为 0(即没有小数单位)的同质化 SPL 代币。
其 JSON 结构包含一些额外字段,例如 attributes:
{
"name": "Game Sword",
"description": "A rare in-game sword used in the battle arena.",
"image": "https://example.com/images/sword.png",
"animation_url": "https://example.com/animations/sword-spin.mp4",
"external_url": "https://game.example.com/item/1234",
"attributes": [
{ "trait_type": "Damage", "value": "12" },
{ "trait_type": "Durability", "value": "50" }
],
"properties": {
"files": [
{
"uri": "https://example.com/images/sword.png",
"type": "image/png"
}
],
"category": "image"
}
}
非同质化标准(token_standard = 0)
这类似于以太坊上的 ERC-721——代表非同质化代币(NFT)。不过,在 Solana 上,每个 NFT 都是一个独立的铸造(mint),供应量为 1 且精度为 0;而在以太坊上,ERC-721 在单个合约内使用唯一的代币 ID。
非同质化标准的 JSON 结构与上述同质化资产标准完全相同。这两个标准使用完全一致的元数据结构——区别仅在链上(供应量和精度),而不在 JSON 格式中。
{
"name": "Rare Art Piece",
"description": "A one-of-one digital artwork by Artist X.",
"image": "https://example.com/images/artwork.png",
"animation_url": "https://example.com/animations/artwork-loop.mp4",
"external_url": "https://artistx.example.com/rare-art-piece",
"attributes": [
{ "trait_type": "Artist", "value": "Artist X" },
{ "trait_type": "Year", "value": "2025" }
],
"properties": {
"files": [
{
"uri": "https://example.com/images/artwork.png",
"type": "image/png"
}
],
"category": "image"
}
}
注意:在以太坊上,一个 NFT 集合(collection)通常存在于单个合约中,该合约铸造并管理许多 NFT。而在 Solana 上,每个 NFT 都有自己的铸造账户,集合是通过 Metaplex 元数据中经过验证的链上链接(我们在上一篇教程中介绍的 collection 字段)形成的,而不是通过单个合约。
既然我们已经了解了这些标准,接下来让我们构建用于创建带元数据的同质化代币程序。
实现同质化标准代币
这是我们将要完成的目标:
- 我们将创建一个包含为 SPL 代币附加元数据函数的 Anchor 程序
- 创建一个 SPL 代币(mint 账户)
- 通过 CPI 调用 Metaplex Token Metadata Program 来创建一个元数据账户并将其链接到代币
- 将代币的 URI 及其内容(如代币图像)存储在永久存储中,代币的元数据账户将引用该存储
项目设置
首先,使用 anchor init spl_with_metadata 创建一个新的 Anchor 项目。
然后,将 Anchor.toml 文件更新为以下内容以正确配置我们的项目。我们会将 cluster 设置为 ‘devnet’,因为我们需要与实际的 Metaplex Token Metadata Program 进行交互,而本地环境中不存在该程序。我们还将添加处理 SPL 代币和元数据所需的依赖项:
[toolchain]
package_manager = "yarn"
[features]
resolution = true
skip-lint = false
[programs.localnet]
spl_token_with_metadata = "ApCjqNHgvuvsiQYpX4kGCxXTipcWJUe7NmnNfq3UKrwD"
[registry]
url = "https://api.apr.dev"
[provider]
cluster = "devnet" # added this
wallet = "~/.config/solana/id.json"
[scripts]
test = "yarn run ts-mocha -p ./tsconfig.json -t 1000000 tests/**/*.ts"
接下来,更新 programs/spl_token_with_metadata/Cargo.toml 文件。
[package]
name = "spl_token_with_metadata"
version = "0.1.0"
description = "Created with Anchor"
edition = "2021"
[lib]
crate-type = ["cdylib", "lib"]
name = "spl_token_with_metadata"
[features]
default = []
cpi = ["no-entrypoint"]
no-entrypoint = []
no-idl = []
no-log-ix-name = []
idl-build = ["anchor-lang/idl-build", "anchor-spl/idl-build"] # added "anchor-spl/idl-build"
[dependencies]
anchor-lang = "0.31.0"
anchor-spl = { version = "0.31.0", features = ["token"] } # added this
mpl-token-metadata = "5.1.0" # added this
我们将项目配置为使用 Anchor SPL 和 Metaplex Token Metadata 的 crate。
我们添加这些依赖项有特定目的:
anchor-spl:为 Solana 的 SPL 代币程序提供兼容 Anchor 的接口mpl-token-metadata:允许我们与 Metaplex 的 Token Metadata Program 交互,从而为我们的 SPL 代币创建和管理元数据
我们在 Cargo.toml 中添加了 idl-build = ["anchor-spl/idl-build"] 特性(feature),以便生成包含 SPL 代币类型的 IDL 文件,从而让我们的 TypeScript 客户端能够正确地与程序交互。
添加 Anchor 程序代码
现在使用以下代码更新 Anchor 程序。
在这里,我们定义了一个 create_token_metadata 函数,用于将元数据附加到提供的 SPL 代币上。随着进度推进,我们将详细解释这些代码。
// Import the necessary dependencies for out program: Anchor, Anchor SPL and Metaplex Token Metadata crate
use anchor_lang::prelude::*;
use anchor_spl::token::Mint;
use mpl_token_metadata::instructions::{
CreateMetadataAccountV3Cpi, CreateMetadataAccountV3CpiAccounts,
CreateMetadataAccountV3InstructionArgs,
};
use mpl_token_metadata::types::{Creator, DataV2};
use mpl_token_metadata::ID as METADATA_PROGRAM_ID;
declare_id!("2SZvgGtgotJFy1aKd4Rnm7UEZNxUdP4sdXbeLDgKDiGM"); // run Anchor sync to update your program ID
#[program]
pub mod spl_token_with_metadata {
use super::*;
pub fn create_token_metadata(
ctx: Context<CreateTokenMetadata>,
name: String,
symbol: String,
uri: String,
seller_fee_basis_points: u16,
is_mutable: bool,
) -> Result<()> {
// Create metadata instruction arguments using the Fungible Standard format
// This follows the token_standard = 2 format we discussed earlier
let data = DataV2 {
name,
symbol,
uri, // Points to JSON with name, symbol, description, and image
seller_fee_basis_points,
creators: Some(vec![Creator {
address: ctx.accounts.payer.key(),
verified: true,
share: 100,
}]),
collection: None,
uses: None,
};
// Find the metadata account address (PDA)
let mint_key = ctx.accounts.mint.key();
let seeds = &[
b"metadata".as_ref(),
METADATA_PROGRAM_ID.as_ref(),
mint_key.as_ref(),
];
let (metadata_pda, _) = Pubkey::find_program_address(seeds, &METADATA_PROGRAM_ID);
// Ensure the provided metadata account matches the PDA
require!(
metadata_pda == ctx.accounts.metadata.key(),
MetaplexError::InvalidMetadataAccount
);
// Create and execute the CPI to create metadata
let token_metadata_program_info = ctx.accounts.token_metadata_program.to_account_info();
let metadata_info = ctx.accounts.metadata.to_account_info();
let mint_info = ctx.accounts.mint.to_account_info();
let authority_info = ctx.accounts.authority.to_account_info();
let payer_info = ctx.accounts.payer.to_account_info();
let system_program_info = ctx.accounts.system_program.to_account_info();
let rent_info = ctx.accounts.rent.to_account_info();
let cpi = CreateMetadataAccountV3Cpi::new(
&token_metadata_program_info,
CreateMetadataAccountV3CpiAccounts {
metadata: &metadata_info,
mint: &mint_info,
mint_authority: &authority_info,
payer: &payer_info,
update_authority: (&authority_info, true),
system_program: &system_program_info,
rent: Some(&rent_info),
},
CreateMetadataAccountV3InstructionArgs {
data,
is_mutable,
collection_details: None,
},
);
cpi.invoke()?;
Ok(())
}
}
我们导入了程序所需的依赖项:用于代币操作的 anchor_spl crate 中的 SPL 代币实用工具,以及用于创建和构建元数据账户的 mpl_token_metadata crate 中的 Metaplex 代币元数据组件。
create_token_metadata 函数用于将元数据附加到 SPL 代币的 mint 上。稍后我们会在测试中通过调用一个新创建的 mint 地址来演示这一点。
解释 create_token_metadata 函数
让我们逐步了解 create_token_metadata 函数,从最重要的部分开始:
定义元数据结构
首先,我们使用从 mpl_token_metadata::types(Metaplex Metadata crate)导入的 DataV2 结构体类型来定义元数据账户的内容。
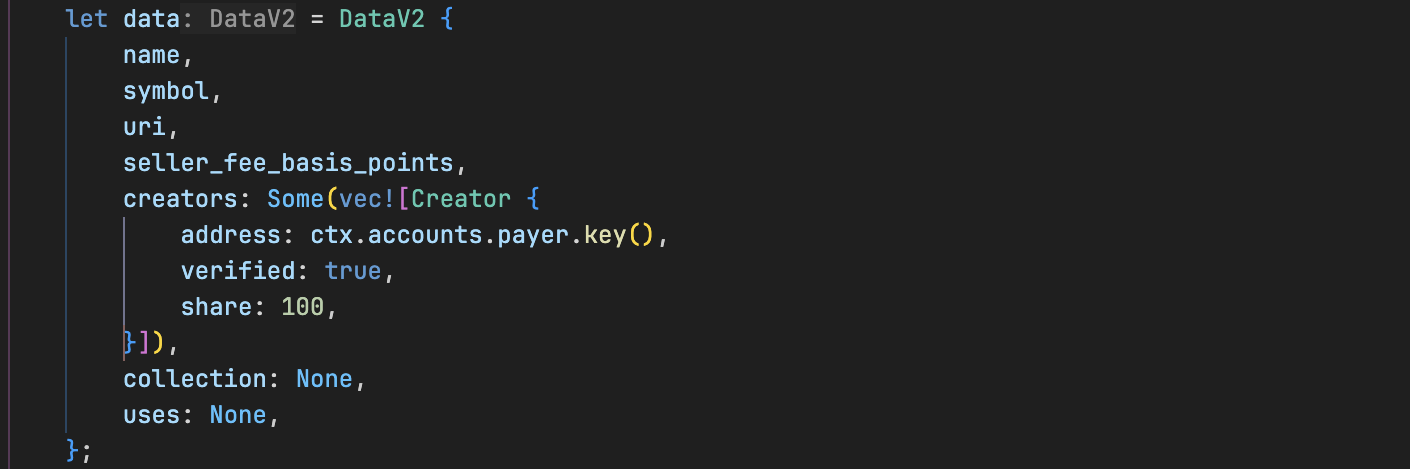
此结构体保存我们元数据账户的数据,并在 Metaplex 构建元数据账户时被使用。
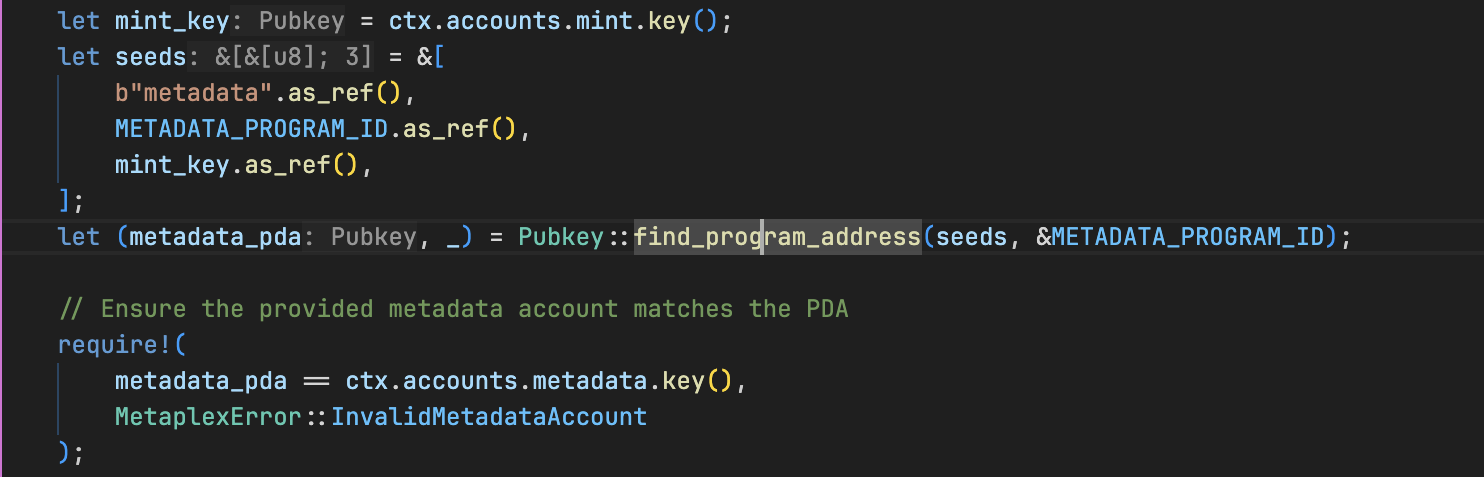
验证元数据账户
接下来,我们进行检查以确保为代币(mint)传入了正确的元数据账户。
通过 CPI 创建元数据账户
最后,我们构建并执行一个通过 CPI 发送给 Metaplex Token Metadata Program 的 CreateMetadataAccountV3 指令(我们在上一篇文章中讨论过这个)。
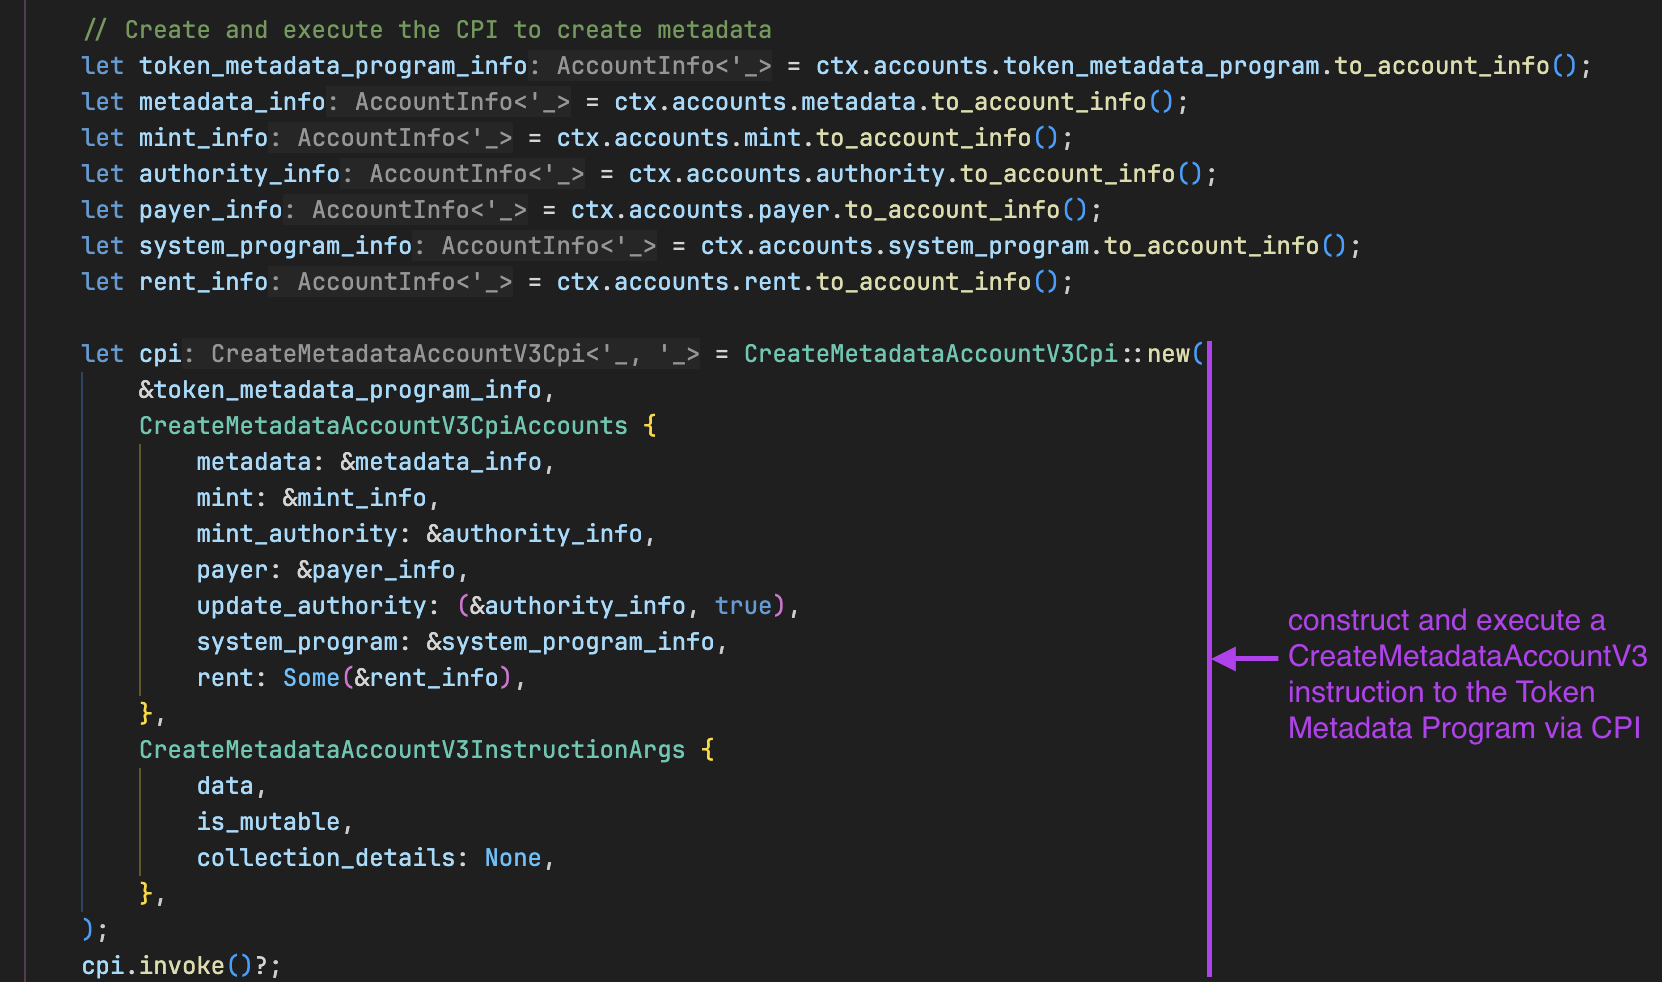
从上图中可以看出,我们将几个账户传递给了 CreateMetadataAccountV3Cpi。这些是创建元数据所需的账户。传递的这些账户在下面的上下文(context)结构体中定义,我们将在那里解释每个账户的来源和用途。
现在,让我们来看看 create_token_metadata 函数的上下文结构体,它包含 CreateMetadataAccountV3Cpi CPI 调用所需的账户:
下面的 CreateTokenMetadata 账户结构体包括:
metadata:将由 Metaplex Token Metadata Program 创建的元数据 PDAmint:一个现有的 SPL 代币 mint 账户,我们将为其附加元数据。我们将在测试程序时创建并传递它authority:用于授权此交易的 mint authority(铸造权限)payer:支付交易费用和租金(rent)的钱包账户system_program:用于创建新账户的 Solana System Programrent:用于计算租金豁免的 Solana Rent sysvar(系统变量)token_metadata_program:链上的 Metaplex Token Metadata Program(其固定地址在我们的代码中定义为METADATA_PROGRAM_ID)
我们还定义了一个自定义错误 MetaplexError 来处理验证失败。将此代码添加到程序代码中。
#[derive(Accounts)]
pub struct CreateTokenMetadata<'info> {
/// CHECK: metadata PDA (will be created by the Metaplex Token Metadata program via CPI in the create_token_metadata function)
#[account(mut)]
pub metadata: AccountInfo<'info>,
// The mint account of the token
#[account(mut)]
pub mint: Account<'info, Mint>,
// The mint authority of the token
pub authority: Signer<'info>,
// The account paying for the transaction
#[account(mut)]
pub payer: Signer<'info>,
// Onchain programs our code depends on
pub system_program: Program<'info, System>,
pub rent: Sysvar<'info, Rent>,
/// CHECK: This is the Metaplex Token Metadata program
#[account(address = METADATA_PROGRAM_ID)]
// constraint to ensure the right account is passed
pub token_metadata_program: AccountInfo<'info>,
}
#[error_code]
pub enum MetaplexError {
#[msg("The provided metadata account does not match the PDA for this mint")]
InvalidMetadataAccount,
}
让我们为程序实现相应的测试。
测试我们的程序
了解 Irys
Irys(前身为 Bundlr)是一个可以轻松将数据上传到 Arweave(一个永久性去中心化存储)的服务。在我们的测试中,我们将使用 Irys 将代币的图像和元数据 JSON 上传到永久存储。
关于 Irys 的关键点:
- 它已经通过
irysStorage模块包含在@metaplex-foundation/js包中,因此安装@metaplex-foundation/js后无需安装额外的依赖项。您只需直接导入即可。 - 它使用我们现有的 Solana 钱包进行支付,因此不需要单独创建账户。
- 在 devnet 环境中,使用您钱包中的 devnet SOL 支付上传费用(稍后我们将通过空投请求 devnet SOL)。
现在使用以下代码更新 tests/spl_token_with_metadata.ts 中的程序测试。
该测试执行以下操作:
- 将 Metaplex Token Metadata Program ID 定义为常量(用于 PDA 派生和 CPI 调用)
- 使用生成的密钥对账户创建一个 SPL 代币
- 将 Metaplex 与 Irys 配置,把本地存储的图像上传到 Arweave devnet,并返回所上传图像的 URI
- 在测试中创建 JSON 元数据(包含名称、符号、描述和图像 URI)并上传到 Arweave
- 使用 ‘metadata’ 前缀、元数据程序 ID 和 mint 地址作为种子派生元数据 PDA
- 调用我们 Anchor 程序中的
create_token_metadata - 最后,它会验证元数据账户是否存在并且具有正确的所有者
代码中添加了注释来展示每个步骤。
import * as anchor from "@coral-xyz/anchor";
import { Program } from "@coral-xyz/anchor";
import {
Metaplex,
irysStorage,
keypairIdentity,
toMetaplexFile,
} from "@metaplex-foundation/js";
import { createMint } from "@solana/spl-token";
import { Keypair, PublicKey, SystemProgram } from "@solana/web3.js";
import { assert } from "chai";
import { readFileSync } from "fs";
import path from "path";
import { SplTokenWithMetadata } from "../target/types/spl_token_with_metadata";
describe("spl_token_with_metadata", () => {
const provider = anchor.AnchorProvider.env();
anchor.setProvider(provider);
const program = anchor.workspace
.splTokenWithMetadata as Program<SplTokenWithMetadata>;
const wallet = provider.wallet as anchor.Wallet;
const TOKEN_METADATA_PROGRAM_ID = new PublicKey(
"metaqbxxUerdq28cj1RbAWkYQm3ybzjb6a8bt518x1s"
);
// configure Metaplex with Irys (formerly Bundlr)
const metaplex = Metaplex.make(provider.connection)
.use(keypairIdentity(wallet.payer))
.use(
irysStorage({
address: "https://devnet.irys.xyz", // Irys endpoint
providerUrl: provider.connection.rpcEndpoint,
timeout: 60_000,
})
);
it("creates token with metadata", async () => {
// Create the mint
const mintKeypair = Keypair.generate();
await createMint(
provider.connection,
wallet.payer,
wallet.publicKey,
wallet.publicKey,
9,
mintKeypair
);
const mintPubkey = mintKeypair.publicKey;
console.log("Mint Pubkey:", mintPubkey.toBase58());
// Read & convert our image into a MetaplexFile
const imageBuffer = readFileSync(
path.resolve(__dirname, "../assets/image/kitten.png")
);
const metaplexFile = toMetaplexFile(imageBuffer, "kitten.png");
// Upload image, get arweave URI string
const arweaveImageUri: string = await metaplex.storage().upload(metaplexFile);
const imageTxId = arweaveImageUri.split("/").pop()!;
const imageUri = `https://devnet.irys.xyz/${imageTxId}`;
console.log("Devnet Irys image URL:", imageUri); // using Irys devnet gateway because Arweave public gateway has no devnet
// Build our JSON metadata object following the Fungible Standard format
// This matches the token_standard = 2 format we explained earlier
const metadata = {
name: "Test Token",
symbol: "TEST",
description: "Test token with metadata example",
image: imageUri,
};
// Upload JSON, get arweave URI string
const arweaveMetadataUri: string = await metaplex
.storage()
.uploadJson(metadata);
const metadataTxId = arweaveMetadataUri.split("/").pop()!;
const metadataUri = `https://devnet.irys.xyz/${metadataTxId}`;
console.log("Devnet Irys metadata URL:", metadataUri); // using Irys devnet gateway because Arweave public gateway has no devnet
// Derive on-chain metadata PDA
const [metadataPda] = PublicKey.findProgramAddressSync(
[
Buffer.from("metadata"),
TOKEN_METADATA_PROGRAM_ID.toBuffer(),
mintPubkey.toBuffer(),
],
TOKEN_METADATA_PROGRAM_ID
);
console.log("Metadata PDA:", metadataPda.toBase58());
// Call the create_token_metadata function
const tx = await program.methods
.createTokenMetadata(
metadata.name,
metadata.symbol,
metadataUri,
100, // 1%
true // isMutable
)
.accounts({
metadata: metadataPda,
mint: mintPubkey,
authority: wallet.publicKey,
payer: wallet.publicKey,
systemProgram: SystemProgram.programId,
rent: anchor.web3.SYSVAR_RENT_PUBKEY,
tokenMetadataProgram: TOKEN_METADATA_PROGRAM_ID,
})
.rpc();
console.log("Transaction signature:", tx);
// Assert the account exists & is owned by the Metadata program
const info = await provider.connection.getAccountInfo(metadataPda);
assert(info !== null, "Metadata account must exist");
assert(
info.owner.equals(TOKEN_METADATA_PROGRAM_ID),
"Wrong owner for metadata account"
);
});
});
现在我们已经准备好了测试,在工作区中创建一个 assets/image 目录,放置我们将用作代币图像的图片。该图像将在我们的测试中被 Irys 使用,位置在:

我们已经为您将此图像上传到 Irys devnet。单击下面的链接下载并将其放置在您刚刚创建的目录中:https://devnet.irys.xyz/8VY89xG1RiUjtz1Lwgip7eUxZvtsdkf1gViGYaDKmwx8
现在,在终端中运行 npm install @solana/spl-token @metaplex-foundation/js 以安装测试依赖项。
接下来,配置 Solana 使用 devnet。
在终端运行此命令:solana config set --url [https://api.devnet.solana.com](https://api.devnet.solana.com/)

请求空投:solana airdrop 5。我们需要资金将我们的程序和所有涉及的账户部署到 devnet。

现在构建项目并运行测试。这会将程序、代币和元数据账户部署到 Solana devnet(注意:这可能需要一些时间,具体取决于您的网络连接)。

我们可以看到附带元数据(并且有图像)的 mint(代币)已被创建,如下所示。
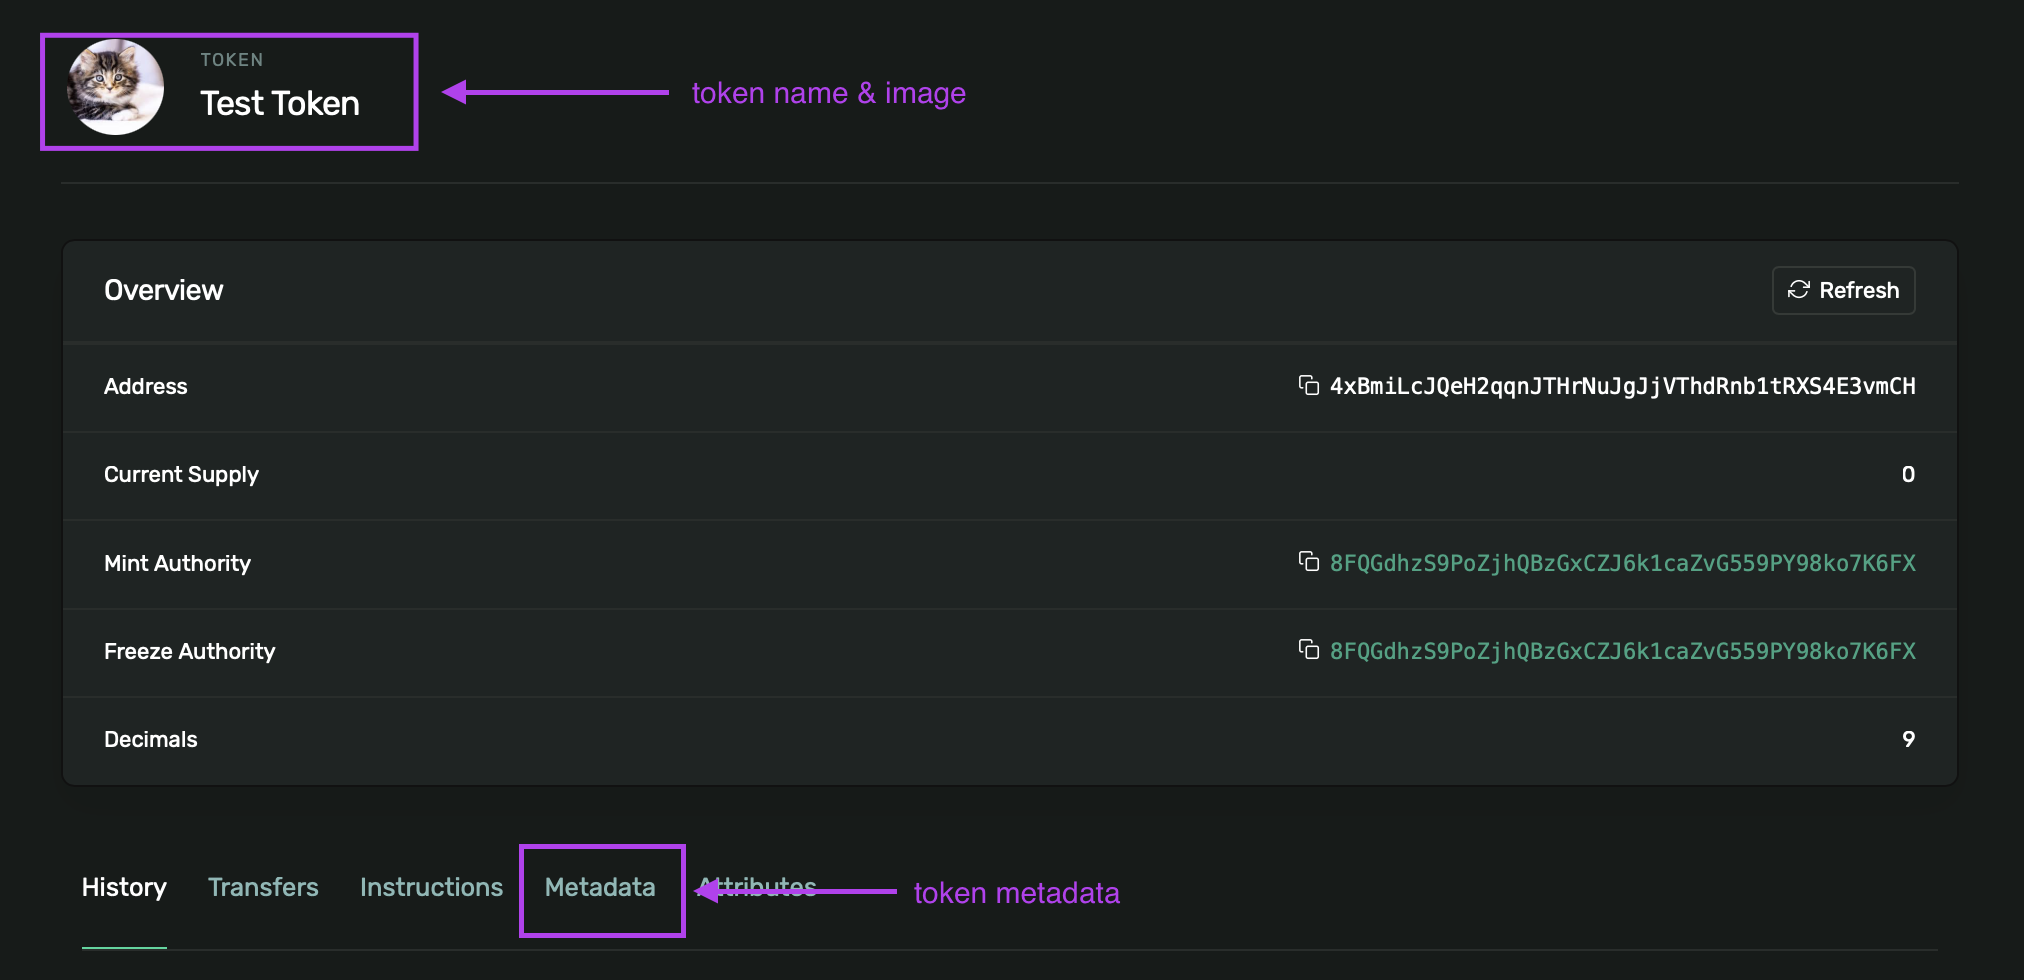
我们也可以查看它的元数据。
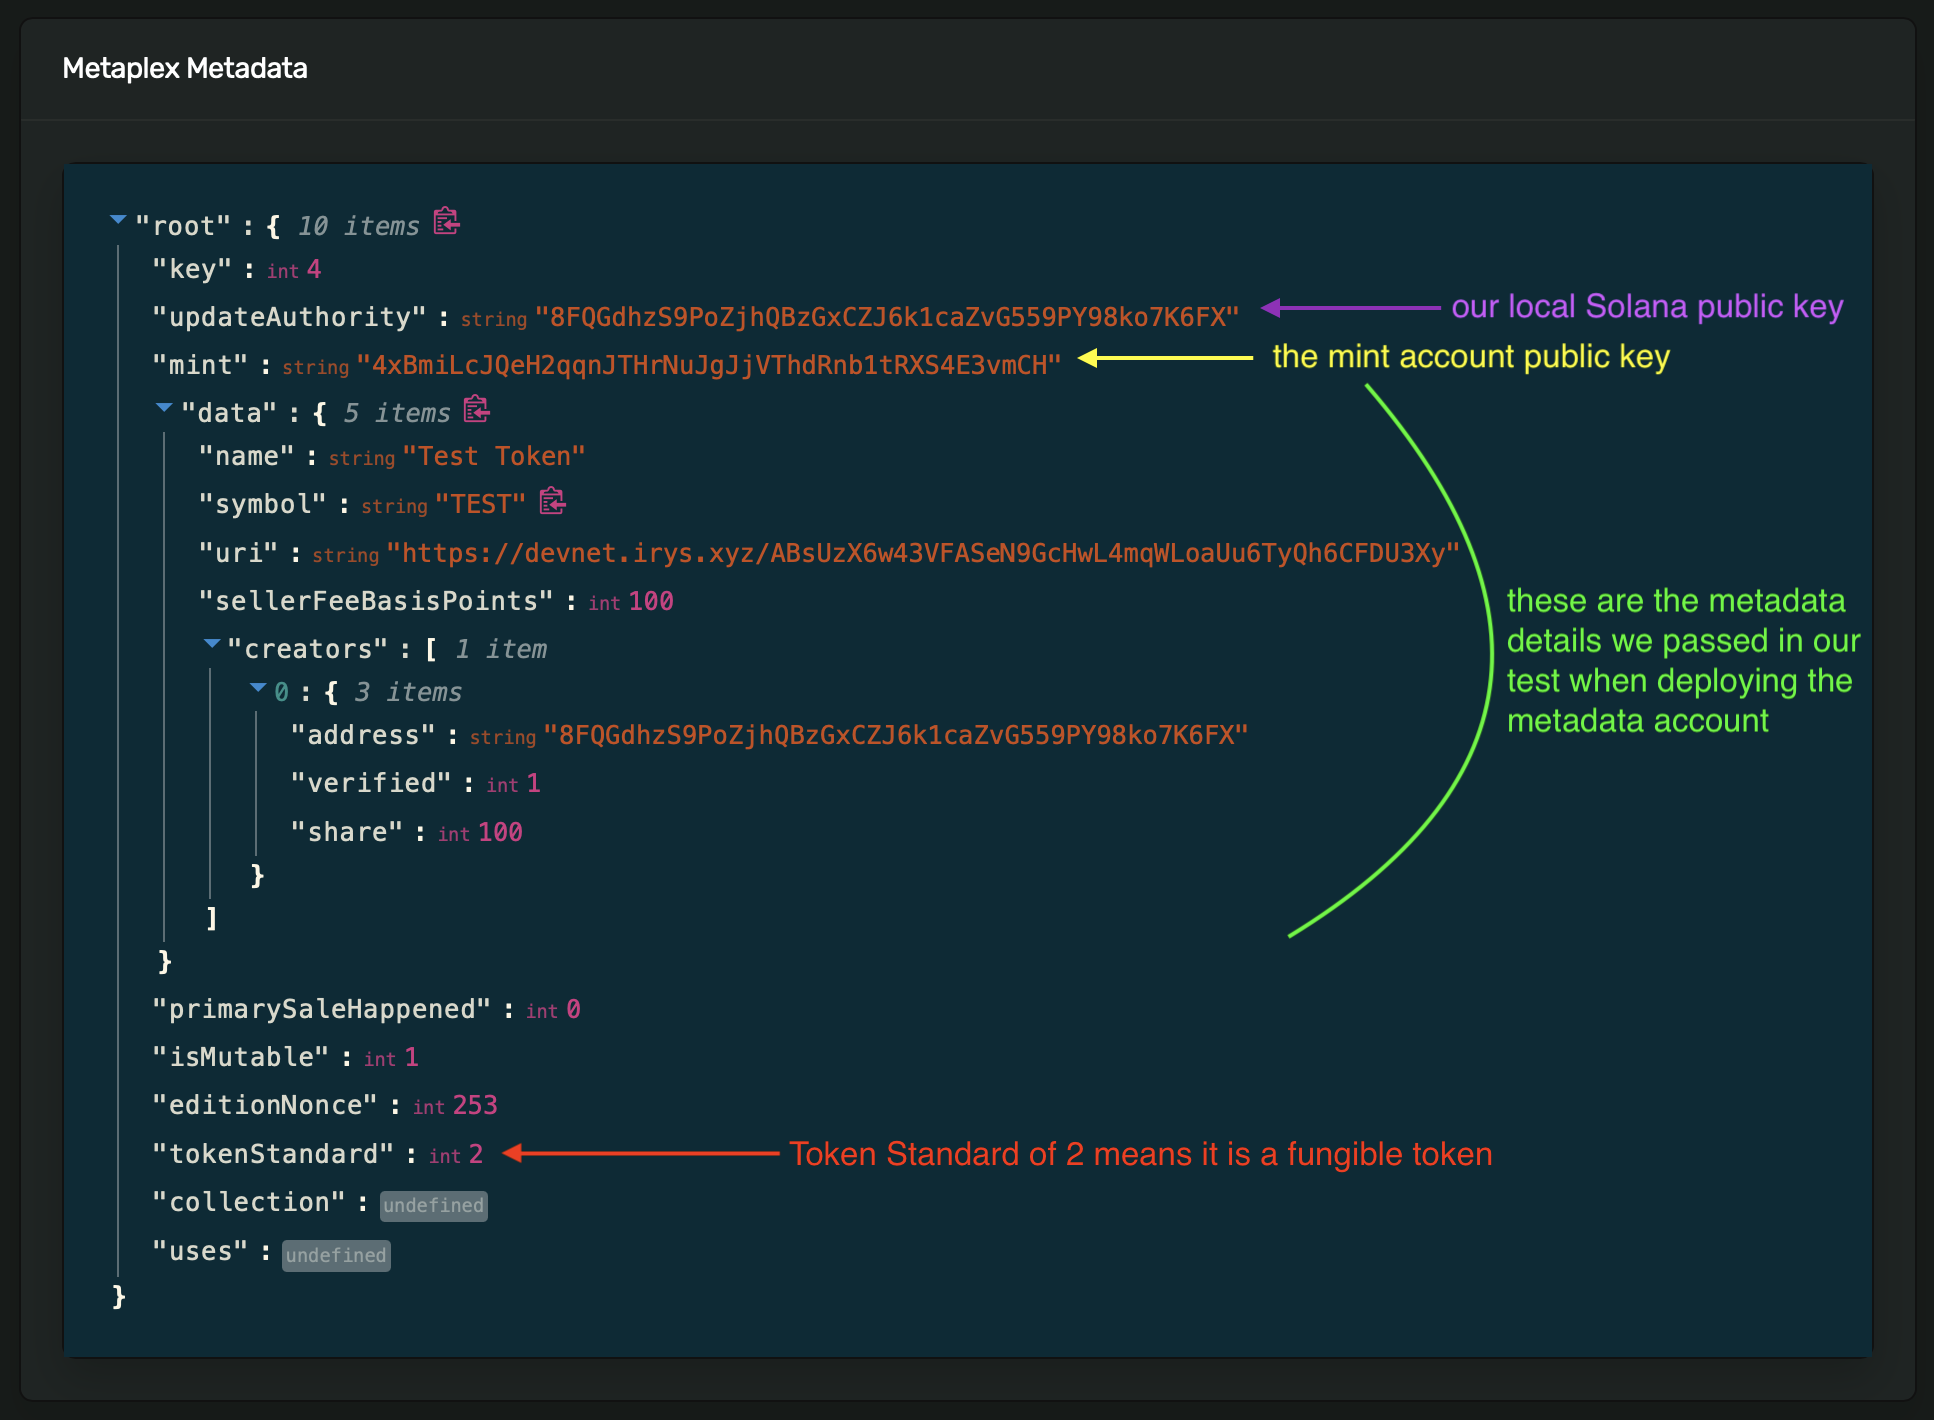
元数据账户:https://explorer.solana.com/address/5feQdhNd3PxPJ9apKUpCWfB47cQdLitNMrVP8Gnq3cad?cluster=devnet
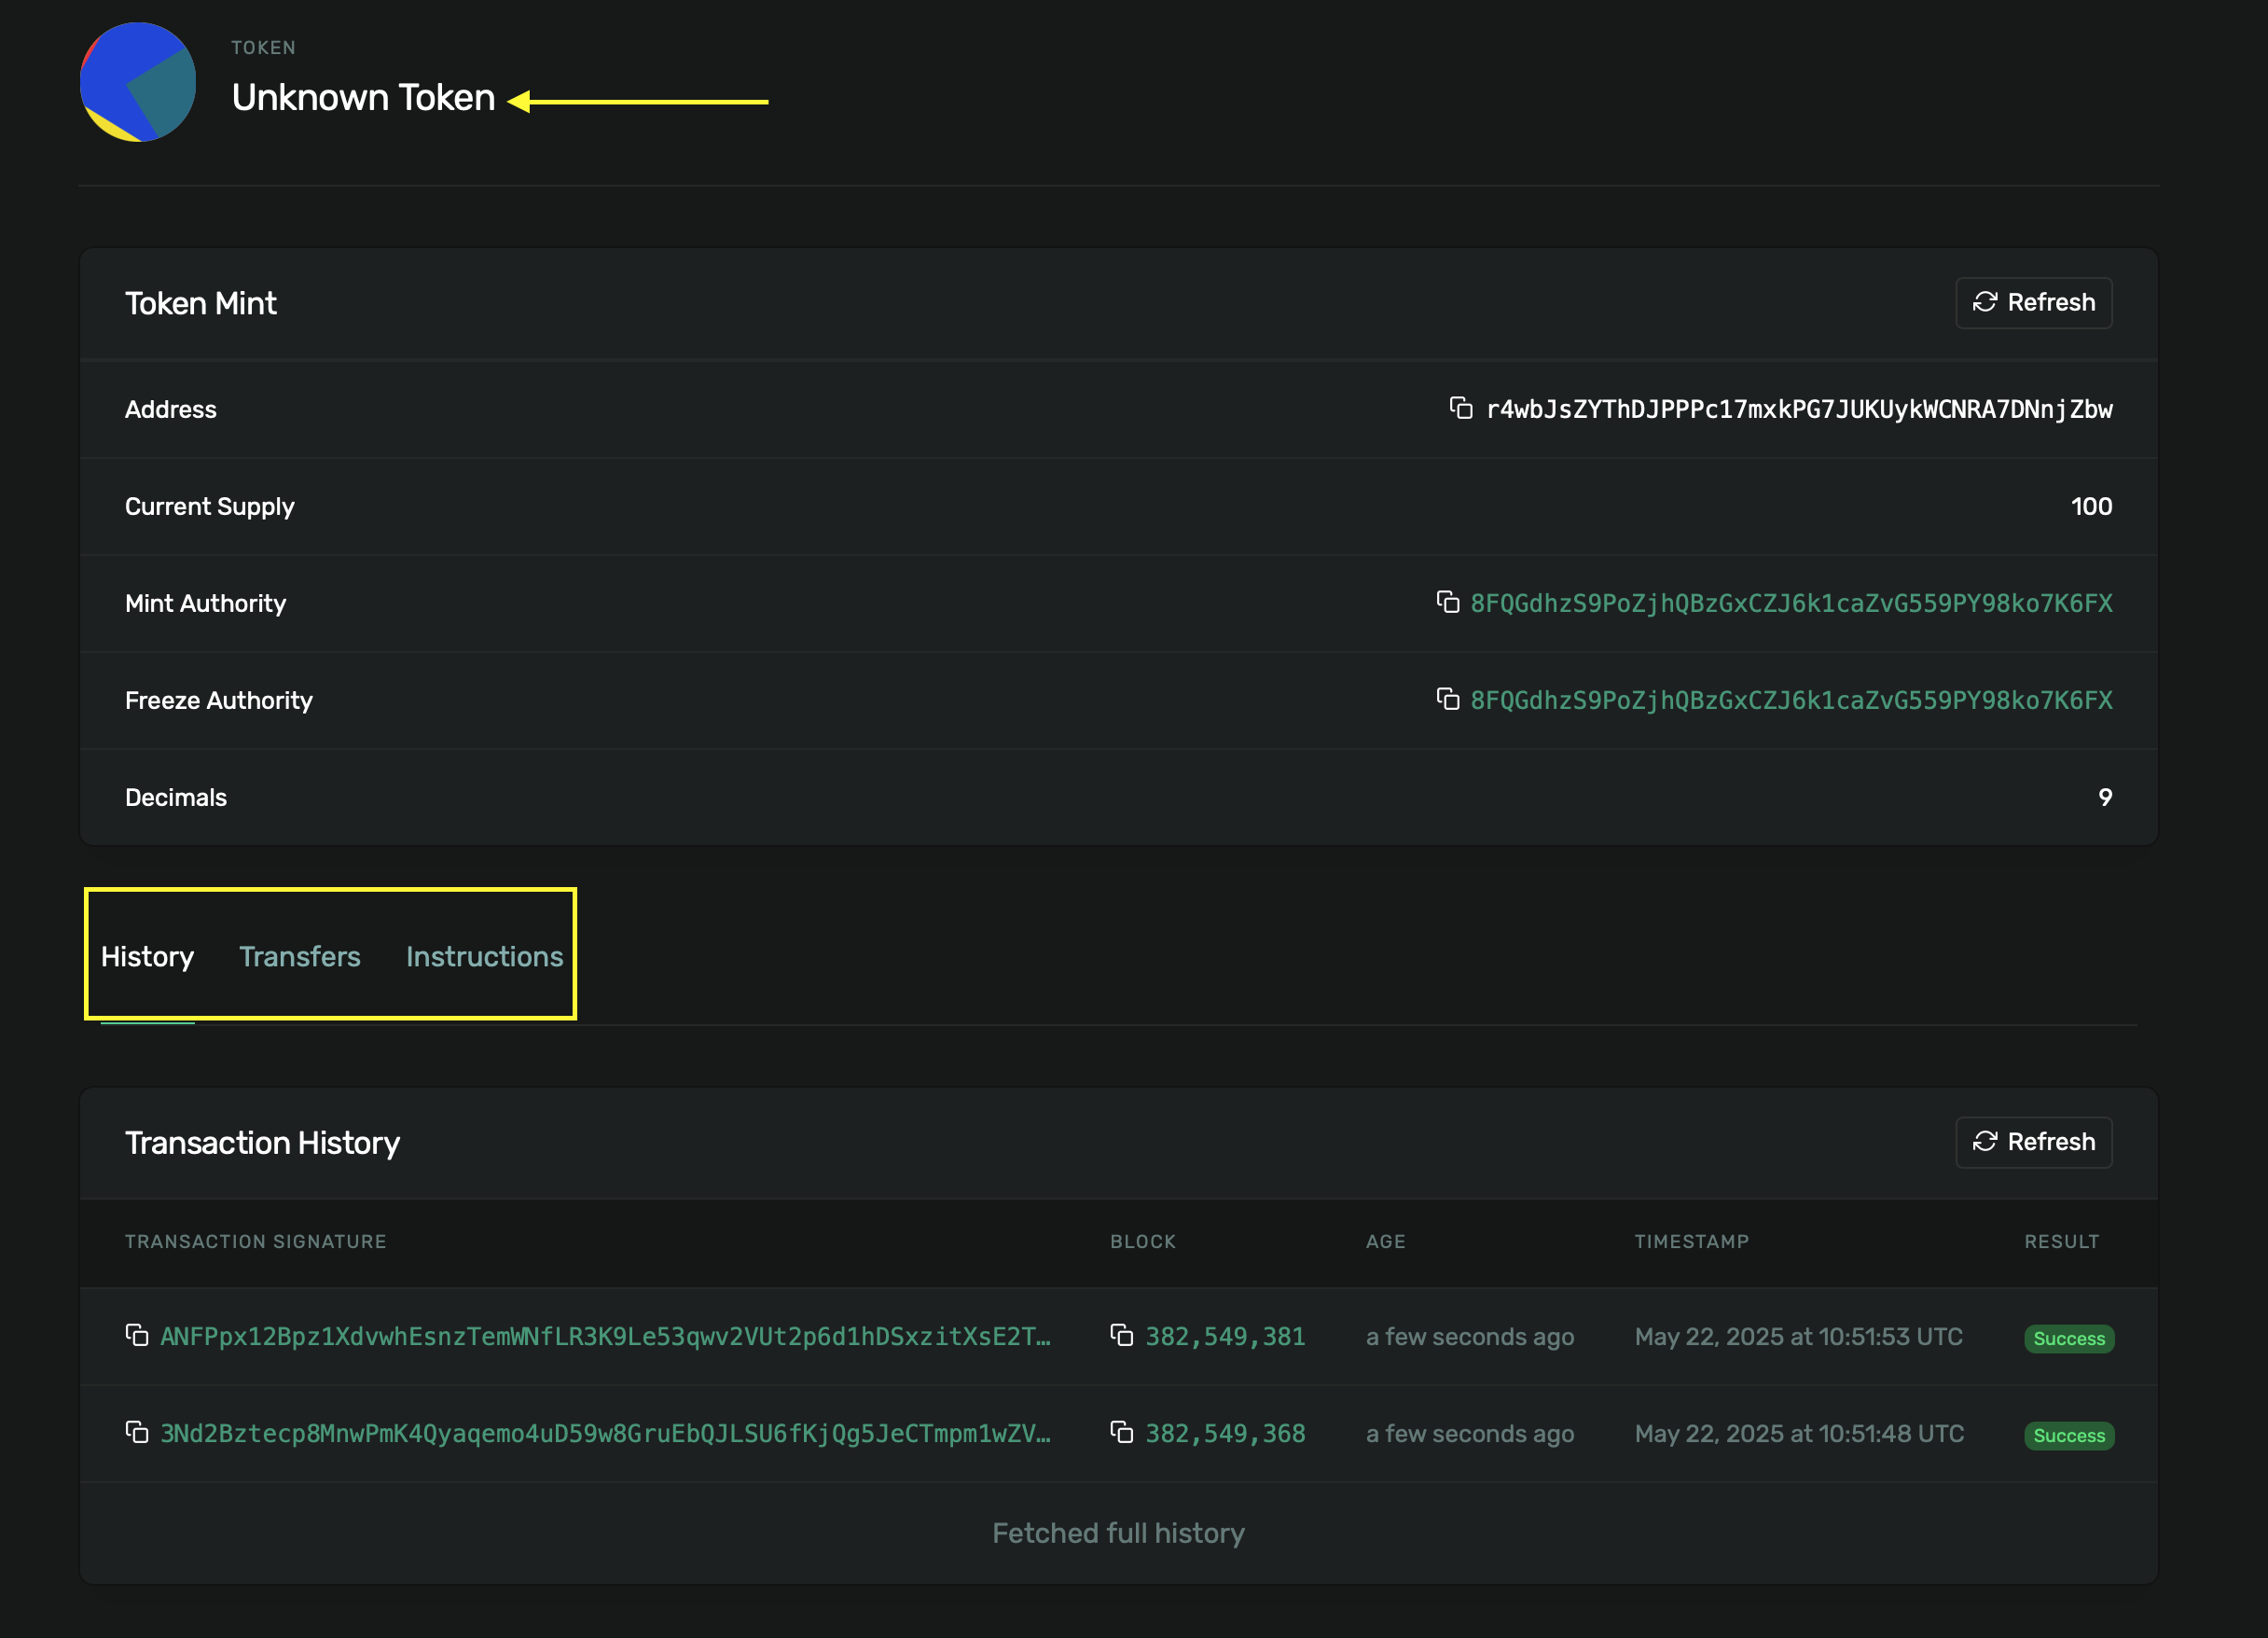
想要查看元数据账户的效果,请查看常规 SPL 代币部署时的 UI(这是我们在之前的教程中所做的)。注意看顶部没有名称或图像,并且在 History(历史记录)、Transfer(转账)和 Instructions(指令)选项卡旁边也没有 Metadata(元数据)选项卡。
我们已成功部署了一个 SPL 代币,并使用 Metaplex 标准为其附加了元数据,遵循了我们前面讨论过的 同质化标准(Fungible Standard) 格式,具有基本的名称、符号、描述和图像字段。
结论
在本教程中,我们借助 Metaplex Token Metadata 标准创建了一个 SPL 代币并为其附加了元数据。
在 Anchor 程序中,我们使用 DataV2 结构体来定义代币的元数据,并调用 mpl-token-metadata crate 中的 CreateMetadataAccountV3 指令(通过 CPI)来创建元数据账户。我们使用 Metaplex 和 Irys 将代币的图像和元数据 JSON 上传到了 Arweave。然后,我们确认了元数据账户在创建后确实存在,并且其所有者是 Metaplex 程序。最后,我们解释了 Metaplex 代币标准——同质化(2)、同质化资产(1)和非同质化(0)——并概述了它们的 JSON URI 格式。
本文是 Solana 系列教程 的一部分。