In Solana, writing test cases that depend on the passing of time is tricky. We might want to test that something happens in our code after a day passes, but we can’t have our test case take a day to run since this would render our testing impractical. LiteSVM solves this by letting you instantly move the blockchain clock forward, like time travel for your local tests.
To show how this works in practice, we’ll build a basic Dutch auction for an NFT using Anchor. A Dutch auction starts with a high price that decreases automatically over time until a buyer accepts the current price. It’s a clear example of time-sensitive behavior where LiteSVM makes testing much simpler.
LiteSVM works like Solana’s local validator (solana-test-validator) but gives us more control over the local blockchain state for the test environment. It can be used in our TypeScript tests, and it makes it easy to test time-based logic like auctions or vesting.
If you’re familiar with Ethereum development, LiteSVM’s time manipulation capabilities are similar to Foundry’s vm.warp (for advancing block timestamps), but tailored for Solana’s slot-based architecture.
Here’s an overview of what we’ll cover in this article:
- We’ll create a Dutch auction program for NFT sales with functions to create auctions and buy NFTs at decreasing prices
- We’ll explain these functions and write tests for them
- Finally, we’ll use LiteSVM to warp time forward 15 minutes to test price decay without waiting, and verify that the auction price drops correctly
Now let’s create the Dutch auction program.
Create the Dutch auction program
As mentioned earlier, a Dutch auction starts high and drops over time until a buyer accepts. To guarantee delivery, we lock the NFT in a program‑controlled vault (escrow). This prevents the seller from pulling or double‑selling the NFT, and it lets buyers avoid relying on the seller to release the NFT after payment. The vault allows the program to settle the swap atomically once a buyer accepts.
The Dutch auction program will comprise of only two functions:
- An
initialize_auctionfunction that creates the required accounts, and deposits the seller’s NFT into a vault account owned by our program - A
buyfunction that allows buyers to purchase the NFT with SOL at the current auction price.
Next, we will create the following accounts:
Auction: A PDA owned by our program to store the auction details, like the starting price, auction duration, etc.Vault Authority: This will be a PDA owned by our program to authorize the NFT transfer to the buyer once a sale occurs. We go into more detail about this in the “Why do we have a vault authority PDA?” section of this article.Vault: An associated token account to hold the deposited NFT. This is owned by theVault AuthorityPDA.
Now create a new Anchor project named dutch-auction and modify the programs/dutch-auction/Cargo.toml file with the following dependencies:
anchor-splfor SPL token functionalityanchor-spl/idl-buildunderfeaturesto include SPL types in the generated IDL file
[package]
name = "dutch-auction"
version = "0.1.0"
description = "Created with Anchor"
edition = "2021"
[lib]
crate-type = ["cdylib", "lib"]
name = "dutch_auction"
[features]
default = []
cpi = ["no-entrypoint"]
no-entrypoint = []
no-idl = []
no-log-ix-name = []
idl-build = ["anchor-lang/idl-build", "anchor-spl/idl-build"]
[dependencies]
anchor-lang = "0.30.1"
anchor-spl = "0.30.1"
You can run anchor build to confirm there are no problems with the dependencies.
Initializing the auction program
Now that we have the dependencies ready, replace the program code in programs/dutch-auction/src/lib.rs with the code below which contains the initialize_auction function that does the following:
- It initializes the auction account and records the auction details and duration (in seconds) in the account.
- It transfers the auctioned NFT from the seller’s Associated Token Account (ATA) into our program-owned vault (also an ATA).
use anchor_lang::prelude::*;
use anchor_lang::solana_program::{program::invoke, system_instruction};
use anchor_spl::associated_token::AssociatedToken;
use anchor_spl::token::{self, Mint, Token, TokenAccount, Transfer};
declare_id!("GKP6La354ejTfqNDW4gdzC2mzNjnP6cMY1vtH6EN15zq");
#[program]
pub mod dutch_auction {
use super::*;
pub fn initialize_auction(
ctx: Context<InitializeAuction>,
starting_price: u64,
floor_price: u64,
duration: i64, // in seconds
) -> Result<()> {
// Initialize the auction account and set seller details
let auction = &mut ctx.accounts.auction;
auction.seller = ctx.accounts.seller.key();
auction.starting_price = starting_price;
auction.floor_price = floor_price;
auction.duration = duration;
auction.start_time = Clock::get()?.unix_timestamp;
auction.token_mint = ctx.accounts.mint.key();
// Move 1 token from seller ATA into vault escrow
let cpi_accounts = Transfer {
from: ctx.accounts.seller_ata.to_account_info(),
to: ctx.accounts.vault.to_account_info(),
authority: ctx.accounts.seller.to_account_info(),
};
let cpi_ctx = CpiContext::new(ctx.accounts.token_program.to_account_info(), cpi_accounts);
token::transfer(cpi_ctx, 1)?;
Ok(())
}
}
Run anchor keys sync to replace the program ID with yours.
Then, add the InitializeAuction accounts struct, with the Auction state to the program code.
The InitializeAuction specifies the following accounts involved during auction initialization:
auction: The account to store auction state (starting price, duration, seller info, etc.).seller: The NFT owner who creates the auction and signs the transaction.seller_ata: The seller’s associated token account that holds the NFT to be auctioned.vault_auth: A PDA (Program Derived Address) that serves as the authority for the vault account. This allows our program to control NFT transfers.vault(escrow): An associated token account that holds the seller’s deposited NFT during the auction. This is owned by theVault AuthorityPDA.mint: The NFT mint account which represents the token being auctioned.
#[derive(Accounts)]
pub struct InitializeAuction<'info> {
#[account(init, payer = seller, space = 8 + Auction::INIT_SPACE)]
pub auction: Account<'info, Auction>,
#[account(mut)]
pub seller: Signer<'info>,
#[account(
mut,
associated_token::mint = mint,
associated_token::authority = seller
)]
pub seller_ata: Account<'info, TokenAccount>,
/// CHECK: This is the PDA that will own the vault
#[account(
seeds = [b"vault", auction.key().as_ref()],
bump
)]
pub vault_auth: UncheckedAccount<'info>,
#[account(
init,
payer = seller,
associated_token::mint = mint,
associated_token::authority = vault_auth
)]
pub vault: Account<'info, TokenAccount>,
pub mint: Account<'info, Mint>,
pub token_program: Program<'info, Token>,
pub associated_token_program: Program<'info, AssociatedToken>,
pub system_program: Program<'info, System>,
}
#[account]
#[derive(InitSpace)]
pub struct Auction {
pub seller: Pubkey,
pub starting_price: u64,
pub floor_price: u64,
pub duration: i64,
pub start_time: i64,
pub token_mint: Pubkey,
pub sold: bool,
}
We won’t test this function yet, we’ll do that later once the full program is in place.
Now let’s add the function to buy the auctioned token.
Buying the auctioned token
In our auction setup, the NFT sits in an escrow (vault) account controlled by the program until it is sold. Buying the auctioned token means transferring lamports from the buyer to the seller in exchange for the NFT.
We’ll now add a function that lets us buy the NFT at the current Dutch auction price. Here’s what the function does
- It checks if the NFT is already sold
- Get the current time and check that the auction is active, it reverts with an
AuctionNotStartederror if the auction hasn’t started yet, or with anAuctionEndederror if the auction duration has elapsed. - Computes elapsed time so far and derive the current price using the formula for a linear Dutch auction.
- It ensures the buyer has enough lamports.
- Transfer lamports from buyer to seller.
- Set up signer seeds so the program can sign for the vault.
- Transfer the NFT from the vault to the buyer’s associated token account.
pub fn buy(ctx: Context<Buy>) -> Result<()> {
// Check if the NFT is already sold
require!(
ctx.accounts.auction.sold == false,
AuctionError::NFTAlreadySold
);
let auction = &mut ctx.accounts.auction;
let now = Clock::get()?.unix_timestamp; // Get the current time from the clock sysvar
// Validate auction timing
require!(now >= auction.start_time, AuctionError::AuctionNotStarted);
require!(
now < auction.start_time + auction.duration,
AuctionError::AuctionEnded
);
// Calculate current price based on elapsed time (linear decay)
let elapsed_time = (now - auction.start_time).min(auction.duration) as u64;
let total_price_drop = auction.starting_price - auction.floor_price;
let price_dropped_so_far = total_price_drop * elapsed_time / auction.duration as u64;
let price = auction.starting_price - price_dropped_so_far;
// Verify funds and transfer payment
require!(
ctx.accounts.buyer.lamports() >= price,
AuctionError::InsufficientFunds
);
invoke(
&system_instruction::transfer(
&ctx.accounts.buyer.key(),
&ctx.accounts.seller.key(),
price,
),
&[
ctx.accounts.buyer.to_account_info(),
ctx.accounts.seller.to_account_info(),
ctx.accounts.system_program.to_account_info(),
],
)?;
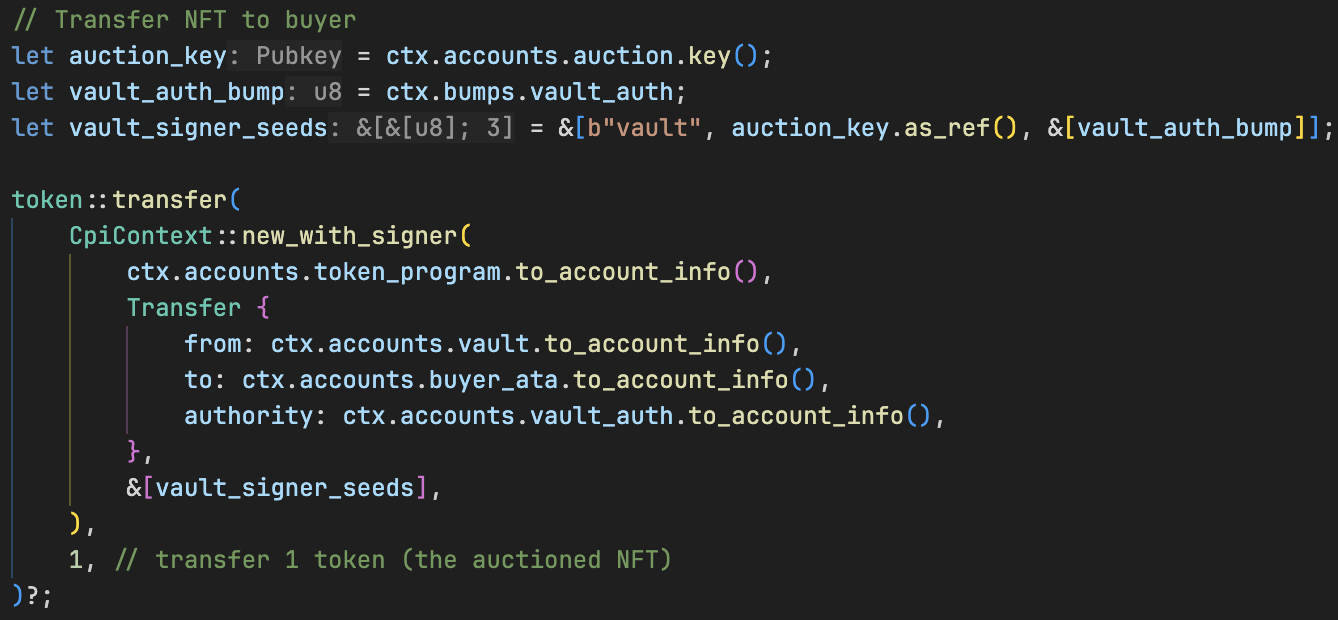
// Transfer NFT to buyer
let auction_key = ctx.accounts.auction.key();
let vault_auth_bump = ctx.bumps.vault_auth;
let vault_signer_seeds = &[b"vault", auction_key.as_ref(), &[vault_auth_bump]]; // Signer seeds for the vault PDA
token::transfer(
CpiContext::new_with_signer(
ctx.accounts.token_program.to_account_info(),
Transfer {
from: ctx.accounts.vault.to_account_info(),
to: ctx.accounts.buyer_ata.to_account_info(),
authority: ctx.accounts.vault_auth.to_account_info(),
},
&[vault_signer_seeds],
),
1, // transfer 1 token (the auctioned NFT)
)?;
Ok(())
}
Why do we have a vault authority PDA?
We use a vault ATA to hold the NFT after the seller deposits it. We need a vault authority PDA so our program can sign transfers for that ATA without the need for an external keypair or signer.
Recall in the Token Sale with Total Supply article, we showed how to make a mint PDA its own authority so the program can mint new tokens by itself. Here we use the same concept for the vault ATA, but to grant our program the power to move an existing token. We derive vault_auth from ["vault", auction.key().as_ref()] and set it as the ATA’s authority.
In the buy() function, we call CpiContext::new_with_signer with those seeds. The Solana runtime sees that our program controls vault_auth and lets it sign for the vault ATA. This allows our program to transfer the NFT to the buyer automatically, with no external signer.
Now add the Buy accounts struct. The Buy struct specifies the accounts involved during NFT purchases in our auction program:
auction: The auction account containing auction details and state.seller: The original NFT seller who will receive the SOL payment.buyer: The account purchasing the NFT at the current auction price, also the transaction signer.buyer_ata: The buyer’s associated token account that will receive the purchased NFT.vault_auth: The PDA authority that controls the vault and authorizes the NFT transfer to the buyer.vault: The vault account holding the escrowed NFT, owned byvault_authPDA.- The final two accounts, Token program (for NFT transfers), and System program (for SOL transfers), are the native programs we interact with.
#[derive(Accounts)]
pub struct Buy<'info> {
#[account(mut, has_one = seller)] // ensure we pass the right auction account
pub auction: Account<'info, Auction>, // auction account
/// CHECK: seller account
#[account(mut)]
pub seller: AccountInfo<'info>, // seller account
#[account(mut)]
pub buyer: Signer<'info>, // buyer account
#[account(
mut,
associated_token::mint = auction.token_mint,
associated_token::authority = buyer
)]
pub buyer_ata: Account<'info, TokenAccount>, // Buyer's ATA
#[account(
mut,
seeds = [b"vault", auction.key().as_ref()],
bump
)]
/// CHECK: PDA authority for the vault
pub vault_auth: AccountInfo<'info>, // Vault authority PDA
#[account(
mut,
associated_token::mint = auction.token_mint,
associated_token::authority = vault_auth
)]
pub vault: Account<'info, TokenAccount>,
pub token_program: Program<'info, Token>, // SPL Token program
pub system_program: Program<'info, System>, // System program
}
Add the AuctionError error, we use this in the buy function
#[error_code]
pub enum AuctionError {
#[msg("Auction hasn't started")]
AuctionNotStarted,
#[msg("Buyer has insufficient funds")]
InsufficientFunds,
#[msg("Auction has ended")]
AuctionEnded,
#[msg("NFT is already sold")]
NFTAlreadySold,
}
Our program is now complete, so let’s write some tests for it.
Testing the Dutch Auction program with LiteSVM
In a Dutch auction, the price of the item decays over time. The goal of this test is to confirm the auction price decays properly over time. To do that, we’ll use LiteSVM to warp time forward and log the price drop at that point.
In a real Dutch auction on-chain, we’d have to wait in real time to see the price drop. With LiteSVM, we can skip the wait by warping time forward.
We’ll add the test in bits, so first, replace the program test in tests/dutch-auction.ts with the code below.
We have defined some test constants. Also notice the two key libraries for this test:
litesvmlets us spin up a local Solana test validator directly from our TypeScript client and gives us control over the validator’s clock for time warping.- The
anchor-litesvmlibrary connects our Anchor project with LiteSVM, which makes it possible to test Anchor programs in this LiteSVM setup.
import * as anchor from "@coral-xyz/anchor";
import { BN, Program } from "@coral-xyz/anchor";
import {
ASSOCIATED_TOKEN_PROGRAM_ID,
createAssociatedTokenAccountInstruction,
createInitializeMintInstruction,
createMintToInstruction,
getAssociatedTokenAddress,
MINT_SIZE,
TOKEN_PROGRAM_ID,
} from "@solana/spl-token";
import {
Keypair,
LAMPORTS_PER_SOL,
PublicKey,
SystemProgram,
Transaction,
} from "@solana/web3.js";
import { fromWorkspace, LiteSVMProvider } from "anchor-litesvm";
import { assert } from "chai";
import { Clock, LiteSVM } from "litesvm";
import { DutchAuction } from "../target/types/dutch_auction";
// Constants
const STARTING_PRICE = new BN(2_000_000_000); // 2 SOL
const FLOOR_PRICE = new BN(500_000_000); // 0.5 SOL
const DURATION = new BN(3600); // 1 hour
Install the test dependencies with: npm install anchor-litesvm litesvm @solana/spl-token
Add the describe block. We simply declare test accounts and variables here (we will discuss them later).
describe("dutch-auction", () => {
// Define our test variables
let svm: LiteSVM;
let provider: LiteSVMProvider;
let program: Program<DutchAuction>;
// Define our test accounts
const seller = Keypair.generate();
const buyer = Keypair.generate();
let auctionAccount: Keypair;
let mintKp: Keypair;
let sellerAta: PublicKey;
let buyerAta: PublicKey;
let vaultAuth: PublicKey;
let vault: PublicKey;
});
Now, add this before test block inside the describe block.
We setup LiteSVM and the accounts here, by doing the following:
- Initialize LiteSVM test environment
- Airdrop test accounts (buyer and seller) with SOL
- Create a token mint and associated token accounts for both the buyer and seller (with the
@solana/spl-tokenlibrary). - Mint NFT to seller
- Create auction account and PDA for vault authority
- Initialize the auction with starting parameters
The way we construct transactions in this test is slightly different to how we did it in the past. The rationale for this will be discussed after the code block.
before(async () => {
// Initialize LiteSVM from the workspace and add SPL/Builtins/Sysvars
svm = fromWorkspace("./").withSplPrograms().withBuiltins().withSysvars();
provider = new LiteSVMProvider(svm);
anchor.setProvider(provider);
program = anchor.workspace.DutchAuction;
// Airdrop funds to seller and buyer
svm.airdrop(seller.publicKey, BigInt(10 * LAMPORTS_PER_SOL)); // Airdrop 10 SOL to seller
svm.airdrop(buyer.publicKey, BigInt(10 * LAMPORTS_PER_SOL)); // Airdrop 10 SOL to buyer
// Create NFT mint (0 decimals) with seller as mint authority
mintKp = Keypair.generate();
const LAMPORTS_FOR_MINT = 1_000_000_000; // sufficient for rent in tests
const createMintIx = SystemProgram.createAccount({
fromPubkey: seller.publicKey,
newAccountPubkey: mintKp.publicKey,
lamports: LAMPORTS_FOR_MINT,
space: MINT_SIZE,
programId: TOKEN_PROGRAM_ID,
});
const initMintIx = createInitializeMintInstruction(
mintKp.publicKey,
0, // decimals
seller.publicKey, // mint authority
null // freeze authority
);
const mintTx = new Transaction().add(createMintIx, initMintIx);
mintTx.recentBlockhash = svm.latestBlockhash();
mintTx.feePayer = seller.publicKey;
mintTx.sign(seller, mintKp);
svm.sendTransaction(mintTx);
// Create ATA for the seller
sellerAta = await getAssociatedTokenAddress(mintKp.publicKey, seller.publicKey);
const createSellerAtaIx = createAssociatedTokenAccountInstruction(
seller.publicKey,
sellerAta,
seller.publicKey,
mintKp.publicKey
);
const sellerAtaTx = new Transaction().add(createSellerAtaIx);
sellerAtaTx.recentBlockhash = svm.latestBlockhash();
sellerAtaTx.feePayer = seller.publicKey;
sellerAtaTx.sign(seller);
svm.sendTransaction(sellerAtaTx);
// Create ATA for the buyer
buyerAta = await getAssociatedTokenAddress(mintKp.publicKey, buyer.publicKey);
const createBuyerAtaIx = createAssociatedTokenAccountInstruction(
buyer.publicKey,
buyerAta,
buyer.publicKey,
mintKp.publicKey
);
const buyerAtaTx = new Transaction().add(createBuyerAtaIx);
buyerAtaTx.recentBlockhash = svm.latestBlockhash();
buyerAtaTx.feePayer = buyer.publicKey;
buyerAtaTx.sign(buyer);
svm.sendTransaction(buyerAtaTx);
// Mint 1 token to seller's ATA
const mintToIx = createMintToInstruction(
mintKp.publicKey,
sellerAta,
seller.publicKey,
BigInt(1)
);
const mintToTx = new Transaction().add(mintToIx);
mintToTx.recentBlockhash = svm.latestBlockhash();
mintToTx.feePayer = seller.publicKey;
mintToTx.sign(seller);
svm.sendTransaction(mintToTx);
// Find PDA for vault authority and associated token account
[vaultAuth] = PublicKey.findProgramAddressSync(
[Buffer.from("vault"), auctionAccount.publicKey.toBuffer()],
program.programId
);
vault = await getAssociatedTokenAddress(
mintKp.publicKey,
vaultAuth,
true
);
// Initialize the auction (moves 1 token from seller ATA to vault)
await program.methods
.initializeAuction(STARTING_PRICE, FLOOR_PRICE, DURATION)
.accounts({
auction: auctionAccount.publicKey,
seller: seller.publicKey,
sellerAta,
vaultAuth,
vault,
mint: mintKp.publicKey,
tokenProgram: TOKEN_PROGRAM_ID,
associatedTokenProgram: ASSOCIATED_TOKEN_PROGRAM_ID,
systemProgram: SystemProgram.programId,
})
.signers([seller, auctionAccount])
.rpc();
});
We use some LiteSVM features and methods in the test above, we will discuss them later.
Next, add the test block below. This block simply asserts that the auction program was initialized properly in the before block.
it("initializes auction state correctly", async () => {
const auction = await program.account.auction.fetch(auctionAccount.publicKey);
assert.ok(auction.seller.equals(seller.publicKey));
assert.equal(auction.startingPrice.toNumber(), STARTING_PRICE.toNumber());
assert.equal(auction.floorPrice.toNumber(), FLOOR_PRICE.toNumber());
assert.equal(auction.tokenMint.toBase58(), mintKp.publicKey.toBase58());
// Seller's NFT should have moved to vault during initialization
const vaultAcc = svm.getAccount(vault);
assert.isNotNull(vaultAcc, "Vault ATA must exist");
});
Before we run the test, let’s go through LiteSVM libraries and how we have used them so far.
Test code walkthrough
LiteSVM and LiteSVMProvider
As shown in the image below, we declared two main variables for our test:

svm: This is aLiteSVMfrom thelitesvmlibrary. It acts like a local Solana test validator that we can control, including its clock for time warping.provider: This is aLiteSVMProviderfrom theanchor-litesvmlibrary. It acts like a normal Anchor provider but works with LiteSVM, so we can run tests with time warping.
Initializing LiteSVM

As shown in the image above, we set up our testing environment by initializing LiteSVM, creating a LiteSVM provider, and configuring Anchor to use this provider.
Let’s break down what each part does:
-
fromWorkspace("./")from thelitesvmlibrary creates a LiteSVM instance from the current directory, which tells LiteSVM where to find our project files. We then chain several methods to this instance:.withSplPrograms()adds SPL token programs, enabling token functionality in our tests.withBuiltins()adds built-in programs, giving us access to native Solana programs.withSysvars()adds system variables, this gives us access to Solana system information like clock
This function chain returns a fully configured
LiteSVMobject, which we assign tosvm. -
new LiteSVMProvider(svm)from theanchor-litesvmlibrary creates a provider that works with LiteSVM but still follows Anchor’s expected interface -
anchor.setProvider(provider)tells Anchor to use our LiteSVM-compatible provider
With this setup, we are now ready to use the LiteSVM provider to warp time.
Now that we’ve set up our test environment, let’s walk through how we create SPL tokens and Associated Token Accounts (ATAs) in LiteSVM. Unlike the typical approach where you’d use helper functions like createMint() and createAssociatedTokenAccount() from the SPL Token library, with LiteSVM we need to construct these instructions manually and execute them with svm.sendTransaction().
Creating Tokens and ATAs in LiteSVM
In LiteSVM, we create tokens and ATAs manually because the @solana/spl-token helper functions aren’t fully compatible with LiteSVM’s testing environment.
Let’s walk through how we create our NFT for the auction.
Step 1: Create the Mint Account
First, we create the mint account.
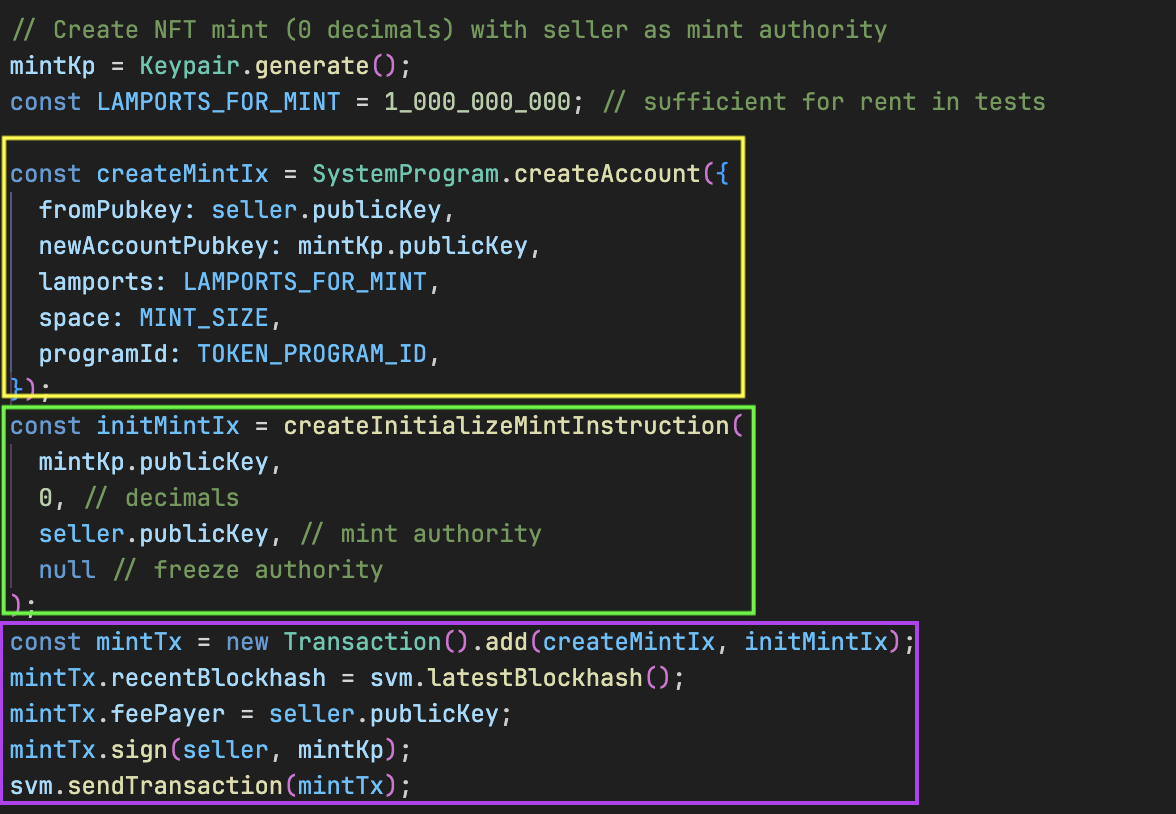
Here’s what’s happening from the image above:
- Create the account: We use
SystemProgram.createAccount()(imported from@solana/web3.js) to allocate space on-chain and assign ownership to the Token Program. This is to be compliant with the SPL Token standard where all token mint accounts must be owned by the Token Program to be valid. - Initialize as mint: We use
createInitializeMintInstruction()(imported from@solana/spl-token) to turn that raw account into a proper token mint with 0 decimals. We do this because Solana’s NFT standard requires 0 decimals to ensure non-divisibility. - Execute: We build the transaction, set the blockhash and fee payer, sign it, then send it to our LiteSVM instance using
svm.sendTransaction(). This is similar to sending a transaction to the Solana blockchain, but on the local LiteSVM environment.
Step 2: Create Token Accounts
Next, we create associated token accounts (ATAs) for our seller and buyer. We use getAssociatedTokenAddress() (imported from @solana/spl-token) to derive the account addresses and createAssociatedTokenAccountInstruction() (imported from @solana/spl-token) to create the instruction that will initialize these accounts.
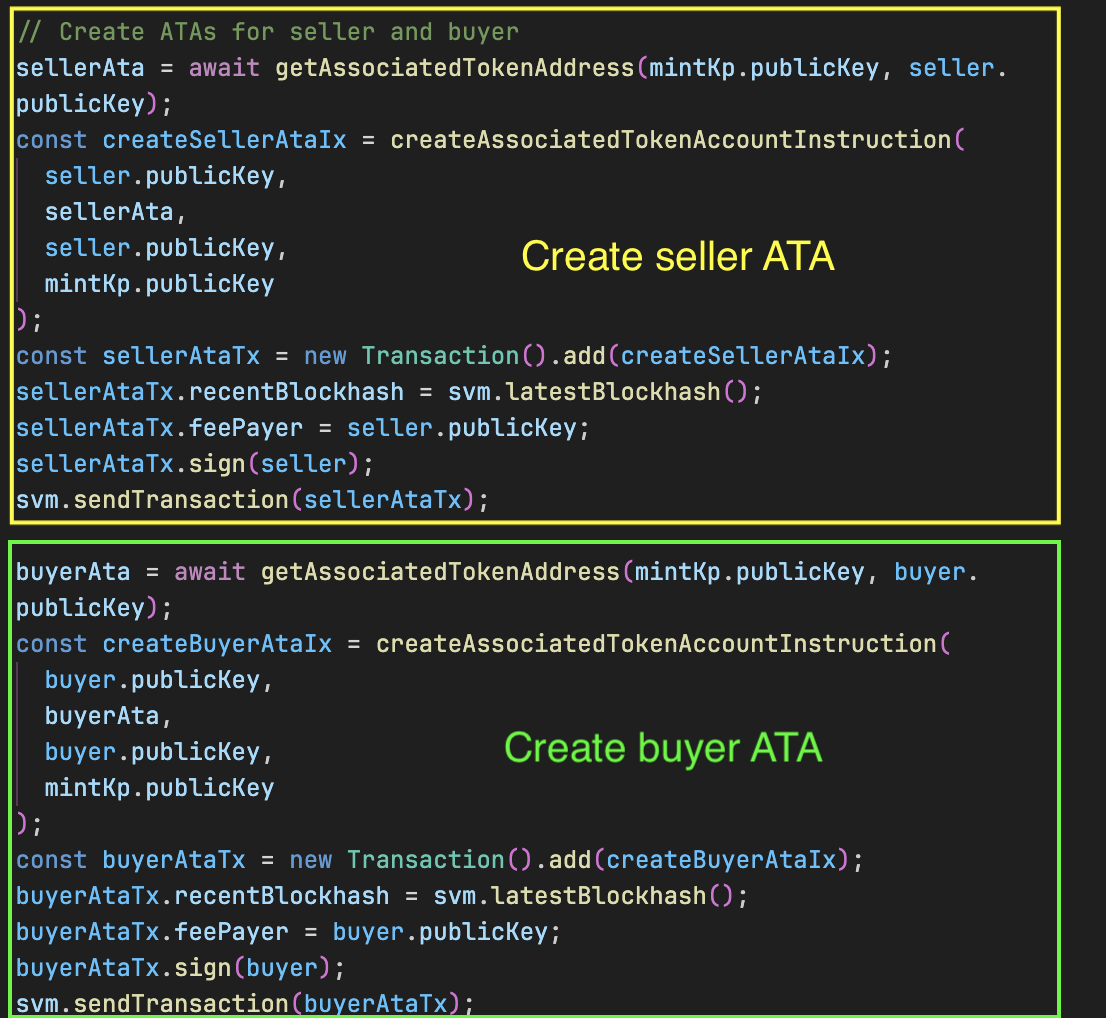
These ATAs will hold the NFTs for the seller and buyer before and after the auction sale.
Because LiteSVM doesn’t have helper functions for token operations, we follow the pattern of manually building transactions, signing, and sending it with svm.sendTransaction().
Simulating Time to Test Auction Linear Price Decay
Now that we’ve set up our test environment and created the necessary token accounts, we can move on to our goal to simulate the passage of time and check that the auction price drops correctly over time.
We’ll warp the clock forward and call the buy function from our program at a specific point to confirm the price reflects the expected price drop.
Now add the following test block. In this test, we want to confirm that the auction price decreases correctly as time passes. Here’s what we do:
- Get the on-chain auction data and extract the key parameters (start time, duration, etc).
- Calculate what the price should be 15 minutes into the auction (which is 25% of the total duration - 60 minutes).
- Warp the Solana clock forward by 15 minutes using LiteSVM.
- Check the buyer’s SOL balance before making a purchase.
- Call the
buyfunction to simulate a purchase at the current price. - Check the buyer’s new balance and subtract it from the previous one to see how much was paid.
- Confirm that the price paid matches the expected price (1.625 SOL).
it("executes buy at 25% time with expected price and transfers NFT", async () => {
const auction = await program.account.auction.fetch(auctionAccount.publicKey);
const startTime = auction.startTime.toNumber();
const duration = auction.duration.toNumber();
const quarterTime = startTime + Math.floor(duration / 4);
// Warp clock to 25% into the auction
const c = svm.getClock();
svm.setClock(
new Clock(c.slot, c.epochStartTimestamp, c.epoch, c.leaderScheduleEpoch, BigInt(quarterTime))
);
// Check buyer's lamports before purchase
const balanceBefore = svm.getBalance(buyer.publicKey)!;
// Execute the buy transaction
console.log('Executing buy transaction...');
await program.methods
.buy()
.accounts({
auction: auctionAccount.publicKey,
seller: seller.publicKey,
buyer: buyer.publicKey,
buyerAta,
vaultAuth,
vault,
tokenProgram: TOKEN_PROGRAM_ID,
systemProgram: SystemProgram.programId,
})
.signers([buyer])
.rpc();
// Check buyer's lamports after purchase
const balanceAfter = svm.getBalance(buyer.publicKey)!;
// Calculate the price paid and log it
const pricePaid = Number(balanceBefore - balanceAfter);
console.log(`Actual price paid: ${lamportsToSol(pricePaid)}`);
// Expected price at 25% through the auction duration:
// Starting price - ((Starting price - Floor price) * 0.25) =
// 2 SOL - ((2 SOL - 0.5 SOL) * 0.25) = 1.625 SOL = 1,625,000,000 lamports
const expectedPriceAt25Percent = 1_625_000_000;
// Assert that the price paid is equal to the expected price
assert.equal(
pricePaid,
expectedPriceAt25Percent,
"Buyer should pay the 25% elapsed linear price"
);
// Verify buyer received the NFT (amount stored at bytes 64..72)
const buyerAtaAcc = svm.getAccount(buyerAta)!;
// Read the token amount as u64 (little-endian) from offset 64
const amount = Number(Buffer.from(buyerAtaAcc.data).readBigUInt64LE(64));
assert.equal(amount, 1, "Buyer ATA should now contain 1 token");
});
Earlier, we initialized the auction in our test with a starting price of 2 SOL and a duration of 60 minutes.

After 15 minutes (which is 25% of the auction time), we expect the price to drop by 25%, based on the formula used in our program’s buy function. That gives us 1.625 SOL, which is the expected price in our test.

Warping time forward by 15 minutes
From the test block above, we use svm.setClock to overwrite the Clock sysvar and simulate a later point in time during the auction.

This method takes a Clock object (imported from litesvm) where we set the unixTimestamp to 15 minutes after the auction start time (defined by quarterTime). This allows us to test price decay without having to wait in real time.
This is all made possible by the LiteSVM initialization and account creation we performed in the before block.
Now that all our tests are in place, we can run them with anchor test like we do for a normal Anchor program, and the test passes.

We have successfully time travelled in order to simulate the auction’s price drop
Summary
In this tutorial, we implemented a Dutch auction where the token price decreases linearly over time, and we wrote a test to verify the logic.
We used litesvm (and anchor-litesvm) to create a local test environment where we could warp time. This allowed us to simulate 15 minutes passing without waiting, and confirm that the auction price correctly dropped from 2 SOL to 1.625 SOL (25% into the auction).
By overwriting the Clock sysvar and using LiteSVM’s APIs, we were able to test time‑based logic deterministically.
This article is part of a tutorial series on Solana.