Foundry 中的“cheatcode”(作弊码)是一种允许合约测试控制环境变量(如调用者地址、当前时间戳等)的机制。
在本文中,您将学习如何使用 Starknet Foundry 中最常用的 cheatcode 来测试 Cairo 智能合约。
caller_address Cheatcodes
在 Starknet 智能合约中,get_caller_address() 返回与合约中的函数交互的当前账户地址,类似于 Ethereum 中的 msg.sender。合约依赖它来进行访问控制、权限管理或自定义用途。例如,以下代码在允许继续执行之前,会检查调用者是否为合约所有者:
// Get who is calling this function
let caller = get_caller_address();
assert(caller == self.owner.read(), 'Only owner');
在测试期间,当函数像上面的代码那样检查调用者地址时,我们需要控制 get_caller_address() 的返回值,以便在不使用真实账户(钱包地址)的情况下测试访问控制是否正常工作。这就是 caller_address cheatcode 发挥作用的地方。
Starknet Foundry 的 caller_address cheatcode 允许我们通过模拟来自我们需要任何地址的调用来实现这一点。它们的工作原理就像 Solidity Foundry 中的 prank 函数。可用的函数有:
Starknet Foundry caller_address cheatcodes |
作用 | Solidity Foundry 等效项 |
|---|---|---|
cheat_caller_address(target, caller_address, span) |
针对目标合约模拟调用者,受 CheatSpan 限制 |
无直接等效项(Solidity 的 vm.prank(caller_address) 会全局影响下一次调用,而不是特定于目标的) |
start_cheat_caller_address(target, caller_address) |
开始针对目标合约模拟调用者 | 无直接等效项(Solidity 没有特定于目标的 prank) |
start_cheat_caller_address_global(caller_address) |
全局开始跨所有合约(包括目标合约及其调用的任何合约)模拟调用者 | vm.startPrank(caller_address) |
stop_cheat_caller_address(target) |
停止针对目标合约模拟调用者 | 无直接等效项 |
stop_cheat_caller_address_global() |
停止全局调用者模拟 | vm.stopPrank() |
为了演示这些 caller_address cheatcode 在实践中是如何工作的,请初始化一个新的 Scarb 项目(scarb new cheatcodes)并选择 Starknet Foundry 作为测试运行器。
在 src/lib.cairo 文件中,有一个由 Scarb 生成的默认余额管理合约,它允许我们增加并从合约存储中检索余额。
更新这个模板合约,在 increase_balance() 函数中加入基于所有者的访问控制。更新后的合约将存储一个 owner 地址和一个只能由所有者修改的 balance。increase_balance() 函数将使用 get_caller_address() 来检查是谁在调用它,并仅允许所有者继续执行。更新后的合约还将包含 get_owner() 函数以检查所有者的地址,这在编写测试时非常有用。
复制下方的更新版合约并将其粘贴到 src/lib.cairo 中:
use starknet::ContractAddress;
/// Interface representing `HelloContract`.
/// This interface allows modification and retrieval of the contract balance.
#[starknet::interface]
pub trait IHelloStarknet<TContractState> {
/// Increase contract balance.
fn increase_balance(ref self: TContractState, amount: u256);
/// Retrieve contract balance.
fn get_balance(self: @TContractState) -> u256;
fn get_owner(self: @TContractState) -> ContractAddress;
}
/// Simple contract for managing balance.
#[starknet::contract]
mod HelloStarknet {
use starknet::{ContractAddress, get_caller_address};
use starknet::storage::{StoragePointerReadAccess, StoragePointerWriteAccess};
#[storage]
struct Storage {
owner: ContractAddress,
balance: u256,
}
#[constructor]
fn constructor(ref self: ContractState, owner: ContractAddress) {
// Set the owner when the contract is deployed
self.owner.write(owner);
}
#[abi(embed_v0)]
impl HelloStarknetImpl of super::IHelloStarknet<ContractState> {
fn increase_balance(ref self: ContractState, amount: u256) {
let caller = get_caller_address();
//NEWLY ADDED
//checks only the owner can increase balance
assert(caller == self.owner.read(), 'Only owner');
assert(amount != 0, 'Amount cannot be 0');
// Update the balance by adding the new amount
self.balance.write(self.balance.read() + amount);
}
fn get_balance(self: @ContractState) -> u256 {
self.balance.read()
}
fn get_owner(self: @ContractState) -> ContractAddress {
self.owner.read()
}
}
}
这种基于所有者的访问控制模式在 DeFi 协议中很常见,其中特定地址有权执行提取资金等特定功能。
由于 increase_balance() 仅限于合约所有者使用,我们需要使用 caller_address cheatcode 来模拟来自所有者地址的调用。
使用 cheat_caller_address 模拟地址
cheat_caller_address cheatcode 允许我们在调用合约函数时模拟任何地址。这意味着我们可以让测试调用看起来像是来自特定地址(例如合约所有者),从而使我们能够测试访问控制逻辑。
cheat_caller_address cheatcode 具有以下函数签名:
fn cheat_caller_address(target: ContractAddress, caller_address: ContractAddress, span: CheatSpan)
它接收三个参数:
target:应该看到被模拟调用者的特定合约caller_address:要模拟的地址span:一个CheatSpan枚举,定义了作弊持续的时间。它有两个变体:CheatSpan::Indefinite:作弊保持活动状态,直到手动停止CheatSpan::TargetCalls(n):将作弊应用于n次函数调用
要在测试中使用 cheat_caller_address,请导航到项目目录中的 tests/test_contract.cairo。清除模板测试并更新导入,以包含 cheat_caller_address 和 CheatSpan,如下所示:
use starknet::ContractAddress;
use snforge_std::{declare, ContractClassTrait, DeclareResultTrait, cheat_caller_address, CheatSpan};
为了解 cheat_caller_address 在实践中如何工作,我们将创建两个测试:一个演示不使用 cheat_caller_address cheatcode 时的失败情况,另一个展示如何正确使用该 cheatcode。
由于更新后的 HelloContract 构造函数现在需要一个所有者地址,我们需要在测试中部署合约时提供一个。我们将创建一个 deploy_contract 辅助函数,它接受所有者地址作为参数并将其传递给构造函数,同时提供一个 OWNER 常量,该常量为测试提供一个可重用的模拟地址。
然后,我们将导入测试中与部署合约交互所需的调度器 (dispatchers)。总的来说,我们有以下代码:
use starknet::ContractAddress;
use snforge_std::{declare, ContractClassTrait, DeclareResultTrait, cheat_caller_address, CheatSpan};
//NEWLY ADDED BELOW//
use cheatcodes::IHelloStarknetDispatcher;
use cheatcodes::IHelloStarknetDispatcherTrait;
const OWNER: ContractAddress = 'OWNER'.try_into().unwrap();
fn deploy_contract(name: ByteArray, owner: ContractAddress) -> ContractAddress {
let contract = declare(name).unwrap().contract_class(); // Declare the contract class
let constructor_args = array![owner.into()]; // Pass owner to constructor
let (contract_address, _) = contract.deploy(@constructor_args).unwrap(); // Deploy the contract and return its addres
contract_address
}
IHelloStarknetDispatcher 和 IHelloStarknetDispatcherTrait 调度器允许我们从测试中调用合约函数。
OWNER 是一个常量,它将字符串字面量 'OWNER' 转换为 ContractAddress 类型,可在我们的测试中重复使用。
deploy_contract 函数声明合约类,通过 constructor_args 将所有者地址传递给构造函数,并返回已部署合约的地址供我们交互。
测试 1:测试失败情况
这第一个测试显示了当我们尝试在不使用 cheat_caller_address cheatcode 的情况下调用 increase_balance() 时会发生什么。我们将以 OWNER 作为所有者来部署合约,然后尝试增加余额。这将会失败,因为测试环境的地址不同于存储在合约中的所有者地址。
将此 test_environment_address_owner_check 测试代码添加到您的测试文件中:
use starknet::ContractAddress;
use snforge_std::{declare, ContractClassTrait, DeclareResultTrait, cheat_caller_address, CheatSpan};
use cheatcodes::IHelloStarknetDispatcher;
use cheatcodes::IHelloStarknetDispatcherTrait;
const OWNER: ContractAddress = 'OWNER'.try_into().unwrap();
fn deploy_contract(name: ByteArray, owner: ContractAddress) -> ContractAddress {
let contract = declare(name).unwrap().contract_class();
let constructor_args = array![owner.into()];
let (contract_address, _) = contract.deploy(@constructor_args).unwrap();
contract_address
}
//NEWLY ADDED//
#[test]
fn test_environment_address_owner_check() {
// Deploy the HelloStarknet contract with OWNER as the owner
let contract_address = deploy_contract("HelloStarknet", OWNER);
let dispatcher = IHelloStarknetDispatcher { contract_address };
// Verify the owner was set correctly during deployment
assert(dispatcher.get_owner() == OWNER, 'Owner not set correctly');
// This call should fail because the test environment address != OWNER
// The get_caller_address() inside increase_balance will return the environment address,
// which is not the OWNER, so the owner check should fail
dispatcher.increase_balance(42);
}
运行 scarb test test_environment_address_owner_check。您应该会看到以下失败:
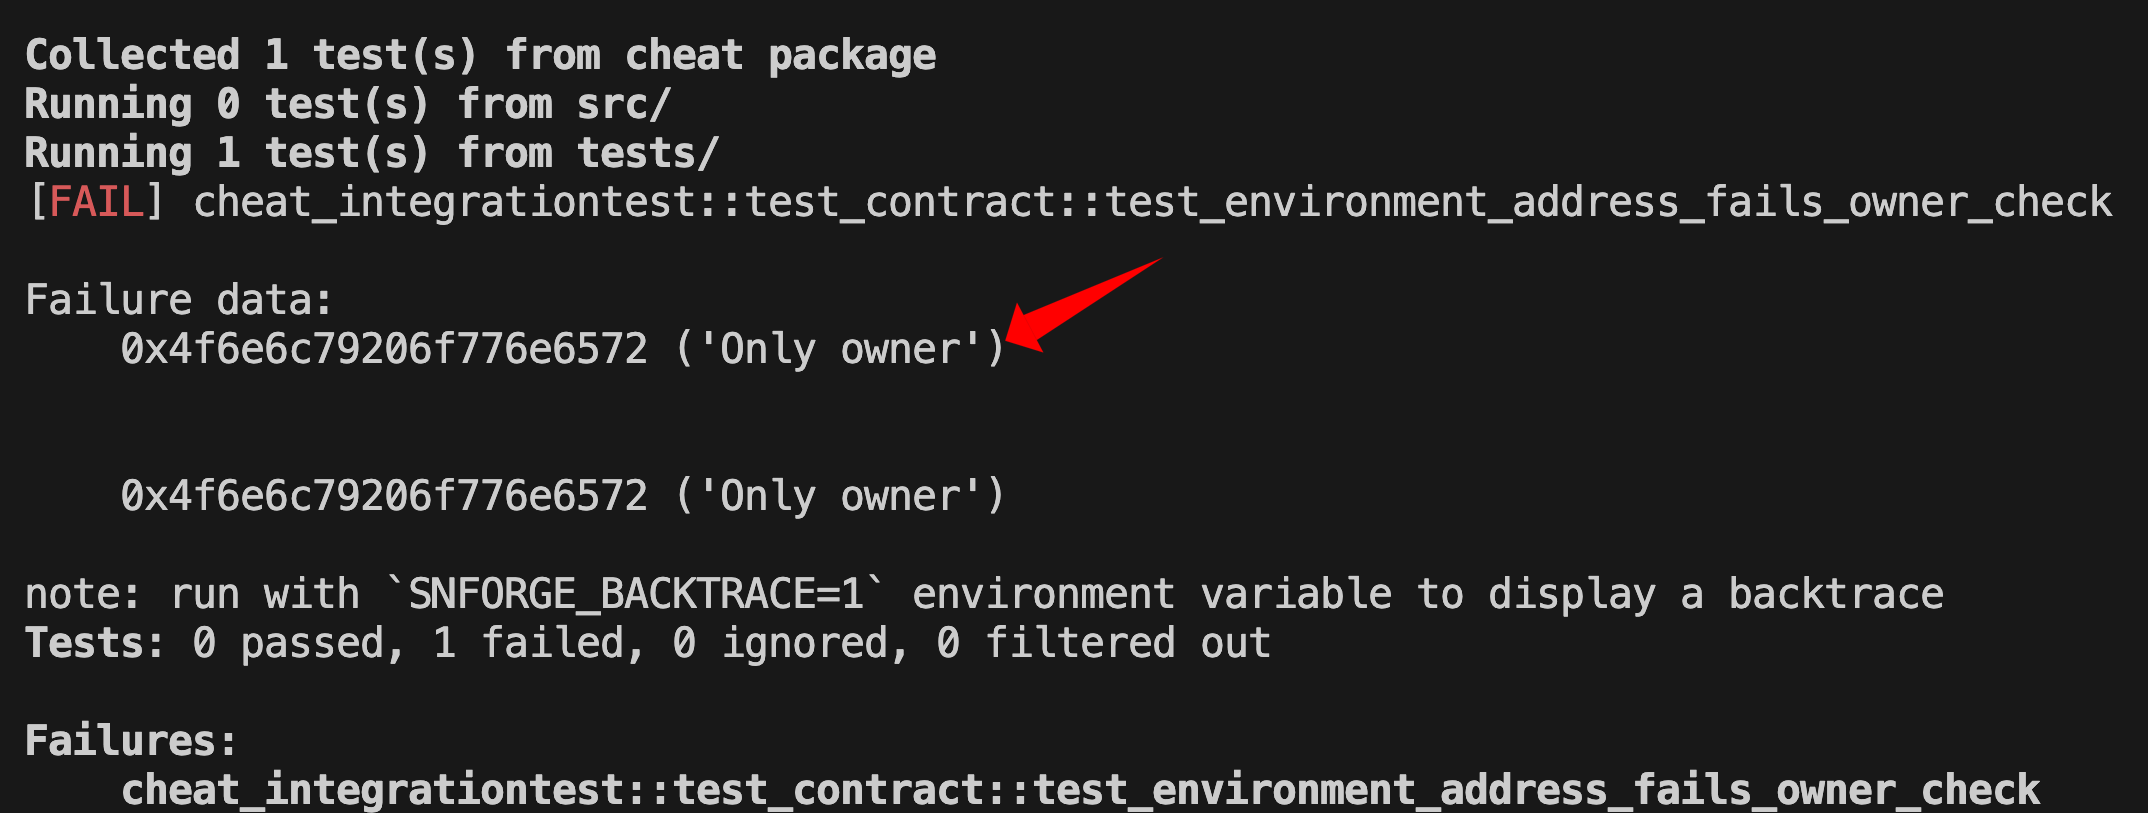
发生故障的原因是,当执行 dispatcher.increase_balance(42) 时,increase_balance() 内部的 get_caller_address() 函数返回的是测试环境的地址,而不是 OWNER。由于合约的所有者设置为 OWNER,因此断言 assert(caller == self.owner.read(), 'Only owner') 失败。
测试 2:使用 cheat_caller_address cheatcode
现在让我们看看 cheat_caller_address 如何解决这个访问控制测试问题。将 test_cheat_caller_address 测试添加到您的测试文件中,如下所示:
use starknet::ContractAddress;
use snforge_std::{declare, ContractClassTrait, DeclareResultTrait, cheat_caller_address, CheatSpan};
use cheatcodes::IHelloStarknetDispatcher;
use cheatcodes::IHelloStarknetDispatcherTrait;
const OWNER: ContractAddress = 'OWNER'.try_into().unwrap();
fn deploy_contract(name: ByteArray, owner: ContractAddress) -> ContractAddress {
let contract = declare(name).unwrap().contract_class();
let constructor_args = array![owner.into()];
let (contract_address, _) = contract.deploy(@constructor_args).unwrap();
contract_address
}
//NEWLY ADDED//
#[test]
fn test_cheat_caller_address() {
// Deploy the HelloStarknet contract with OWNER as the owner
let contract_address = deploy_contract("HelloStarknet", OWNER);
let dispatcher = IHelloStarknetDispatcher { contract_address };
// Verify the owner was set correctly during deployment
assert(dispatcher.get_owner() == OWNER, 'Owner not set correctly');
// cheat caller address to be the owner
cheat_caller_address(contract_address, OWNER, CheatSpan::TargetCalls(1));
dispatcher.increase_balance(42); // This function call uses the cheat
assert(dispatcher.get_balance() == 42, 'Balance not 42');
// The cheat has expired after 1 call (CheatSpan::TargetCalls(1))
// Any subsequent calls would fail the owner check
}
cheat_caller_address(contract_address, OWNER, CheatSpan::TargetCalls(1)) 调用覆盖了 get_caller_address() 的返回值。它使合约相信下一次函数调用来自 OWNER 而不是测试环境。
当 dispatcher.increase_balance(42) 执行时,get_caller_address() 返回 OWNER,从而允许所有者检查通过。
运行 scarb test test_cheat_caller_address,您应该会看到测试通过:
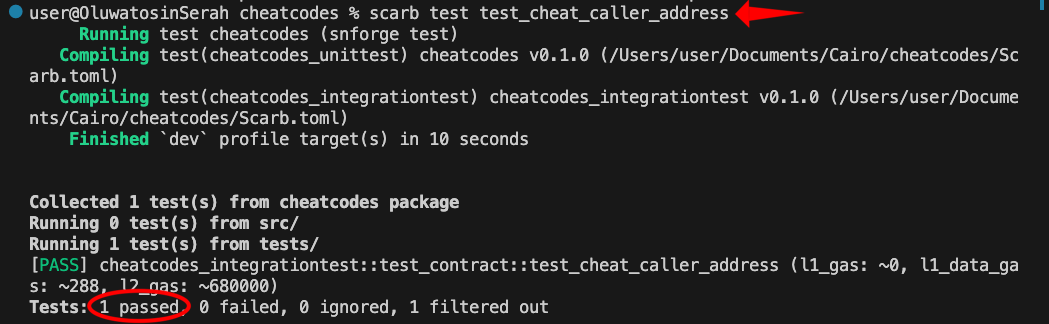
CheatSpan::TargetCalls(1) 参数告诉 snforge 仅对下一次函数调用 (increase_balance(42)) 应用调用者作弊。之后,调用者地址恢复正常。
如果我们试图在没有另一次作弊或不增加 TargetCalls 的情况下再次调用 increase_balance(),它将会失败,因为调用者将不再是所有者。
使用 start_cheat_caller_address 和 stop_cheat_caller_address 持久化模拟调用者
与需要 CheatSpan 参数来控制持续时间的 cheat_caller_address 不同,start_cheat_caller_address 会为所有后续调用无限期地设置调用者地址,直到使用 stop_cheat_caller_address 手动停止。
start_cheat_caller_address 需要两个参数:一个 target(应该看到被模拟调用者的特定合约)和一个 caller_address(要模拟的地址),如下所示:
fn start_cheat_caller_address(target: ContractAddress, caller_address: ContractAddress
而 stop_cheat_caller_address 仅获取 target 以停止该特定合约的模拟:
fn stop_cheat_caller_address(target: ContractAddress)
要使用这些 cheatcode,请更新 snforge 库导入以包含 start_cheat_caller_address 和 stop_cheat_caller_address cheatcode 以及现有的导入项:
use snforge_std::{declare, ContractClassTrait, DeclareResultTrait, start_cheat_caller_address, stop_cheat_caller_address, cheat_caller_address, CheatSpan};
以下测试演示了如何使用 start_cheat_caller_address 在多个函数调用中持久化模拟调用者:
#[test]
fn test_persistent_caller_cheat() {
let contract_address = deploy_contract("HelloStarknet", OWNER);
let dispatcher = IHelloStarknetDispatcher { contract_address };
// Start impersonating OWNER for all calls to this specific contract until we explicitly stop it
start_cheat_caller_address(contract_address, OWNER);
// multiple calls will all use OWNER as caller
dispatcher.increase_balance(10);
dispatcher.increase_balance(2);
dispatcher.increase_balance(45);
assert(dispatcher.get_balance() == 57, 'Balance should be 57');
// Stop the caller impersonation
stop_cheat_caller_address(contract_address);
}
在 test_persistent_caller_cheat() 中,我们部署了以 OWNER 为存储所有者的合约,然后调用 start_cheat_caller_address(contract_address, OWNER) 以开始对该合约的所有后续调用进行所有者模拟。
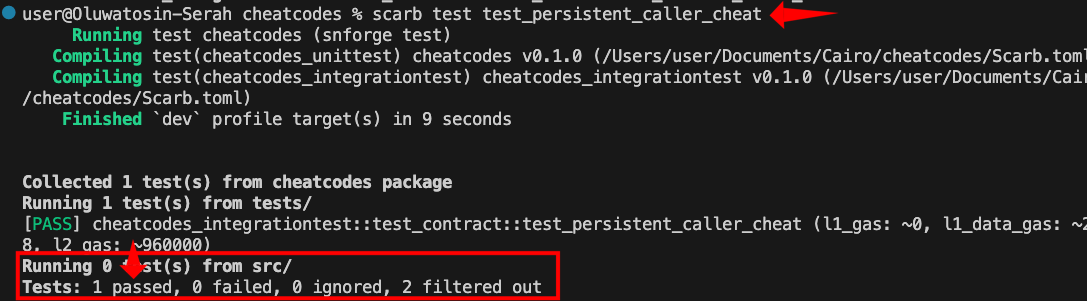
将上面的测试复制到 tests/test_contract.cairo 中并使用 scarb test test_persistent_caller_cheat 运行它。
对 increase_balance 的这三次调用都会成功,因为作弊在所有函数调用中保持激活状态。每次函数检查 get_caller_address() 时,它都会返回 OWNER 而不是测试环境的地址。作弊一直保持活跃,直到我们显式地调用 stop_cheat_caller_address(contract_address)。
重要提示:
start_cheat_caller_address是特定于目标的,这意味着它只影响对指定合约地址的调用。如果在针对 contractA 激活作弊的同时调用了另一个合约 (contractB) 上的函数,contractB 将看到正常的测试环境地址,而不是模拟的地址。作弊仅适用于target参数中指定的合约。
当您需要以相同地址向指定的合约进行多次连续调用时,请使用 start_cheat_caller_address。
使用 start_cheat_caller_address_global 和 stop_cheat_caller_address_global 全局模拟调用者
对于测试多个合约之间的交互,start_cheat_caller_address_global 为所有合约调用设置一个通用的调用者地址,直到使用 stop_cheat_caller_address_global 显式停止。它的工作原理类似于 Foundry 中 Solidity 的 startPrank/stopPrank。
要使用这些全局调用者 cheatcode,请将它们添加到现有的 snforge 库导入中:
use snforge_std::{declare, ContractClassTrait, DeclareResultTrait, start_cheat_caller_address, stop_cheat_caller_address, cheat_caller_address, CheatSpan, start_cheat_caller_address_global, stop_cheat_caller_address_global};
下面的测试使用此 start_cheat_caller_address_global cheatcode,通过相同的被伪装的调用者与两个合约进行交互。我们将部署 HelloStarknet 合约的两个独立实例,并在全局模拟所有者的同时对两者进行调用:
#[test]
fn test_global_caller_cheat() {
// Deploy two separate instances of the HelloStarknet contract
// Both contracts have OWNER as their owner
let contract1 = deploy_contract("HelloStarknet", OWNER);
let contract2 = deploy_contract("HelloStarknet", OWNER);
// Create dispatchers to interact with each contract
let dispatcher1 = IHelloStarknetDispatcher { contract_address: contract1 };
let dispatcher2 = IHelloStarknetDispatcher { contract_address: contract2 };
// Start global caller impersonation - affects ALL contracts
// Every contract call will now appear to come from OWNER
start_cheat_caller_address_global(OWNER);
// Both calls succeed because both contracts see OWNER as the caller
dispatcher1.increase_balance(100);
dispatcher2.increase_balance(200);
// Confirm each contract has the correct balance
assert(dispatcher1.get_balance() == 100, 'Contract1 balance wrong');
assert(dispatcher2.get_balance() == 200, 'Contract2 balance wrong');
// Stop the global cheat
stop_cheat_caller_address_global();
}
将上面的测试代码添加到您的 test_contract.cairo 文件中,并使用 scarb test test_global_caller_cheat 运行它。
测试将会通过,因为 test_global_caller_cheat() 测试中的 start_cheat_caller_address_global 会同时影响所有合约。这两个合约(contract1 和 contract2)都将调用者视为 OWNER,因此两项操作都会成功,而无需为每个合约设置单独的作弊。
这种全局调用者 cheatcode 在测试多个合约之间的交互时特别有用,在此类场景中所有的调用都应源自同一个地址。一个实际的例子是质押协议,其中用户需要使用相同的调用者地址与多个合约交互,先在 ERC-20 合约上批准代币,然后将这些代币质押到质押合约中。使用全局调用者作弊可确保跨所有这些相互关联的操作的调用者身份保持一致。
正如 caller_address cheatcode 让我们控制谁在调用合约函数一样,我们也需要一种方法来测试具有时间依赖逻辑的合约,而无需等待实际时间流逝。许多智能合约都包含基于时间的限制,例如取款延迟、归属时间表或冷却期。通常测试这些功能需要等待实时时间过去,这使得测试变得不切实际。区块时间戳 (Block timestamp) cheatcode 通过让我们控制合约对时间的感知来解决这个问题。
block_timestamp Cheatcodes
block_timestamp cheatcode 使得能够在无需等待实际时间流逝的情况下模拟基于时间的行为。此 cheatcode 的可用函数有:
Starknet foundry block_timestamp cheatcode |
作用 | Solidity foundry 等效项 |
|---|---|---|
cheat_block_timestamp(target, timestamp, span) |
针对目标合约设置区块时间戳,受 CheatSpan 限制 |
无直接等效项(vm.warp(timestamp) 仅是全局的) |
start_cheat_block_timestamp(target, timestamp) |
开始针对目标合约设置时间戳 | 无直接等效项 |
start_cheat_block_timestamp_global(timestamp) |
全局跨所有合约设置区块时间戳 | vm.warp(timestamp) |
stop_cheat_block_timestamp(target) |
停止针对目标合约的时间戳修改 | 无直接等效项 |
stop_cheat_block_timestamp_global() |
停止全局时间戳修改 | 使用 vm.warp(original_timestamp) 手动重置 |
为了说明这些 block_timestamp cheatcode 的工作原理,我们将修改 HelloStarknet 合约以包含时间锁功能。修改后的合约将包括两个新函数:
set_lock_time(duration)允许所有者设置时间锁,方法是通过调用get_block_timestamp()获取当前时间并将持续时间加到该时间上time_locked_withdrawal(amount)允许所有者提取资金,但只能在锁定时间过后,方法是检查当前时间戳(get_block_timestamp())是否大于或等于存储的锁定时间。
复制下方的更新代码并替换您的 src/lib.cairo 文件的内容:
use starknet::ContractAddress;
/// Interface representing `HelloContract`.
/// This interface allows modification and retrieval of the contract balance with time-locked functionality.
#[starknet::interface]
pub trait IHelloStarknet<TContractState> {
fn increase_balance(ref self: TContractState, amount: u256);
fn get_balance(self: @TContractState) -> u256;
fn get_owner(self: @TContractState) -> ContractAddress;
// NEWLY ADDED
fn time_locked_withdrawal(ref self: TContractState, amount: u256);
fn set_lock_time(ref self: TContractState, duration: u64);
}
#[starknet::contract]
mod HelloStarknet {
use starknet::{ContractAddress, get_caller_address, get_block_timestamp};
use starknet::storage::{StoragePointerReadAccess, StoragePointerWriteAccess};
#[storage]
struct Storage {
owner: ContractAddress,
balance: u256,
lock_until: u64,
}
#[constructor]
fn constructor(ref self: ContractState, owner: ContractAddress) {
// Set the owner when the contract is deployed
self.owner.write(owner);
}
#[abi(embed_v0)]
impl HelloStarknetImpl of super::IHelloStarknet<ContractState> {
fn increase_balance(ref self: ContractState, amount: u256) {
// Get who is calling this function
let caller = get_caller_address();
// Only owner can increase balance
assert(caller == self.owner.read(), 'Only owner');
assert(amount != 0, 'Amount cannot be 0');
// Add the amount to current balance
self.balance.write(self.balance.read() + amount);
}
fn get_balance(self: @ContractState) -> u256 {
self.balance.read()
}
fn get_owner(self: @ContractState) -> ContractAddress {
self.owner.read()
}
// NEWLY ADDED: Time lock functionality
fn set_lock_time(ref self: ContractState, duration: u64) {
let caller = get_caller_address();
// Only owner can set lock time
assert(caller == self.owner.read(), 'Only owner');
assert(duration > 0, 'Duration must be positive');
// Set lock_until = current timestamp + duration
self.lock_until.write(get_block_timestamp() + duration);
}
// NEWLY ADDED: Time-locked withdrawal function
fn time_locked_withdrawal(ref self: ContractState, amount: u256) {
let caller = get_caller_address();
// Only owner can withdraw
assert(caller == self.owner.read(), 'Only owner');
// Check if enough time has passed since lock was set
// This is the key time-based check we'll test with cheatcodes
assert(get_block_timestamp() >= self.lock_until.read(), 'Still locked');
// Ensure sufficient balance for withdrawal
assert(amount <= self.balance.read(), 'Insufficient balance');
// Subtract the withdrawal amount from balance
self.balance.write(self.balance.read() - amount);
}
}
}
有了这个时间锁合约之后,让我们看看如何使用 block_timestamp cheatcode 对其进行测试。
使用 cheat_block_timestamp cheatcode
cheat_block_timestamp cheatcode 可以针对特定合约在可控的调用次数内改变区块时间戳。以下是函数签名:
fn cheat_block_timestamp(target: ContractAddress, timestamp: u64, span: CheatSpan)
该函数接收三个参数:
target:应该看到修改后时间戳的特定合约timestamp:要设置的时间戳值span:应该有多少次调用看到此时间戳
请注意,在测试环境中,
get_block_timestamp()默认返回 0,因此我们不能在测试中依赖它进行时间戳断言。相反,我们需要根据我们使用 cheatcode 设置的值来手动计算和跟踪时间戳。
要测试时间锁功能,请将 cheat_block_timestamp cheatcode 添加到现有的 snforge 库导入中。
我们将首先展示没有进行任何时间戳操作时时间锁提款会失败,然后展示 cheatcode 如何使我们能够绕过时间限制:
#[test]
fn test_time_locked_withdrawal_fails_without_cheat() {
let contract_address = deploy_contract("HelloStarknet", OWNER);
let dispatcher = IHelloStarknetDispatcher { contract_address };
// Set up as owner for initial state
start_cheat_caller_address(contract_address, OWNER);
// Set up the contract state
dispatcher.increase_balance(1000);
// Set 1-hour lock: lock_until = current_time + 3600
dispatcher.set_lock_time(3600);
// Try to withdraw immediately without advancing time
// This will cause the test to fail with "Still locked" error when you run scarb test
dispatcher.time_locked_withdrawal(100);
// This assertion will never be reached because the withdrawal above fails
assert(dispatcher.get_balance() == 900, 'Withdrawal should fail');
}
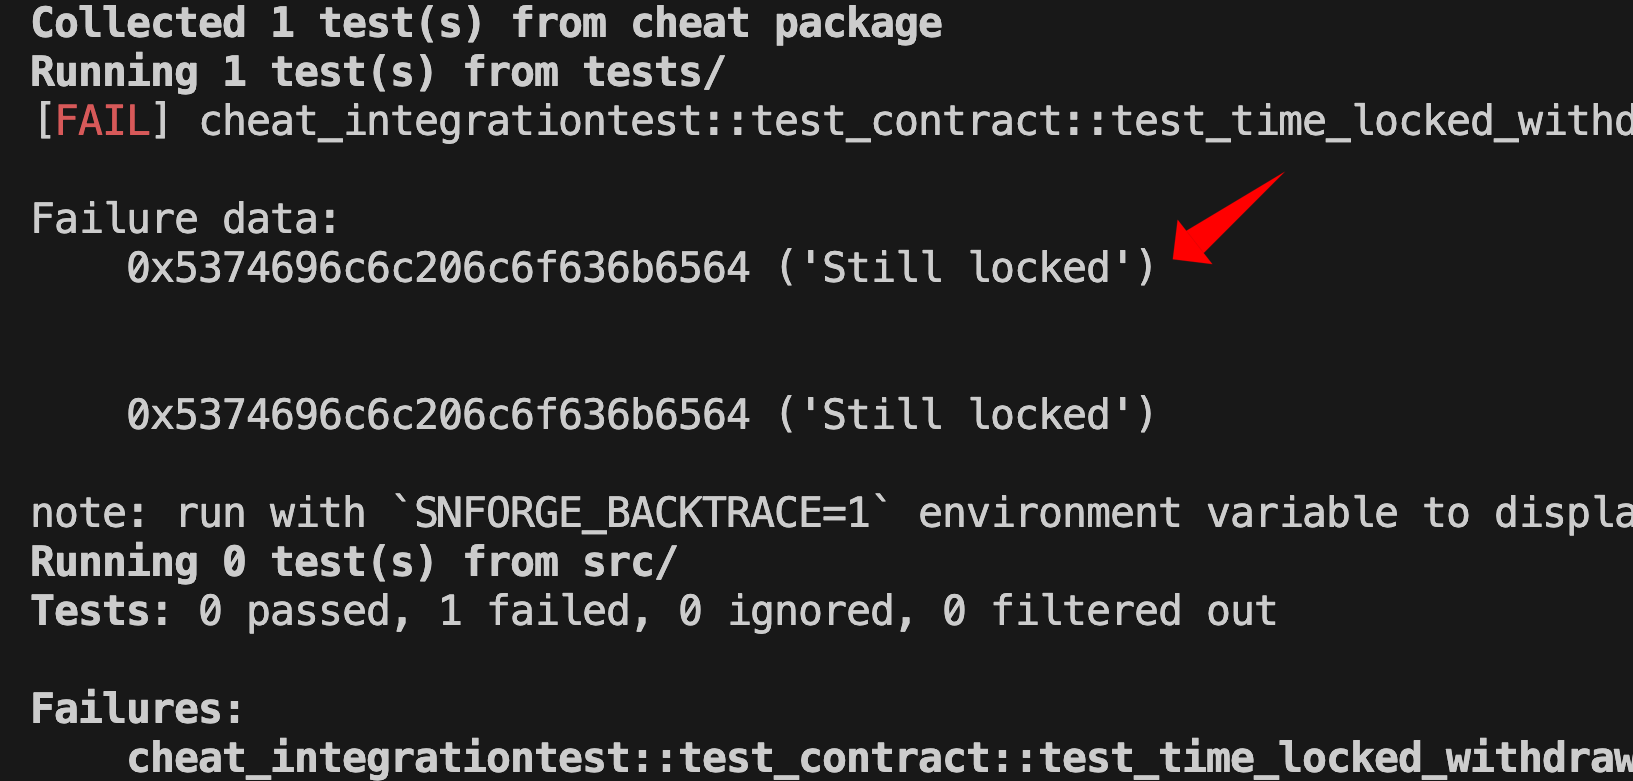
当您运行 scarb test test_time_locked_withdrawal_fails_without_cheat 时,此测试将失败并显示“Still locked”错误,证明时间锁机制正常工作。
现在让我们看一个使用 cheat_block_timestamp 进行“时间旅行”的测试,它通过模拟足够时间流逝来使时间锁提款成功。
#[test]
fn test_cheat_block_timestamp() {
let contract_address = deploy_contract("HelloStarknet", OWNER);
let dispatcher = IHelloStarknetDispatcher { contract_address };
// Set up initial state: we need 2 owner calls (increase_balance + set_lock_time)
cheat_caller_address(contract_address, OWNER, CheatSpan::TargetCalls(2));
// Add 1000 to the balance (first owner call)
dispatcher.increase_balance(1000); // Balance: 0 + 1000 = 1000
// Set a 1-hour time lock from current timestamp (second owner call)
dispatcher.set_lock_time(3600); // Lock until: current_time + 3600 seconds
// "Time travel" to 2 hours in the future (7200 seconds from block 0)
let future_timestamp = 7200;
cheat_block_timestamp(contract_address, future_timestamp, CheatSpan::TargetCalls(1));
// Need to impersonate owner again for the withdrawal call
cheat_caller_address(contract_address, OWNER, CheatSpan::TargetCalls(1));
// This withdrawal succeeds because get_block_timestamp() now returns 7200 which is > lock_until (3600)
dispatcher.time_locked_withdrawal(100); // Balance: 1000 - 100 = 900
// confirm the withdrawal was successful
assert(dispatcher.get_balance() == 900, 'Withdrawal failed');
}
在上面的代码中,我们部署了合约,向所有者的余额中添加了 1000,并使用 set_lock_time(3600) 设置了 1 小时的锁定。
调用 cheat_block_timestamp(contract_address, future_timestamp, CheatSpan::TargetCalls(1)) 会使合约认为已经过去了 2 小时(7200 秒)。当 time_locked_withdrawal() 使用 get_block_timestamp() 检查当前时间时,它看到的是 7200 秒,这大于 lock_until (3600),因此提款成功。
let future_timestamp = 7200; // 2 hours later
cheat_block_timestamp(contract_address, future_timestamp, CheatSpan::TargetCalls(1));
CheatSpan::TargetCalls(1) 参数意味着只有下一次函数调用 (time_locked_withdrawal) 会看到这个被修改的时间戳。
cheat_block_timestamp 可在不产生实际延迟的情况下模拟时间推移,让我们能够即时测试与时间相关的逻辑。
使用 start_cheat_block_timestamp cheatcode
与需要 CheatSpan 参数来控制持续时间的 cheat_block_timestamp 不同,start_cheat_block_timestamp 会使目标合约在所有后续调用中看到模拟的时间戳,直到被手动停止。这是函数签名:
fn start_cheat_block_timestamp(target: ContractAddress, timestamp: u64)
更新 snforge 库导入以将 start_cheat_block_timestamp 和 stop_cheat_block_timestamp cheatcode 与现有的导入内容包含在一起,以便我们了解它们的工作原理:
use snforge_std::{declare, ContractClassTrait, DeclareResultTrait, start_cheat_caller_address, stop_cheat_caller_address, cheat_caller_address, CheatSpan, start_cheat_caller_address_global, stop_cheat_caller_address_global, cheat_block_timestamp, start_cheat_block_timestamp, stop_cheat_block_timestamp};
考虑下面的测试代码,它展示了如何通过重新启动时间戳作弊来推进时间,以使用 start_cheat_block_timestamp 和 stop_cheat_block_timestamp 测试时间锁功能:
#[test]
fn test_start_cheat_block_timestamp() {
let contract_address = deploy_contract("HelloStarknet", OWNER);
let dispatcher = IHelloStarknetDispatcher { contract_address };
// Set a specific starting timestamp (August 6th, 2025)
let start_time = 1754439529;
start_cheat_caller_address(contract_address, OWNER);
// Set up the contract state
dispatcher.increase_balance(1000);
// Make all contract calls see this timestamp until we change it
start_cheat_block_timestamp(contract_address, start_time);
// Set 1-hour lock: lock_until = start_time + 3600
dispatcher.set_lock_time(3600); // Lock until: 1754439529 + 3600 = 1754443129
// move 2 hours forward (7200 seconds)
let future_time = start_time + 7200; // New time: 1754439529 + 7200 = 1754446729
// Stop the current timestamp cheat
stop_cheat_block_timestamp(contract_address);
// Start a new timestamp cheat with the future time
// This simulates 2 hours passing (future_time > lock_until, so withdrawal allowed)
start_cheat_block_timestamp(contract_address, future_time);
// Withdrawal succeeds because get_block_timestamp() returns future_time (1754446729)
// which is greater than lock_until (1754443129)
dispatcher.time_locked_withdrawal(100);
// confirm the withdrawal was successful
assert(dispatcher.get_balance() == 900, 'Withdrawal failed');
// stop both cheats
stop_cheat_caller_address(contract_address);
stop_cheat_block_timestamp(contract_address);
}
在 test_start_cheat_block_timestamp() 中,我们首先设置一个所有合约调用都会看到的特定时间戳 (start_time),然后通过增加余额并创建时间锁来设置合约状态。
为了模拟时间流逝,我们停止当前的时间戳作弊,并以 future_time(2 小时后)开始一个新的作弊,这使得提款成功,因为合约现在看到的是较晚的时间戳。
要使用 start_cheat_block_timestamp 更新时间戳,我们必须停止当前作弊并开始一个新作弊,从而有效地通过从 start_time 更改为 future_time 来模拟时间流逝。
当你需要在推进时间进行后续操作之前,让多个操作发生在完全相同模拟时间时,使用 start_cheat_block_timestamp 是很有用的。与 start_cheat_caller_address 类似,这个 cheatcode 是特定于目标的;它仅影响对指定合约地址进行的调用。如果您需要在同一个测试中为了与多个不同合约实例交互而不同地设置时间,则应改用 start_cheat_block_timestamp_global cheatcode。
在 caller_address 和 block_timestamp cheatcode 涵盖的所有场景中,测试都要求验证函数在满足条件时能正确工作,并在应该失败时抛出失败。这时候我们就需要确保合约能够正确地回滚 (revert)。
预期回滚 (Expecting a revert)
在测试一个函数应在特定条件下失败时,Starknet Foundry 提供了 #[should_panic] 属性,这类似于 Solidity foundry 中的 vm.expectRevert()。该属性本身不是一个 cheatcode,但它能与其他 cheatcode 配合使用来测试失败场景:
#[should_panic(expected: ('Still locked',))]
#[should_panic] 属性告诉测试框架:
- 预期此测试会导致 panic(恐慌);如果不 panic,则测试失败
- 预期具体的错误信息;panic 必须包含完全一致的信息 ‘Still locked’
- 测试仅在它正确地引发 panic 时才通过;panic 和错误信息必须同时匹配
当包含 #[should_panic] 的测试通过时,说明函数如预期般 panic 了。在 expected 参数中包含正确的错误信息非常重要,以验证测试是否因预期的原因而失败。
下面是一个基本的回滚测试示例,它验证了如果在锁定周期到期之前尝试时间锁取款,它是否会失败:
#[test]
#[should_panic(expected: ('Still locked',))]
fn test_time_locked_withdrawal_fails_too_early() {
let contract_address = deploy_contract("HelloStarknet", OWNER);
let dispatcher = IHelloStarknetDispatcher { contract_address };
start_cheat_caller_address(contract_address, OWNER);
// Set up the contract state
dispatcher.increase_balance(1000);
dispatcher.set_lock_time(3600); // Lock for 1 hour from timestamp 0
dispatcher.time_locked_withdrawal(100);
}
运行 scarb test test_time_locked_withdrawal_fails_too_early 来测试代码:
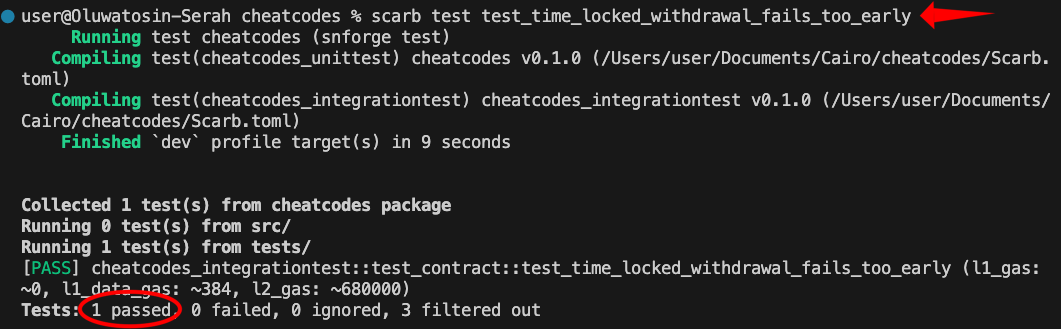
由于测试环境从时间戳 0 开始,而我们设置了 3600 秒的锁定,取款尝试命中 assert(get_block_timestamp() >= self.lock_until.read(), 'Still locked') 这一行并触发 panic。
#[should_panic(expected: ('Still locked',))] 属性告诉测试框架,此 panic 是预期的行为,并且当其发生时该测试应被视为通过。
我们不需要在 test_time_locked_withdrawal_fails_too_early 测试中使用 stop_cheat_caller_address,因为它在到达任何清理代码之前就已经 panic 了。
使用安全调度器 (Safe Dispatcher)
有时我们想要在不使我们的测试直接 panic 的情况下检查错误。为此,我们可以使用“安全调度器”(Safe Dispatcher)。
安全调度器是合约调度器自动生成的一个变体,它返回 Result<T, Array<felt252>> 而不是直接 panic。
当我们定义类似 IHelloStarknet 的合约接口时,编译器会生成许多与调度器相关的项,但与测试相关的主要有以下两项:
- 常规调度器 (Regular Dispatcher) (
IHelloStarknetDispatcher和IHelloStarknetDispatcherTrait):在出错时会 panic - 安全调度器 (Safe Dispatcher) (
IHelloStarknetSafeDispatcher和IHelloStarknetSafeDispatcherTrait):返回 Result 类型
在以下情况下使用安全调度器:
- 检查确切的错误信息
- 在一个测试中测试多个错误条件
- 以编程方式处理错误而不引发 panic
以下测试示例使用安全调度器来验证访问控制,通过确保未授权的调用不仅会失败,还会返回正确的错误信息。导入安全调度器(IHelloStarknetSafeDispatcher 和 IHelloStarknetSafeDispatcherTrait)以启用合约交互:
const USER: ContractAddress = 'USER'.try_into().unwrap();
#[test]
#[feature("safe_dispatcher")]
fn test_non_owner_error_with_safe_dispatcher() {
// Deploy the HelloStarknet contract with OWNER as the owner
let contract_address = deploy_contract("HelloStarknet", OWNER);
// Use the safe dispatcher variant to handle errors gracefully
let safe_dispatcher = IHelloStarknetSafeDispatcher { contract_address };
// Impersonate USER who is NOT the owner
start_cheat_caller_address(contract_address, USER);
// Call increase_balance - this will fail but return a Result instead of panicking
match safe_dispatcher.increase_balance(100) {
// If the call succeeds, the test should fail because non-owners shouldn't have access
Result::Ok(_) => core::panic_with_felt252('Should have panicked'),
// If the call fails (expected), confirm we get the correct error message
Result::Err(panic_data) => {
// Check that the first element of panic_data contains our expected error message
assert(*panic_data.at(0) == 'Only owner', 'Wrong error message');
},
};
// stop the caller impersonation
stop_cheat_caller_address(contract_address);
}
在上面的 test_non_owner_error_with_safe_dispatcher 测试中,当 USER_1 尝试增加余额时,安全调度器会返回成功 (Ok) 或失败 (Err):
match safe_dispatcher.increase_balance(100) {
Result::Ok(_) => core::panic_with_felt252('Should have panicked'), //success
Result::Err(panic_data) => {
assert(*panic_data.at(0) == 'Only owner', 'Wrong error message'); //failure
},
};
如果调用意外成功,测试会因 ‘Should have panicked’ 而失败,因为非所有者不应拥有访问权限。如果它按预期失败,我们通过检查 panic_data 数组的第一个元素,来验证错误信息是否精确为 ‘Only owner’。
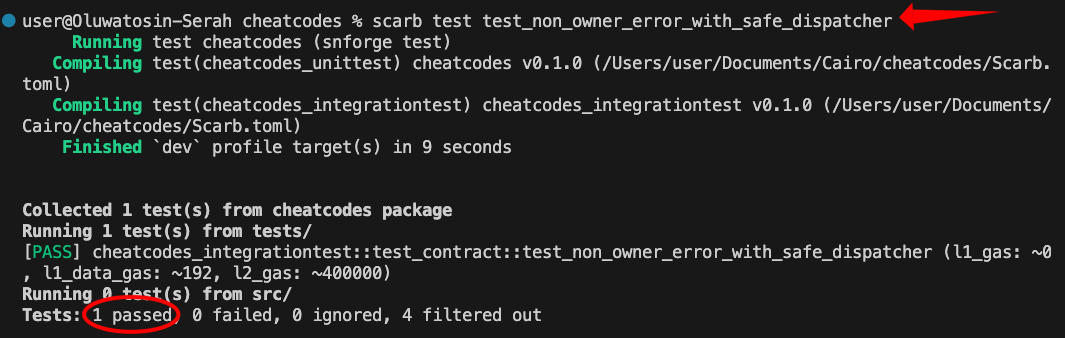
通过这种方式,我们可以验证函数是否失败了,并且是以正确的错误信息失败的。
写入存储 (Writing to Storage)
store cheatcode 让我们能够在测试期间直接将值写入合约的存储槽,而无需调用合约的函数或执行其通常的逻辑流。这意味着我们可以绕过通常会通过函数调用发生的检查、验证、访问控制和其他状态转换。这在设置特定的合约状态或在不经过常规函数调用的情况下测试边缘情况时特别有用。
在 HelloStarknet 合约中,我们的存储如下所示:
#[storage]
struct Storage {
owner: ContractAddress,
balance: u256,
lock_until: u64,
}
每个存储变量都有一个独一无二的槽位,我们可以使用 store cheatcode 直接对其进行写入。
store cheatcode
fn store(target: ContractAddress, storage_address: felt252, serialized_value: Span<felt252>)
它接收三个参数:
target:要修改的合约地址storage_address:存储槽位置(使用map_entry_address计算得出)serialized_value:要存储的值,转换为felt252数组
查找存储地址
要使用 store cheatcode,我们必须首先为要修改的变量计算确切的存储地址。我们将使用 map_entry_address 来计算存储位置。
从 snforge_std 库中同时导入 store 和 map_entry_address 以及现有的内容:
use snforge_std::{declare, ContractClassTrait, DeclareResultTrait, start_cheat_caller_address, stop_cheat_caller_address, cheat_caller_address, CheatSpan, start_cheat_caller_address_global, stop_cheat_caller_address_global, cheat_block_timestamp, start_cheat_block_timestamp, stop_cheat_block_timestamp, store, map_entry_address};
以下是我们如何找到 balance 变量地址的方法:
let balance_storage_addr = map_entry_address(
map_selector: selector!("balance"),
keys: array![].span()
);
map_entry_address 函数为变量计算出精确的存储槽地址。它接收两个参数:
map_selector:唯一标识存储变量的存储标识符keys:用于访问映射存储的键数组
在我们的示例中:
selector!("balance")将存储变量名称 (balance) 转换为所需的存储标识符keys: array![].span()是一个空数组,因为balance是一个简单的存储变量,而不是一个映射 (mapping)。如果balance是一个像LegacyMap<ContractAddress, u256>这样的映射,我们则会在这里传递地址键
结果 balance_storage_addr 就是我们现在可以传递给 store cheatcode 的存储槽地址。
对于像 balance 这样简单的存储变量(非映射),你也可以使用更短的语法:
let balance_storage_addr = selector!("balance");
何时使用哪个:
- 仅对简单的存储变量(如
u256、felt252、bool)使用selector!() - 在以下情况使用
map_entry_address():LegacyMap类型(在keys数组中提供映射的键)- 数组 (Arrays)(在
keys数组中提供索引) - 任何需要指定键或索引的存储类型
- 简单变量(使用空键:
array![].span()) - 尽管在这种情况下selector!()更简短
这两种方法都可以计算出合约存储变量的确切存储地址,使我们能够将新值直接写入该位置。
序列化值
不同的数据类型需要不同的序列化格式:
- 对于
ContractAddress:单个felt252
let serialized_owner = array![OWNER.into()];
- 对于
u64:单个felt252
let timestamp: u64 = 1641070800;
let serialized_timestamp = array![timestamp.into()];
- 对于
u256(我们的余额类型):需要低位 (low) 和高位 (high) 部分,因为u256大于单个felt252可以容纳的大小。
let balance: u256 = 5000;
let serialized_balance = array![balance.low.into(), balance.high.into()];
以下测试表明,存储写入绕过了所有的访问控制;不需要调用 increase_balance() 或进行所有权检查。我们将在不调用任何合约函数的情况下,直接将 HelloStarknet 合约的余额修改为 5000:
#[test]
fn test_store_balance_directly() {
let contract_address = deploy_contract("HelloStarknet", OWNER);
let dispatcher = IHelloStarknetDispatcher { contract_address };
//calculate the storage address where the "balance" variable is stored
let balance_storage_addr = map_entry_address(
map_selector: selector!("balance"),
keys: array![].span()
);
// value to write directly to storage
let new_balance: u256 = 5000;
// Serialize u256 into low and high parts (u256 = {low: u128, high: u128})
// In Cairo, u256 values are serialized as 2 felt252 values - one for lower 128 bits, one for upper 128 bits
let serialized_value = array![new_balance.low.into(), new_balance.high.into()];
// Check balance before direct storage write
let balance_before = dispatcher.get_balance();
assert(balance_before == 0, 'Initial balance should be 0');
// write directly to storage
store(contract_address, balance_storage_addr, serialized_value.span());
assert(dispatcher.get_balance() == 5000, 'Direct storage write failed');
}
使用 load cheatcode 直接从存储中读取
我们可以使用 load cheatcode 直接从存储中读取,而不是使用合约函数来验证存储的值。这是函数签名:
fn load(target: ContractAddress, storage_address: felt252, size: felt252) -> Array<felt252>
它接收三个参数:
target:要读取的合约地址storage_address:要读取的存储槽位置size:要读取的felt252值的数量
从 snforge_std 导入 load。下面是一个测试,使用 store 写入余额,并使用 load 将其读回:
#[test]
fn test_load_balance_directly() {
let contract_address = deploy_contract("HelloStarknet", OWNER);
// Calculate the storage address where the "balance" variable is stored
let balance_storage_addr = selector!("balance");
// Value to write directly to storage
let new_balance: u256 = 5000;
// Serialize u256 into low and high parts (u256 = {low: u128, high: u128})
// In Cairo, u256 values are serialized as 2 felt252 values - one for lower 128 bits, one for upper 128 bits
let serialized_value = array![new_balance.low.into(), new_balance.high.into()];
// Write directly to storage
store(contract_address, balance_storage_addr, serialized_value.span());
// Read the raw storage data from the balance storage slot
let stored_data = load(contract_address, balance_storage_addr, 2);
// Extract the low and high parts from the storage data array
let stored_balance_low = *stored_data.at(0);
let stored_balance_high = *stored_data.at(1);
// Reconstruct the u256 from its low and high components
let stored_balance: u256 = u256 {
low: stored_balance_low.try_into().unwrap(),
high: stored_balance_high.try_into().unwrap(),
};
// Confirm that the directly read storage value matches our expected balance
assert(stored_balance == 5000, 'Direct storage read failed');
}
请注意,我们使用了 2 作为要加载的尺寸 (size):
let stored_data = load(contract_address, balance_storage_addr, 2);
这是因为 balance 是 u256 类型,在 Cairo 中,u256 值序列化为 2 个 felt252 值;正如前面提到的,一个包含低 128 位,另一个包含高 128 位。这就是我们需要读取 2 个 felt 并重新构建完整 u256 值的原因。如果存储的值类型为 u512,我们将加载 4 个 felt252 值。
store 和 load 都提供了直接读取存储的途径,可用于快速设置特定的测试场景,并测试您的合约在各种状态条件下的工作情况。
检查是否触发了事件
Starknet Foundry 还提供了 spy_events cheatcode,用于捕获和验证在合约执行期间是否触发了特定事件。此 cheatcode 提供的主要函数包括:
spy_events()- 开始捕获事件get_events()- 检索捕获的事件- 事件过滤和断言实用工具
有关带有 cheatcode 的事件测试的详细示例和全面介绍,请参阅我们关于 Starknet 事件的文章。
结论
本文介绍了一些用于 Cairo 智能合约测试的主要 cheatcode:caller_address、block_timestamp、store、load、结合 #[should_panic] 的回滚测试以及使用安全调度器。这些函数提供了模拟调用者、操作时间戳、直接访问存储以及验证错误的能力。
与 Solidity Foundry 测试框架中的 cheatcode 类似,Starknet Foundry cheatcode 提供了与其对等的功能,同时其语法针对 Cairo 架构进行了调整。在两个生态系统中,核心的测试概念保持一致。
有关其他 cheatcode,请参考 Starknet Foundry 手册。
本文是 Starknet 上的 Cairo 编程系列教程的一部分。