Token-2022 is a new backward-compatible version of the SPL Token program that supports additional features in the form of extensions. The bytecode for these extensions is part of the Token-2022 program itself, no separate programs are deployed. The bytecode activated for a particular token is determined by the extension enabled in the mint or token accounts.
For example, in the original SPL Token program, adding metadata such as a token name, symbol, or logo URL requires an external program like Metaplex. But in Token-2022, you can add metadata by enabling a metadata extension on the token mint.
In this article, we’ll learn how Token-2022 works under the hood, and what changes were made to support extensions. We’ll walk through a practical example of creating Solana tokens with extensions using Token-2022.
The architecture of Token-2022
First, we’ll look at how Token-2022 extends the original SPL Token program under the hood, how account layouts remain compatible, and how the instruction set grows without breaking existing programs.
Superset design and backward compatibility
Token-2022 is a drop-in replacement for the SPL Token program. Every operation you could perform before—minting, transferring, burning, freezing, changing authorities—still works exactly the same. This is because Token-2022 preserves the first 82 bytes of the original SPL mint account and the first 165 bytes of a token account, which contain fields like supply, decimals, owner, freeze authority, and amount. Below is the layout of the original SPL mint account:
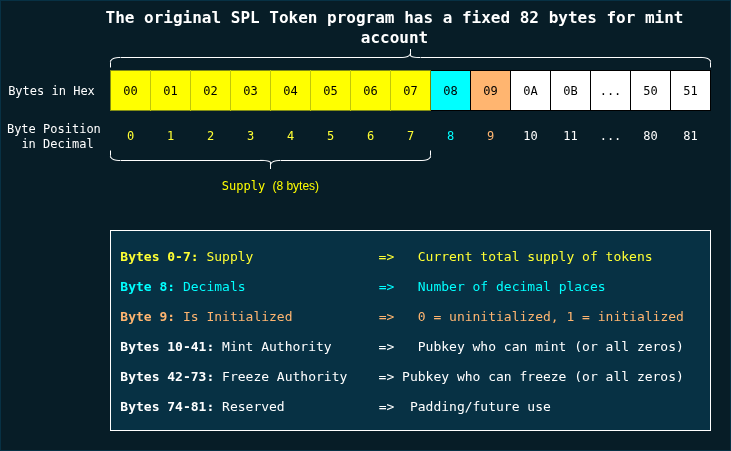
A diagram showing the memory layout of the first 82 bytes of an SPL mint account
The original program (SPL) deserializes and processes only that data; Token-2022 deserializes the same region and then continues reading beyond it for extensions.
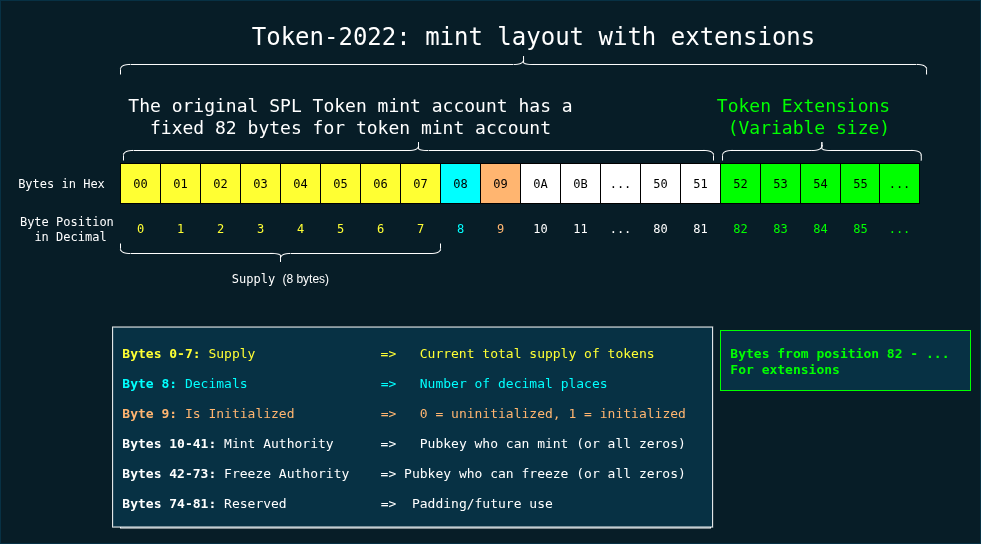
Extensions are optional features built into the Token-2022 program that you can enable on a mint account or a token account. The diagram below shows the Token-2022 mint TLV layout: the fixed 82 bytes of the original SPL mint followed by the variable-size TLV region that stores extensions data.
Token-2022 account layout and TLV extensions
The original SPL Token program has a fixed binary layout where each field’s size, type, and value are predetermined. Token-2022 uses the same fixed binary layout in the preserved first 82 to 165 bytes region, but beyond that it uses a variable Type-Length-Value (TLV) encoding scheme to store extensions.
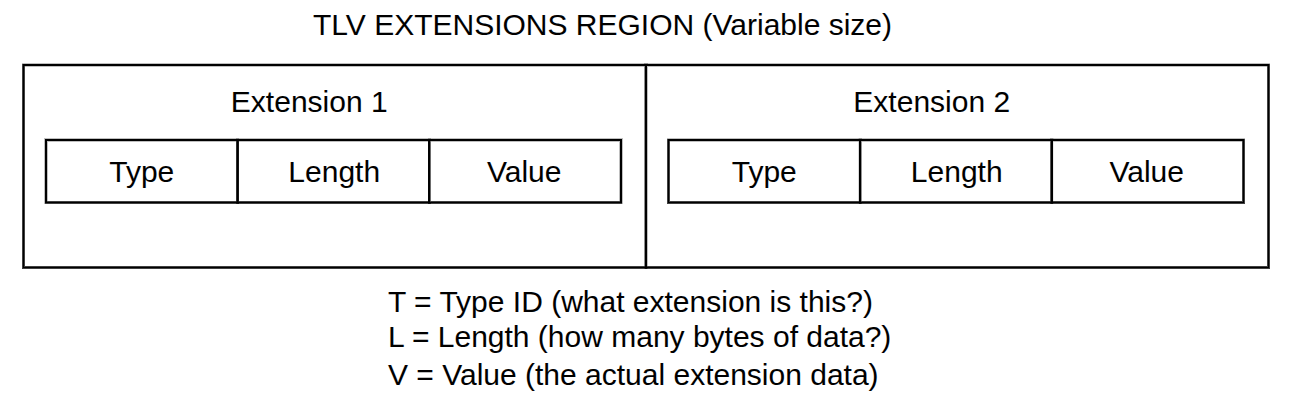
The Type–Length–Value (TLV) is a data serialization scheme. Each object in the data contains three parts:
- Type: an identifier that specifies what the data represents.
- Length: the size of the data in bytes.
- Value: the actual data bytes.
Because each entry states both its type and its length, a program can read the type to understand what it’s parsing, read exactly that number of bytes as the value, and then use the length to skip directly to the next entry.
Even if a type is unknown, the program can still use the length to skip over it.
For example, in the diagram below, the entry with type 12 has a length of 2 bytes, so its value field contains two bytes. If the program doesn’t recognize type 12, it can skip those 2 bytes and move directly to the next entry, type 20.

A diagram illustrating Type Length Value
Token-2022 is implemented with this TLV encoding scheme. Each extension is represented as a TLV entry and this context:
- The Type is the extension’s unique ID.
- The Length is the size of the serialized extension data in bytes.
- The Value is the serialized extension data itself.
This structure allows multiple extensions to be packed sequentially into the same account without conflicts.
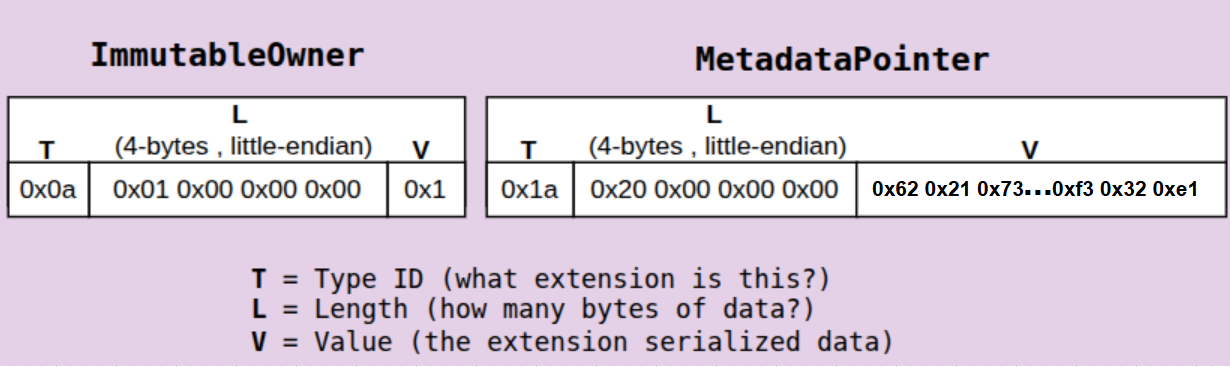
To illustrate how TLV encoding works in practice, let’s look at two extensions: ImmutableOwner and MetadataPointer.
ImmutableOwner TLV layout
The ImmutableOwner extension is a Token-2022 extension that prevents a token account’s owner from being changed after creation. We’ll look at the TLV layout now and discuss more about its usage later in this article.
ImmutableOwner has the following TLV properties:
- Type (T):
0x0a(the unique ID forImmutableOwner) - Length (L):
0x01 0x00 0x00 0x00(the number 1 encoded as a 4-byte little-endian integer) - Value (V):
0x01(The extension stores a single byte of data value, either0or1)
The Rust definition is an empty struct:
pub struct ImmutableOwner {}
Although the struct has no fields, the TLV encoding still reserves one byte for V to represent whether the flag is enabled (1 for enabled, 0 for disabled). That’s why the entry has a non-zero length.
So, its TLV layout would look like this:

MetadataPointer TLV layout
The MetadataPointer extension defines where a token’s off-chain metadata is located and who can update it.
Unlike the ImmutableOwner extension, MetadataPointer contains values: two public key values (authority and metadata_address).
Here is how the Rust struct looks:
struct MetadataPointer {
authority: PubKey;
metadata_address: PubKey;
}
In TLV, the layout would contain the following information:
0x1a: Type ID (T) forMetadataPointer0x40 0x00 0x00 0x00: Length (L) = 64 bytes (little-endian)<64 bytes>: Value (V), serializedauthorityandmetadata_addresspointing to the metadata public address.
Because the V contains an authority and the metadata_address public key, let’s use sample 32 byte public keys to represent them so we can have a better understanding of how the layout will look.
Suppose the account’s authority public key is:
7c4YH58z6Yd1H5pa9vHqPqN8P3f9DuzGcbj2duq5Vn6a
and the metadata_address public key is:
9A4q8Xzj8cQ6w6sKuS27rrR2i1cC6VnV4c7pg1Zg1Vgk
On Solana, public keys are Base58-encoded 32-byte values. The value (V) is the concatenation of authority and metadata_address. When both public keys are decoded from Base58 to their raw bytes and then written in hexadecimal form, the resulting 64-byte sequence will be:
// authority (32 bytes)
0x62 0x21 0x73 0xa4 0x94 0x0c 0x4c 0x3c 0x29 0x7a 0x7f 0x3c 0x4f 0xc1 0x12 0x3f
0x3b 0x34 0xc6 0x51 0x3f 0x3e 0x24 0x23 0xf3 0x1c 0xaa 0x88 0x83 0x44 0xa3 0x37
// metadata_address (32 bytes)
0x79 0x30 0x0d 0x97 0x56 0x47 0xc2 0x18 0x79 0x35 0x0d 0xe6 0x18 0x9f 0x80 0xec
0xd6 0xca 0x36 0xa5 0xb1 0x77 0x5a 0xa8 0xe4 0x45 0x66 0x7b 0x85 0xf3 0x32 0xe1
Assuming a Token-2022 account has both ImmutableOwner and MetadataPointer extensions initialized, here is how the TLV layout would look:
When reading an account, the program can iterate through the TLV section, selectively decoding only the extensions it recognizes. Unknown extension types are skipped by using their declared lengths.
Let’s consider how the program would handle an unknown extension UnknownExtension:
- The program reads
UnknownExtension’s TLV entry:- T =
0x0b(an unknown type) - L =
0x14 0x00 0x00 0x00(20, little-endian) - V =
0x4…0xed(20 bytes long, as specified by L)
- T =
- Since the type isn’t recognized, the program doesn’t try to interpret the value
- But it still reads the length and skips forward by that number of bytes (in this case, 20)
- It then proceeds to the next TLV entry, if any
Now suppose the unknown extension had a 64-byte value, the program would read the value 64 from L and then skip forward 64 bytes (over the V) to find the next T. This approach makes Token-2022 forward-compatible; future extensions won’t break existing programs.
Token-2022 instruction compatibility and new functionality
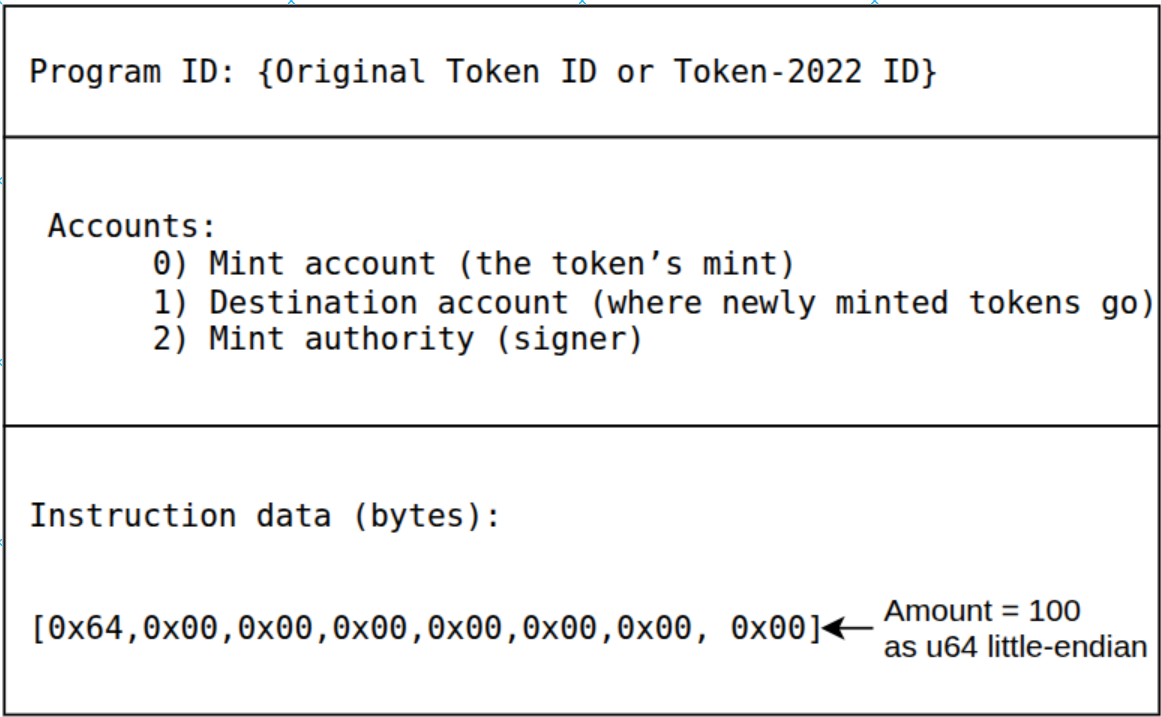
A Solana instruction is a call to an on-chain program, it consists of three fields:
- a Program ID, the public key of the on-chain program to call,
- the list of accounts the program will read from or write to
- the instruction data — an arbitrary sequence of bytes whose format is defined by the program.
The original SPL Token Program has 25 unique instructions. Token-2022 supports all of these instructions and adds new instructions after the 25th instruction to enable new extension functionality.
In other words, existing token instructions such as MintTo, Transfer, or Burn in Token-2022 behave exactly as in SPL.
Here is an example instruction layout that tells the token program to mint 100 tokens from a mint account to a destination token account:
Applications can adopt Token-2022 by simply changing the program ID in their instructions.
Here’s the list of Token-2022 instruction beyond the original 25 instructions of the Token program. The token instructions are named to match the extensions they initialize or manage:
25: InitializeMintCloseAuthority
26: TransferFeeExtension
27: ConfidentialTransferExtension
28: DefaultAccountStateExtension
29: Reallocate
30: MemoTransferExtension
31: CreateNativeMint
32: InitializeNonTransferableMint
33: InterestBearingMintExtension
34: CpiGuardExtension
35: InitializePermanentDelegate
36: TransferHookExtension
37: ConfidentialTransferFeeExtension
38: WithdrawExcessLamports
39: MetadataPointerExtension
40: GroupPointerExtension
41: GroupMemberPointerExtension
42: ConfidentialMintBurnExtension
43: ScaledUiAmountExtension
44: PausableExtension
Implementation patterns and how to create a Token-2022 token
In Token-2022, all extensions must be specified before initializing the mint or token account, so that sufficient space can be allocated for their data. Once initialized, no additional extensions can be added.
You can create Token-2022 tokens with their extensions using the spl-token CLI. It will calculate the required account size, write each extension’s TLV entry into the mint account, and finally initialize the mint with the InitializeMint2 instruction behind the scenes.
Here’s how the CLI template would look:
spl-token --program-id TokenzQdBNbLqP5VEhdkAS6EPFLC1PHnBqCXEpPxuEb \
create-token <extension flags>
Assume we want to add two extensions to a mint: one that defines a fixed interest rate for tokens (InterestBearingConfig) and another that enables the mint to reference off-chain metadata (MetadataPointer). We can run the command below attaching the —-interest-rate and —-enable-metadata flags. The 5 in the command below is the interest rate:
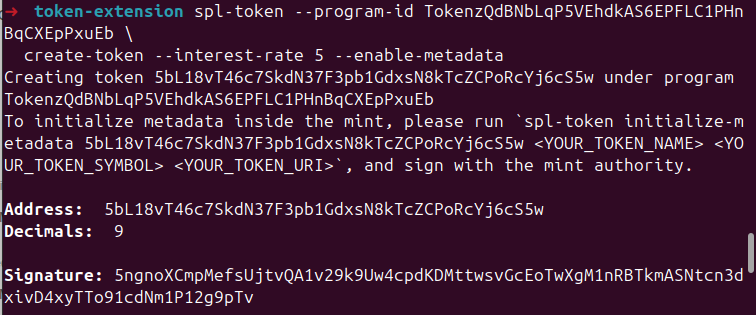
spl-token --program-id TokenzQdBNbLqP5VEhdkAS6EPFLC1PHnBqCXEpPxuEb \
create-token --interest-rate 5 --enable-metadata
This command creates a mint account with both the InterestBearingConfig and MetadataPointer extensions enabled. Internally, it allocates the full account size using ExtensionType::try_calculate_account_len::<Mint>(&[InterestBearingConfig, MetadataPointer])?;, writes the interest rate parameters immediately which implicitly initializes the InterestBearingConfig extension, and reserves a TLV slot for metadata. Now, we have to manually initialize the metadata extension.
The ****try_calculate_account_len (from the token-2022 library) ****function calculates the total space needed based on selected extensions, and each extension’s initialization instruction configures its specific parameters before the final mint initialization locks the account structure.
If you run the spl-token command we mentioned earlier to enable the extensions, you’ll see an output like this:
At this stage:
- The interest rate extension has been fully initialized with an interest rate of
5. - The metadata extension has a reserved TLV slot, but no metadata content has been written yet.
You’ll notice the message: “To initialize metadata inside the mint, please run spl-token initialize-metadata 5bL18vT46c7SkdN37F3pb1GdxsN8kTcZCPoRcYj6cS5w <YOUR_TOKEN_NAME> <YOUR_TOKEN_SYMBOL> <YOUR_TOKEN_URI>, and sign with the mint authority." in the response.
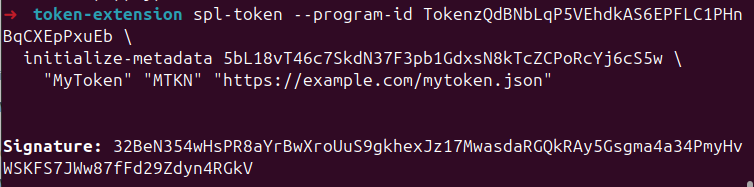
We’ll run that command to finalize metadata initialization and populate the already-allocated metadata TLV block.
spl-token --program-id TokenzQdBNbLqP5VEhdkAS6EPFLC1PHnBqCXEpPxuEb \
initialize-metadata 5bL18vT46c7SkdN37F3pb1GdxsN8kTcZCPoRcYj6cS5w \
"MyToken" "MTKN" "https://example.com/mytoken.json"
The result would look like this:
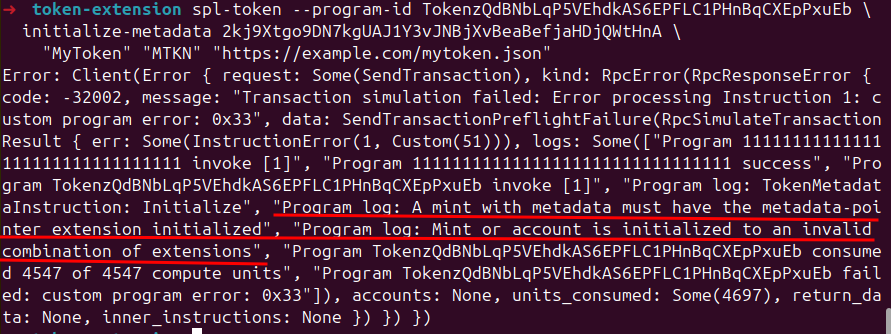
If you had omitted --enable-metadata earlier, this step would fail, because once the mint is initialized, no new TLV space can be added. Therefore, you’ll see an error like this:
The summary of the steps necessary for adding extensions to a mint includes:
- Enabling the extension by allocating space for the extension.
- Initializing the extension. You can initialize multiple extensions at once.
For extensions like the interest-bearing extension which allows you to provide the required parameter in one go (which we did above with --interest-rate 5), you will enable and initialize the extension at once.
Here are some token extensions and the flags you can use to enable them on CLI.
| Extension | CLI Flag |
|---|---|
| Mint Close Authority | –enable-close |
| Transfer Fees | –transfer-fee-basis-points |
| Non-Transferable | –enable-non-transferable |
| Interest-Bearing | –interest-rate |
| Permanent Delegate | –enable-permanent-delegate |
| Transfer Hook | –transfer-hook |
| Metadata | –enable-metadata |
| Metadata Pointer | –metadata-address |
| Confidential Transfers | –enable-confidential-transfers auto |
The ExtensionType enum in the Solana Token-2022 source code defines all the available extensions.
Combining extensions
You’ve seen how we combined Interest Bearing and Metadata extensions when we created the mint account. You also saw how to enable and initialize the extensions.
However, not all extensions can be combined with another. For example, you can’t combine NonTransferable and TransferHook, because if tokens can’t transfer, a transfer hook has no meaningful work. The SVM and development tools enforce this rule, so trying to combine these two extensions will cause the execution to fail.
Also, you can’t combine ConfidentialTransfer and TransferHook extensions because confidential transfers encrypt amounts and limits visibility. Since transfer hooks rely on reading the transferred amount, the two cannot work together.
Here are a few other combinations of extensions that won’t work together:
- ConfidentialTransfer and TransferFeeConfig
- ConfidentialTransfer and PermanentDelegate
Summary
Before we get into the next part of this article, let’s summarize what we’ve discussed so far:
- Both Token account’s first 165 bytes and Mint account’s first 82 bytes are preserved in Token-2022.
- Extensions are stored using a TLV (Type-Length-Value) encoding format.
- Token-2022 adds 20 new instructions to the 25 from the original SPL Token program.
- The developer must allocate enough space for all the extensions they want to enable upfront during account creation.
- Extensions must be initialized before mint creation
ImmutableOwner and Non-Transferable Extensions
We’ll now discuss two extensions: (ImmutableOwner and NonTransferable) and demonstrate how we can combine them to build a credential issuing program.
The Immutable Owner Extension
The legacy Token Program allows you to change a Token Account’s owner to another account using the SetAuthority instruction. Token-2022 enables you to make the owner unchangeable with the ImmutableOwner extension. The ImmutableOwner extension permanently locks the ownership of a Token Account. That means, once a token account is created with this extension, it will permanently belong to the specified wallet.
Here is a scenario where the ImmutableOwner extension prevents phishing attacks that could occur with the legacy Token Program, which allows ownership changes after account creation.
In the legacy Token Program (without ImmutableOwner):
- Alice creates an associated token account (ATA) called
AliceTokenAccount, derived from her wallet address and a specific mint. - She is tricked into signing a transaction that transfers ownership of that ATA to Bob.
- Later, an application computes Alice’s ATA address using the standard derivation function. The function still returns
AliceTokenAccountbecause it doesn’t check for ownership changes. - The application sends tokens to that address, assuming Alice owns it. But Bob now controls it, so Bob receives the tokens.
- Any future transfers to Alice’s “ATA” will also go to Bob.
With Token-2022’s ImmutableOwner extension (enabled by default on ATAs):
- The transaction in step 2 would fail - ownership cannot be changed
- Alice retains control of her ATA even if tricked into signing malicious transactions
- Tokens sent to her derived ATA address will always reach her
Here is how Token-2022 enforces this constraint with the ImmutableOwner extension
When a SetAuthority instruction (the instruction used to change token account ownership in the legacy SPL token program) is executed, it calls the process_set_authority function which checks the authority type that’s present. If the authority type is AuthorityType::AccountOwner, it triggers the ImmutableOwner check, returns an error and blocks the ownership change:
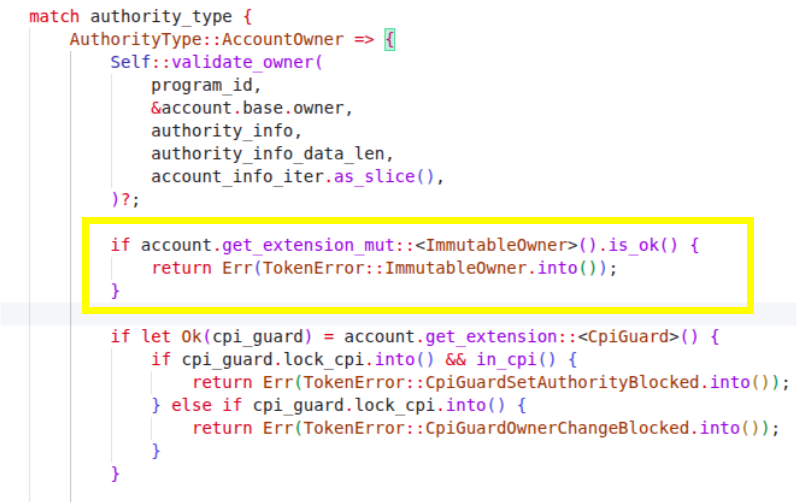
This implementation can be found in the core logic of the Token-2022 program on GitHub.
The ImmutableOwner extension is always enabled by default for ATAs created with the Token-2022 program.
When you create an ATA using the standard ATA program with Token-2022, the ATA program automatically includes the ImmutableOwner extension in the account initialization process.
This happens regardless of whether you explicitly specify it - it’s built into the ATA program’s logic for Token-2022 accounts. This is different from manually created token accounts with the system createAccount instruciton, where you would need to explicitly initialize the ImmutableOwner extension if desired.
This design ensures that the most common token account pattern (ATAs) gets the security benefits of immutable ownership by default.
The Non-Transferable Extension
The NonTransferable extension disables token transfers entirely. You can still mint tokens to accounts, but once received, they can’t be sent anywhere else.
The only valid operations on such accounts are burning tokens (For those coming from Ethereum background, Solana treats token burning as a separate operation from transferring) or closing empty accounts.
This is useful for building systems where tokens represent non-transferable assets. For example, certificates or on-chain identity markers shouldn’t be moved between users or debt a user owes to a protocol. In such cases, you’d issue NFTs with the NonTransferable extension.
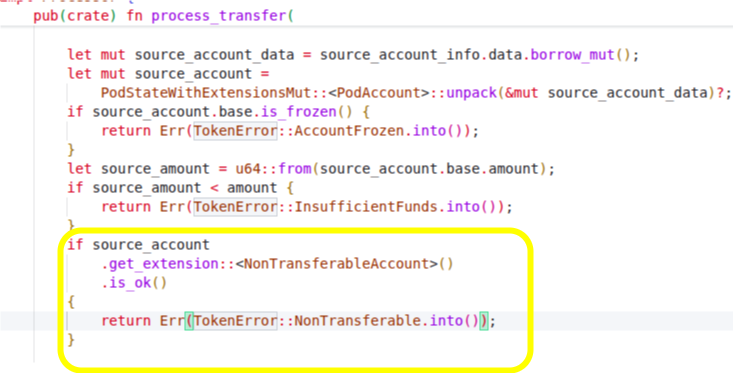
Token-2022 enforces this restriction in the program logic. If you attempt a transfer from an account that holds non-transferable tokens, the instruction will fail with an error.
You can see this check in processor.rs, where the program inspects the account for the NonTransferableAccount extension and rejects the transfer with a NonTransferable error if it’s present.
Non-transferable tokens can only be minted to accounts with immutable owners. This is designed to prevent indirect token transfer through account ownership changes.
When a mint is created with the NonTransferable extension, any token accounts created for that mint will automatically inherit two extensions: NonTransferableAccount (which prevents transfers) and ImmutableOwner (which prevents ownership changes). Here is how this is enforced in the Token-2022 program logic and can be found in the same file we mentioned earlier on GitHub.
if mint.get_extension::<NonTransferable>().is_ok()
&& destination_account.get_extension::<ImmutableOwner>().is_err()
{
return Err(TokenError::NonTransferableNeedsImmutableOwnership.into());
}
Example: using ImmutableOwner and NonTransferable extensions to build a minimal credential issuing program
This section will cover:
- how to define a mint that has both
ImmutableOwnerandNonTransferableextensions. - how to issue non-transferable credential tokens to recipients
- and how the Token-2022 program logic ensures the credentials can’t be transferred
Disclaimer: The Anchor program described here is for educational purpose only. For production, ensure your programs include complete validation, security checks, and undergo review.
Project setup
Create a new Anchor project by running the command anchor init credentials. We’ll write all our code in the programs/src/lib.rs file.
Configuration
Open programs/src/Cargo.toml and update the [features] and [dependencies] sections.
In the [features] section, add idl-build and link it to the corresponding sub-features in anchor-lang and anchor-spl.
In the [dependencies] section, add anchor-lang and anchor-spl. Make sure to include the init-if-needed feature for anchor-lang—we’ll need it later to create associated token accounts (ATAs).
...
[features]
anchor-debug = []
cpi = ["no-entrypoint"]
default = []
**idl-build = ["anchor-lang/idl-build", "anchor-spl/idl-build"]**
no-entrypoint = []
no-log-ix-name = []
custom-heap = []
custom-panic = []
no-idl = []
[dependencies]
**anchor-lang = {version = "0.31.0", features = ["init-if-needed"]}
anchor-spl = {version = "0.31.0"}**
These dependencies are the only ones we’ll import and use throughout this example.
// Import necessary modules from the Anchor framework and SPL token program.
use anchor_lang::prelude::*;
use anchor_spl::{
associated_token::AssociatedToken,
token_2022_extensions::non_transferable_mint_initialize,
token_interface::{
mint_to,
Mint,
TokenAccount,
TokenInterface,
},
};
Mint setup
To create our mint account, we initialize it with the NonTransferable extension. This extension applies only to the mint itself. Later, when an associated token account is created for this mint through the Token-2022 ATA program, the ATA program adds the ImmutableOwner and NonTransferableAccount extensions to the new token account automatically as we discussed earlier.
The code below shows how we’ll initialize the mint account.
- It first initializes the
NonTransferableextension with theNonTransferableMintInitializeinstruction. - And then it initializes the mint account itself with the valid authorities using the
initialize_mint2instruction.
// Import necessary modules from the Anchor framework and SPL token program.
use anchor_lang::prelude::*;
use anchor_spl::{
associated_token::AssociatedToken,
token_2022_extensions::non_transferable_mint_initialize,
token_interface::{
mint_to,
Mint,
TokenAccount,
TokenInterface,
},
};
/// Initializes a new mint for the credentials
/// with NonTransferable extension.
pub fn initialize_credential_mint(ctx: Context<InitializeCredentialMint>) -> Result<()> {
// Initialize the NonTransferable extension.
non_transferable_mint_initialize(CpiContext::new(
ctx.accounts.token_program.to_account_info(),
anchor_spl::token_2022_extensions::NonTransferableMintInitialize {
mint: ctx.accounts.mint.to_account_info(),
token_program_id: ctx.accounts.token_program.to_account_info(),
},
))?;
// Initialize the mint itself, setting decimals to 0 and defining authorities.
anchor_spl::token_interface::initialize_mint2(
CpiContext::new(
ctx.accounts.token_program.to_account_info(),
anchor_spl::token_interface::InitializeMint2 {
mint: ctx.accounts.mint.to_account_info(),
},
),
0, // Decimals are set to 0 because credentials are whole units and cannot be fractional.
&ctx.accounts.mint.key(), // The mint authority is the program-derived address (PDA) itself.
Some(&ctx.accounts.mint.key()), // The freeze authority is also the PDA.
)?;
Ok(())
}
We’ll initialize the mint account using the accounts defined in the struct below:
-
The struct allocates 98 bytes space for the mint
- 8 bytes for the account discriminator
- 82 bytes to store the fundamental information about the mint, such as its total supply, number of decimals, and who has the authority to create more tokens.
- And another 8 bytes for the
NonTransferableextension.
In practice, we’ll use
ExtensionType::try_calculate_account_len::<PodMint>(&[ExtensionType::NonTransferable])?;method to calculate the size dynamically.
I’ve left some comments in the code for a better understanding of the rest of it:
/// Defines the accounts required for the `initialize_credential_mint` instruction.
#[derive(Accounts)]
pub struct InitializeCredentialMint<'info> {
// The mint account to be initialized as a Program Derived Address (PDA).
#[account(
init,
payer = payer,
// The space allocation for the account's data:
// 8 bytes: for the account discriminator, a unique identifier for the account type in Anchor.
// 82 bytes: the standard fixed size of a SPL Token Mint account.
// 8 bytes: additional space reserved for the NonTransferable extension.
space = 8 + 82 + 8,
owner = token_program.key(),
// Defines the seeds for the Program Derived Address (PDA).
seeds = [b"mint"],
bump
)]
pub mint: InterfaceAccount<'info, Mint>,
// The account paying for the transaction and rent.
#[account(mut)]
pub payer: Signer<'info>,
// System program, required for creating accounts.
pub system_program: Program<'info, System>,
// The SPL token program.
pub token_program: Interface<'info, TokenInterface>,
}
Issuing credentials
Now that we’ve created our mint account, let’s start issuing the credentials. We’ll mint exactly one token (the credential token) and send it to the user.
pub fn issue_credential(ctx: Context<IssueCredential>) -> Result<()> {
// Mint one token to the recipient's associated token account.
mint_to(
CpiContext::new(
ctx.accounts.token_program.to_account_info(),
anchor_spl::token_interface::MintTo {
mint: ctx.accounts.mint.to_account_info(),
to: ctx.accounts.recipient_ata.to_account_info(),
authority: ctx.accounts.authority.to_account_info(),
},
),
1, // Mint exactly one token.
)?;
Ok(())
}
The issue_credential function expects the IssueCredential struct as its context. When issuing a credential, we create the user’s token account using the Token-2022 associated token account (ATA) program. This automatically applies the ImmutableOwner extension to the account. Since the mint is marked as NonTransferable, the user’s ATA will also have the NonTransferableAccount extension applied implicitly.
/// Defines the accounts required for the `issue_credential` instruction.
#[derive(Accounts)]
pub struct IssueCredential<'info> {
// The mint account, must be mutable.
#[account(
mut,
seeds = [b"mint"],
bump,
constraint = mint.mint_authority.unwrap() == authority.key() // Ensure the authority is the mint authority.
)]
pub mint: InterfaceAccount<'info, Mint>,
// The authority signing the transaction (must be the mint authority).
#[account(mut)]
pub authority: Signer<'info>,
// The recipient's associated token account, created if it doesn't exist.
#[account(
init_if_needed,
payer = authority,
associated_token::mint = mint,
associated_token::authority = recipient,
associated_token::token_program = token_program
)]
pub recipient_ata: InterfaceAccount<'info, TokenAccount>,
// The recipient of the credential.
pub recipient: Signer<'info>,
// The SPL token program.
pub token_program: Interface<'info, TokenInterface>,
// The associated token program.
pub associated_token_program: Program<'info, AssociatedToken>,
// The system program.
pub system_program: Program<'info, System>,
}
So, with this implementation it will be impossible to:
- transfer a credential token: the transfer will fail with
TokenError::NonTransferable. We’ve seen this error earlier in the Token-2022 program source code. - change the token account owner: the account is immutable and the change will fail
The complete source code for this program can be found on GitHub.
Conclusion
Token-2022 makes building on Solana more flexible. We’ve learned about the architecture of token-2022 and how it maintains backward compatibility with the original SPL token program.
We saw how extensions are used to add new behavior to tokens. While extensions can be used together, other combinations aren’t allowed.
And finally, we built a credential issuing program that combines the NonTransferable and ImmutableOwner extensions. This showed how enabling NonTransferable on a mint prevents tokens from being transferred, enforcing strict control over how credentials are held.
This article is part of a tutorial series on Solana.