代币发售(Token sale)程序是一个以固定价格出售特定代币的智能合约,通常用于换取诸如 SOL 等原生代币。发售将持续进行,直到达到预定的供应量或所有者主动结束发售。
我们的实现遵循以下流程:
- 用户根据我们的汇率存入 SOL,例如 1 SOL 兑换 100 个代币。
- 该程序将 SOL 存储在金库 Program Derived Address (PDA) 中,这是一个由程序控制的账户。
- 一旦收到 SOL,就会向用户铸造代币。
- 发售持续进行,直到达到预定的供应量上限。
- 管理员可以从金库中提取收集到的 SOL。
创建 Token Sale 程序
我们将构建的 Solana 程序会直接向买家铸造 SPL 代币,而不需要我们作为铸造权限(mint authority)签署每笔交易。这是标准的做法——否则管理员将需要手动批准每次购买,这在实际操作中是不可行的。
创建代币发售所需的账户
首先,使用 Anchor 创建一个新的 token_sale 程序,并将 programs/token_sale/src/lib.rs 中的样板代码替换为以下代码。
下面的代码导入了我们的程序依赖项,并定义了一个 initialize 函数。该函数执行以下操作:
- 设置管理员账户以控制金库提款
- 为我们正在出售的新代币创建一个 mint 账户
- 创建一个金库账户来收集代币购买所得的 SOL
use anchor_lang::prelude::*;
use anchor_lang::system_program::{transfer, Transfer};
use anchor_spl::token::{mint_to, Mint, MintTo, Token, TokenAccount};
declare_id!("Gm8bFHtX3TapZDqA2tjviP1Qn1f8bLjTf8tbhFcgzcFs"); // REPLACE THIS WITH YOUR PROGRAM ID OR RUN `anchor sync`
// Tokens per SOL, i.e., 1 SOL == 100 of our tokens
const TOKENS_PER_SOL: u64 = 100;
// Max supply: 1000 tokens (with 9 decimals)
const SUPPLY_CAP: u64 = 1000e9 as u64;
#[program]
pub mod token_sale {
use super::*;
pub fn initialize(ctx: Context<Initialize>) -> Result<()> {
// Set the admin key
ctx.accounts.admin_config.admin = ctx.accounts.admin.key();
Ok(())
}
}
在上面的代码中,我们为代币发售程序定义了常量:TOKENS_PER_SOL = 100 和 SUPPLY_CAP = 1000(带有 9 位小数)。
接下来,为我们的函数添加 Initialize 账户结构体。它包含以下账户:
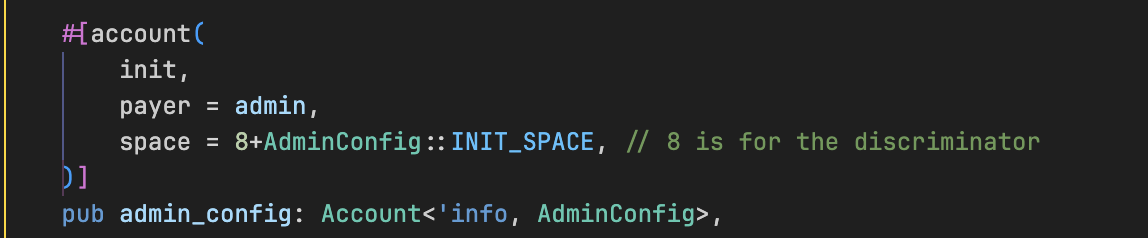
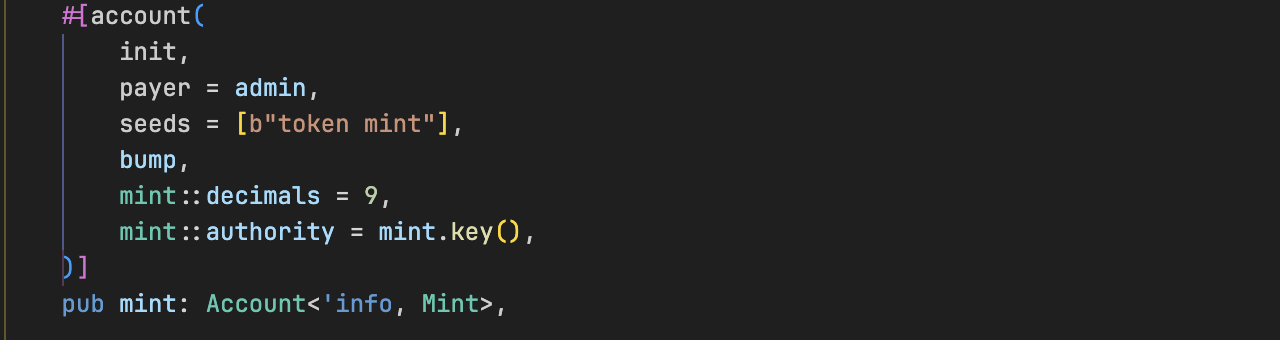
admin:支付交易费用并担任程序管理员的账户admin_config:这是一个由程序拥有的账户,用于存储管理员的公钥,以便稍后在提款期间我们可以验证签名者是同一位管理员(就像在 Solidity 中检查msg.sender == admin一样,其中admin是存储管理员公钥的状态变量)。mint:一个自引用的 mint PDA,既作为代币的 mint 账户,也作为其自身的权限(authority)(我们稍后会解释这个概念)treasury:一个保存从代币发售中收集的 SOL 的 PDA- 最后,我们传入与之交互的 Token Program 和 System Program。
#[derive(Accounts)]
pub struct Initialize<'info> {
#[account(mut)]
pub admin: Signer<'info>, // The transaction signer
#[account(
init,
payer = admin,
space = 8+AdminConfig::INIT_SPACE, // 8 is for the discriminator
)]
pub admin_config: Account<'info, AdminConfig>,
#[account(
init,
payer = admin,
seeds = [b"token_mint"],
bump,
mint::decimals = 9,
mint::authority = mint.key(),
)]
pub mint: Account<'info, Mint>,
/// CHECK: PDA for treasury
#[account(
seeds = [b"treasury"],
bump
)]
pub treasury: AccountInfo<'info>,
pub token_program: Program<'info, Token>,
pub system_program: Program<'info, System>,
}
// Stores the admin public key
#[account]
#[derive(InitSpace)] // This is a derive attribute macro provided by anchor, it calculates the space needed for the account and gives us access to AdminConfig::INIT_SPACE, as used above
pub struct AdminConfig {
pub admin: Pubkey,
}
#[error_code]
pub enum Errors {
#[msg("Max token supply limit reached")]
SupplyLimit,
#[msg("Math overflow")]
Overflow,
#[msg("Only admin can withdraw")]
UnauthorizedAccess,
#[msg("Not enough SOL in treasury")]
InsufficientFunds,
}
理解 Initialize 结构体账户
让我们分解 Initialize 账户结构体中的每个账户,并了解它们的用途:
admin config
admin_config:该账户持有管理员的公钥(由 AdminConfig 结构体定义),用于确保只有管理员才能从金库中提取 SOL。

mint account
这是我们 SPL 代币(被出售的代币)的 mint 账户。我们将其创建为一个 PDA,以便程序稍后可以为其签名(我们将在本文后面解释这一点)。
在我们调用 initialize 之前,该账户在链上并不存在。在这次调用中,Anchor 将:
- 使用种子
"token_mint"和程序 ID 计算 mint PDA 地址 - 以
mint::decimals = 9创建该账户(这是我们设置的,如下所示) - 将 mint 的权限(authority)设置为其自身(
mint::authority = mint.key())。这一部分非常重要,因为通过使 PDA 成为其自身的权限,只有我们的程序,使用相同的种子和 bump,才能签署mint_to指令(同样,我们将在本文后面解释这是如何工作的)。
treasury
该 PDA 专门用于保存用户在发售期间发送的 SOL(lamports)。
现在使用以下内容更新 programs/token_sale/Cargo.toml 文件。
[package]
name = "token_sale"
version = "0.1.0"
description = "Created with Anchor"
edition = "2021"
[lib]
crate-type = ["cdylib", "lib"]
name = "token_sale"
[features]
default = []
cpi = ["no-entrypoint"]
no-entrypoint = []
no-idl = []
no-log-ix-name = []
idl-build = ["anchor-lang/idl-build", "anchor-spl/idl-build"] # "anchor-spl/idl-build" was added
[dependencies]
anchor-lang = "0.31.0"
anchor-spl = "0.31.0" # THIS WAS ADDED
现在更新我们程序的测试。
这个测试与我们在前面的教程中看到的非常相似。它只需使用所需的账户调用我们程序的 initialize 指令,并断言新创建的 mint 账户(代币)的属性。
import * as anchor from "@coral-xyz/anchor";
import { Program } from "@coral-xyz/anchor";
import {
createAssociatedTokenAccount,
getAccount,
getMint,
TOKEN_PROGRAM_ID
} from "@solana/spl-token";
import * as web3 from "@solana/web3.js";
import { assert } from "chai";
import { TokenSale } from "../target/types/token_sale";
describe("token_sale", async () => {
const provider = anchor.AnchorProvider.env();
anchor.setProvider(provider);
const program = anchor.workspace.TokenSale as Program<TokenSale>;
const connection = provider.connection;
const adminKp = provider.wallet.payer;
const buyer = adminKp; // Using the same keypair as both admin and buyer for testing
const TOKENS_PER_SOL = 100;
// Generate keypair for admin config account (will be passed as signer to authorize adminConfig account creation)
const adminConfigKp = web3.Keypair.generate();
let mint: anchor.web3.PublicKey;
let treasuryPda: anchor.web3.PublicKey;
let buyerAta: anchor.web3.PublicKey;
it("creates mint", async () => {
[mint] = web3.PublicKey.findProgramAddressSync(
[Buffer.from("token_mint")],
program.programId
);
[treasuryPda] = web3.PublicKey.findProgramAddressSync(
[Buffer.from("treasury")],
program.programId
);
const tx = await program.methods
.initialize()
.accounts({
admin: adminKp.publicKey,
adminConfig: adminConfigKp.publicKey,
mint: mint,
treasury: treasuryPda,
tokenProgram: TOKEN_PROGRAM_ID,
systemProgram: anchor.web3.SystemProgram.programId,
})
.signers([adminKp, adminConfigKp])
.rpc();
console.log("initialize tx:", tx);
const mintInfo = await getMint(connection, mint);
assert.equal(mintInfo.mintAuthority.toBase58(), mint.toBase58());
assert.equal(Number(mintInfo.supply), 0);
assert.equal(mintInfo.decimals, 9);
});
});
运行 npm install @solana/spl-token 以更新依赖项。
运行测试,测试通过。

使用 1 SOL 购买 100 个代币
我们已经设置了 Token Sale 程序。现在我们将添加一个函数来铸造新的代币单位用于发售,以便用户可以购买我们的代币。
该代码执行以下操作:
- 根据输入的 lamport 计算要铸造的代币数量。
- 检查我们是否超过了总供应量。
- 将 SOL 从买方转移到金库。
- 准备签名者种子(signer seeds),以便程序可以代表 mint PDA 进行签名(在下面的代码块之后会有更多介绍)。
- 设置 mint 指令,将 mint 账户作为其自身的权限。
- 使用签名者种子创建一个 CPI 上下文。
- 将代币铸造到买方的代币账户。
pub fn mint(ctx: Context<MintTokens>, lamports: u64) -> Result<()> {
// Calculate how many tokens to mint (lamports * TOKENS_PER_SOL)
let amount = lamports
.checked_mul(TOKENS_PER_SOL)
.ok_or(Errors::Overflow)?; // If overflow, return error
// Ensure we don't exceed the max supply
let current_supply = ctx.accounts.mint.supply;
let new_supply = current_supply.checked_add(amount).ok_or(Errors::Overflow)?; // If overflow, return error
require!(new_supply <= SUPPLY_CAP, Errors::SupplyLimit);
// Send SOL to treasury
let transfer_instruction = Transfer {
from: ctx.accounts.buyer.to_account_info(),
to: ctx.accounts.treasury.to_account_info(),
};
let cpi_context = CpiContext::new(
ctx.accounts.system_program.to_account_info(),
transfer_instruction,
);
transfer(cpi_context, lamports)?;
// Create signer seeds for the mint PDA
let bump = ctx.bumps.mint;
let signer_seeds: &[&[&[u8]]] = &[&[b"token mint".as_ref(), &[bump]]];
// Setup mint instruction with mint as its own authority
let mint_to_instruction = MintTo {
mint: ctx.accounts.mint.to_account_info(),
to: ctx.accounts.buyer_token_account.to_account_info(),
authority: ctx.accounts.mint.to_account_info(),
};
// Create CPI context with `new_with_signer` - allows our token sale program to sign for the mint PDA. This works because the Solana runtime verifies that our program derived the mint PDA with these seeds and bump
// See here for more: <https://github.com/solana-foundation/developer-content/blob/main/content/guides/getstarted/how-to-cpi-with-signer.md>
let cpi_ctx = CpiContext::new_with_signer(
ctx.accounts.token_program.to_account_info(),
mint_to_instruction,
signer_seeds,
);
mint_to(cpi_ctx, amount)?;
Ok(())
}
为什么我们将 mint 设置为其自身的权限
在上面的 mint() 函数中,你可以看到我们如何使用 CpiContext::new_with_signer 来铸造代币。这之所以有效,是因为我们早前设置 mint 账户的方式。回想一下,在初始化期间,我们设置了 mint::authority = mint.key(),使 mint PDA 成为其自身的权限。
以下是为什么这种模式至关重要的原因。
代币铸造权限面临的挑战
代币铸造需要权限控制。通常,你会指定一个特定的密钥对作为铸造权限(mint authority),并且该密钥对需要签署每一个 mint_to 指令。虽然这提供了安全性,但它带来了一个实际问题:我们必须管理这个密钥对,并确保它随时可用以签署每次铸造操作。
然而,这种方法并不适合自动化的代币发售。除非权限密钥对可用以签署每次铸造,否则用户无法购买代币。这违背了创建一个无需许可的系统的初衷。
PDA 如何解决权限问题
我们不使用传统的密钥对,而是让 mint PDA 成为其自身的权限。乍一看这似乎令人困惑:当 PDA 没有私钥时,它如何签署交易?
解决方案在于 PDA 签名。当我们的程序想要铸造代币时,它使用 CpiContext::new_with_signer 以及用于创建 mint PDA 的确切种子("token_mint" + bump)。Solana 运行时识别到我们的程序使用这些特定种子派生了这个 PDA,因此它允许我们的程序充当该 PDA 的签名者。
这创造了一个有用的模式:
- 铸造权限是 PDA 地址(而不是密钥对)
- 只有我们的程序可以使用正确的种子为该 PDA“签名”
- 我们的程序间接充当铸造权限(因为它拥有 mint PDA),并可以在需要时铸造代币,而无需专用的外部签名者
- 任何其他人都无法铸造这些代币,即使他们发现了种子(这里的代币只能在用户通过我们程序的
mint函数购买时被铸造)
为什么不让管理员成为铸造权限?
我们本可以设置 mint::authority = admin.key(),让管理员成为铸造权限。但如前所述,这样管理员就需要签署每一笔铸造交易。
现在让我们继续编写程序并添加 MintTokens 账户结构体。
MintTokens 指定了代币发售/铸造期间涉及的账户。
buyer:进行代币购买并签署交易的账户。mint:我们出售的 SPL 代币。buyer_ata:买方的关联代币账户(ATA),用于接收铸造的代币单位。treasury:接收代币发售所得 SOL 的账户。- 最后两个账户,Token program(用于铸造)和 System program(用于 SOL 转账),是我们与之交互的原生程序。
#[derive(Accounts)]
pub struct MintTokens<'info> {
#[account(mut)]
pub buyer: Signer<'info>,
#[account(
mut,
seeds = [b"token mint"],
bump
)]
pub mint: Account<'info, Mint>,
#[account(
mut,
token::mint = mint,
token::authority = buyer,
)]
pub buyer_ata: Account<'info, TokenAccount>,
/// CHECK: PDA for treasury
#[account(
mut,
seeds = [b"treasury"],
bump
)]
pub treasury: AccountInfo<'info>,
pub token_program: Program<'info, Token>,
pub system_program: Program<'info, System>,
}
将以下自定义错误添加到程序代码中。此处的错误用于 mint 函数以及我们将添加的下一个函数。
#[error_code]
pub enum Errors {
#[msg("Max token supply limit reached")]
SupplyLimit,
#[msg("Math overflow")]
Overflow,
#[msg("Only admin can withdraw")]
UnauthorizedAccess,
#[msg("Not enough SOL in treasury")]
InsufficientFunds,
}
现在使用以下代码更新测试。
此测试执行以下操作:
- 为我们的代币创建买方的 ATA
- 通过调用我们程序的
mint函数购买价值 1 SOL 的代币(100 个代币) - 断言金库中具有来自该交易的正确数量的 SOL
- 断言购买后买方的 ATA 中有正确数量的铸造代币
it("buys tokens", async () => {
const solToSend = new anchor.BN(1e9); // 1 SOL
const expectedTokenAmount = Number(solToSend) * TOKENS_PER_SOL; // 1*100 tokens
const initialTreasuryBalance = await connection.getBalance(treasuryPda);
// Create buyer's ata
buyerAta = await createAssociatedTokenAccount(
provider.connection,
buyer,
mint,
buyer.publicKey,
undefined,
TOKEN_PROGRAM_ID
);
const buyerAtaInfo = await getAccount(connection, buyerAta, undefined, TOKEN_PROGRAM_ID);
const initialBuyerAtaBalance = Number(buyerAtaInfo.amount);
// Call our program's mint function to purchase tokens
const tx = await program.methods
.mint(solToSend)
.accounts({
buyer: buyer.publicKey,
mint: mint,
buyerAta: buyerAta,
treasury: treasuryPda,
tokenProgram: TOKEN_PROGRAM_ID,
systemProgram: anchor.web3.SystemProgram.programId,
})
.rpc();
console.log("mint tx:", tx);
console.log("Sent", lamportsToSol(solToSend), "SOL, expecting", toDisplayAmount(expectedTokenAmount), "tokens");
const newTreasuryBalance = await connection.getBalance(treasuryPda);
assert.equal(
newTreasuryBalance - initialTreasuryBalance,
Number(solToSend),
"SOL was not correctly transferred to treasury"
);
const updatedBuyerAtaInfo = await getAccount(connection, buyerAta, undefined, TOKEN_PROGRAM_ID);
const newBuyerAtaBalance = Number(updatedBuyerAtaInfo.amount);
assert.equal(
newBuyerAtaBalance - initialBuyerAtaBalance,
expectedTokenAmount,
"Tokens were not correctly minted"
);
});
现在运行测试,测试通过。

确保达到供应上限时结束代币发售
请记住,供应上限是 1000 个代币,在上面的测试中,我们用 1 SOL 铸造了 100 个代币。我们将尝试用 9.2 SOL 铸造 920 个代币,以确认代币发售程序会防止铸造超过供应上限的代币。
添加以下测试块。
该测试断言当我们试图购买超过 1000 的上限时,代币发售会失败。
it("stops minting when supply cap is reached", async () => {
const mintInfo = await getMint(connection, mint, undefined, TOKEN_PROGRAM_ID);
const currentSupply = Number(mintInfo.supply);
const SUPPLY_CAP = toRawTokenAmount(1000);
const remainingSupply = SUPPLY_CAP - currentSupply;
console.log(`Current supply: ${toDisplayAmount(currentSupply)} tokens, Remaining: ${toDisplayAmount(remainingSupply)} tokens`);
const tokensToMint = remainingSupply + toRawTokenAmount(20);
const solToSend = new anchor.BN(Math.ceil(tokensToMint / TOKENS_PER_SOL));
console.log(`Trying to mint ${toDisplayAmount(tokensToMint)} tokens by sending ${lamportsToSol(solToSend)} SOL`);
try {
await program.methods
.mint(solToSend)
.accounts({
buyer: buyer.publicKey,
mint: mint,
buyerAta: buyerAta,
treasury: treasuryPda,
tokenProgram: TOKEN_PROGRAM_ID,
systemProgram: anchor.web3.SystemProgram.programId,
})
.rpc();
assert.fail("Minting succeeded but should have failed due to supply cap");
} catch (error) {
console.log("Expected error:", error.toString().substring(0, 150) + "...");
assert.include(
error.toString(),
"SupplyLimit",
"Expected supply limit error not received"
);
console.log("Supply cap limit correctly enforced");
}
});
运行测试,它应该会通过。

提取金库账户 SOL 余额
到目前为止,我们已经设置了用于初始化程序和购买代币的测试。现在,我们将为代币发售程序管理员(我们的账户)添加代码,以从金库账户中提取收集到的 SOL,并测试这一功能。
将下面的 withdraw_funds 函数添加到代币发售程序中。它执行以下操作:
- 检查金库是否有足够的余额用于提款。
- 准备签名者种子,以便程序可以代表 treasury PDA 进行签名。
- 设置一个 CPI 上下文以调用 System Program 的
transfer指令。 - 使用
CpiContext::new_with_signer允许程序为金库进行签名。 - 将 SOL(lamports)从金库转移到管理员钱包。
**注意:**这里使用的是 Solana 的 System transfer,而不是 SPL token 的 transfer,因为我们是在转移 SOL(原生代币),而不是 SPL 代币。SPL 转移需要与代币账户(token accounts)交互,而 SOL 转移直接由 System program 处理。
pub fn withdraw_funds(ctx: Context<WithdrawFunds>, amount: u64) -> Result<()> {
// Check balance
let treasury_balance = ctx.accounts.treasury.lamports();
require!(treasury_balance >= amount, Errors::InsufficientFunds);
// Create signer seeds for PDA
let bump = ctx.bumps.treasury;
let signer_seeds: &[&[&[u8]]] = &[&[b"treasury".as_ref(), &[bump]]];
// Prepare the CPI context to System Program::transfer
// DO NOT CONFUSE THIS WITH SPL TOKEN TRANSFER
let transfer_instruction = Transfer {
from: ctx.accounts.treasury.to_account_info(),
to: ctx.accounts.admin.to_account_info(),
};
let cpi_ctx = CpiContext::new_with_signer(
ctx.accounts.system_program.to_account_info(),
transfer_instruction,
signer_seeds,
);
transfer(cpi_ctx, amount)?; // DO NOT CONFUSE THIS WITH SPL TOKEN TRANSFER
Ok(())
}
现在添加 WithdrawFunds 账户结构体,由 withdraw_funds 函数使用。它包含以下账户:
admin:交易签名者,也就是我们的管理员账户。admin_config:存储管理员公钥的账户,带有一个约束条件以验证签名者是否获得了授权。我们传递它是因为我们需要检查当前签名者是否与初始化期间存储的管理员密钥相匹配。treasury:保存要提取的 SOL 的可变金库 PDA。system_program:用于处理 SOL 转移的 System Program。
#[derive(Accounts)]
pub struct WithdrawFunds<'info> {
#[account(mut)]
pub admin: Signer<'info>,
#[account(
constraint = admin_config.admin == admin.key() @ Errors::UnauthorizedAccess // Ensure the signer is authorized
)]
pub admin_config: Account<'info, AdminConfig>,
/// CHECK: PDA for treasury
#[account(
mut,
seeds = [b"treasury"],
bump
)]
pub treasury: AccountInfo<'info>,
pub system_program: Program<'info, System>,
}
接下来,更新测试。
此测试块从 treasury PDA 中提取一半的金库余额到管理员密钥对中,并断言管理员的余额增加了提取的金额,同时金库的余额减少了相同的金额。
it("allows the admin to withdraw funds from treasury", async () => {
const initialAdminBalance = await connection.getBalance(adminKp.publicKey);
const initialTreasuryBalance = await connection.getBalance(treasuryPda);
console.log("Initial treasury balance:", lamportsToSol(initialTreasuryBalance), "SOL");
console.log("Initial admin balance:", lamportsToSol(initialAdminBalance), "SOL");
assert.isAbove(
initialTreasuryBalance,
0,
"Treasury should have funds from previous tests"
);
const amountToWithdraw = new anchor.BN(Math.floor(initialTreasuryBalance / 2)); // Withdraw half of the treasury balance
try {
const tx = await program.methods
.withdrawFunds(amountToWithdraw)
.accounts({
admin: adminKp.publicKey,
adminConfig: adminConfigKp.publicKey,
treasury: treasuryPda,
systemProgram: anchor.web3.SystemProgram.programId,
})
.rpc();
console.log("withdrawFunds tx:", tx);
const newAdminBalance = await connection.getBalance(adminKp.publicKey);
const newTreasuryBalance = await connection.getBalance(treasuryPda);
console.log("New treasury balance:", lamportsToSol(newTreasuryBalance), "SOL");
console.log("New admin balance:", lamportsToSol(newAdminBalance), "SOL");
// assert that the treasury balance decreased by the amount we withdrew, which is half of the initial treasury balance
assert.approximately(
initialTreasuryBalance - newTreasuryBalance,
Number(amountToWithdraw),
10000,
"Treasury balance did not decrease by approximately the correct amount"
);
// assert that the admin balance increased by the amount we withdrew
assert.isTrue(
newAdminBalance > initialAdminBalance,
"Admin balance did not increase after withdrawal"
);
} catch (error) {
console.error("Error in withdraw test:", error);
throw error;
}
});
运行测试。我们可以看到金库账户的 SOL 余额减少了,而我们的余额增加了。

测试非管理员无法从金库中提款
添加以下测试块,以确认未授权的账户无法从金库账户余额中提取 SOL。
这里的未授权账户指的是,其公钥与我们之前在初始化期间存储在 adminConfig 账户中的公钥不匹配的任何账户。
it("prevents non-admins from withdrawing funds", async () => {
const nonAdminKeypair = web3.Keypair.generate();
const amountToWithdraw = new anchor.BN(1e8);
try {
await program.methods
.withdrawFunds(amountToWithdraw)
.accounts({
admin: nonAdminKeypair.publicKey,
adminConfig: adminConfigKp.publicKey,
treasury: treasuryPda,
systemProgram: anchor.web3.SystemProgram.programId,
})
.signers([nonAdminKeypair])
.rpc();
assert.fail("Non-admin was able to withdraw funds, but should be prohibited");
} catch (error) {
console.log("Expected error occurred:", error.toString().substring(0, 150) + "...");
assert.include(
error.toString(),
"UnauthorizedAccess",
"Expected unauthorized access error not received"
);
console.log("Non-admin withdrawal was correctly rejected");
}
});
运行测试。

从日志中我们可以看到,当我们尝试使用未授权的账户提取资金时,Anchor 抛出了一个错误。
总结
在本教程中,我们展示了 SPL Token 的一个实际用例,通过构建一个 Token Sale 程序(带有供应上限),允许用户以固定汇率用 SOL 兑换我们的 SPL 代币。
该程序使用了两个关键的 PDA:一个自引用的 mint PDA 和一个 treasury PDA。我们在初始化期间通过 mint::authority = mint.key() 将 mint 设置为其自身的权限,从而无需单独的铸造权限账户。这种模式确保了任何人都可以通过我们的程序购买/铸造代币,而不需要我们每次都授权铸造。
通过结合正确派生的种子使用 CpiContext::new_with_signer,我们的程序可以向买家铸造代币,并间接充当铸造权限。
本文是 Solana 教程系列 的一部分。