Solana में Function dispatching वह प्रक्रिया है जिसमें instruction data में एनकोड किए गए विशिष्ट आइडेंटिफायर्स (identifiers) के आधार पर आने वाले instructions को उचित handler function तक रूट (route) किया जाता है।
हमारे पिछले नेटिव Rust Solana ट्यूटोरियल्स में, हमने सभी प्रोग्राम लॉजिक को process_instruction फंक्शन के अंदर रखा था। यह सिंगल instruction वाले साधारण प्रोग्राम्स के लिए काम करता है। हालाँकि, जब कोई प्रोग्राम कई instructions को सपोर्ट करता है, तो entrypoint पार्सिंग लॉजिक, कंडीशन चेक्स और handler कोड से भर जाता है। एक बेहतर और साफ तरीका यह है कि लॉजिक को अलग-अलग फंक्शन्स में ले जाया जाए और प्रत्येक instruction को सही handler तक रूट किया जाए।
Ethereum के विपरीत, जहाँ EVM बिल्ट-इन सिलेक्टर्स (built-in selectors) के साथ कॉल्स को सही फंक्शन तक रूट करता है, Solana प्रोग्राम्स को instructions खुद ही रूट करने पड़ते हैं। Anchor 8-byte discriminators जनरेट करके और उन्हें instruction data के आगे जोड़कर इसका समाधान करता है। प्रोग्राम इस वैल्यू को पढ़ता है और सही handler को डिस्पैच (dispatch) करता है। हम अगले भाग में इसे विस्तार से समझाएंगे।
इस ट्यूटोरियल में, हम दिखाएंगे कि नेटिव Rust Solana प्रोग्राम्स में function dispatching को कैसे हैंडल किया जाता है।
How Anchor handles function dispatching
जब आप Anchor में इस तरह से फंक्शन्स लिखते हैं:
#[program]
pub mod my_program {
pub fn initialize(ctx: Context<Initialize>) -> Result<()> {
// Initialize logic
Ok(())
}
pub fn update_counter(ctx: Context<UpdateCounter>, new_value: u64) -> Result<()> {
// Update logic
Ok(())
}
pub fn close_account(ctx: Context<CloseAccount>) -> Result<()> {
// Close logic
Ok(())
}
}
Anchor instruction data के आधार पर instructions को उचित फंक्शन तक रूट करने के लिए आवश्यक कोड जनरेट करता है। आंतरिक रूप से (Under the hood), यह तीन मुख्य चरण निष्पादित करता है:
-
Step 1 — Anchor हर instruction के आगे एक 8-byte discriminator जोड़ता है। यह discriminator “global:” और फंक्शन के नाम (
sha256("global:" + function_name)) के SHA-256 हैश के पहले 8 बाइट्स लेकर बनाया जाता है। यह यूनिक आइडेंटिफायर प्रत्येक instruction को सही handler function तक रूट करने में मदद करता है, यह Ethereum के समान है जहाँ function selector फंक्शन सिग्नेचर के Keccak-256 हैश के पहले 4 बाइट्स होते हैं।let mutdiscriminator = [0u8; 8]; let preimage = format!("global:{}", ix_name); // ix_name = function name let hash = sha2::Sha256::digest(preimage.as_bytes()); discriminator.copy_from_slice(&hash[..8]); -
Step 2 — Anchor कंपाइल टाइम पर एक dispatcher जनरेट करता है। यह instruction data को 8-byte मार्क पर स्प्लिट करता है और instruction processor के ठीक अंदर, एक Rust match स्टेटमेंट के साथ उचित handler तक रूट करने के लिए discriminator का उपयोग करता है।
// Conceptual representation of what Anchor generates pub fn process_instruction( program_id: &Pubkey, accounts: &[AccountInfo], instruction_data: &[u8], ) -> ProgramResult { // Split off the 8-byte discriminator let (discriminator, remaining_data) = instruction_data.split_at(8); // Match against known instruction discriminators match discriminator { // Each instruction's discriminator is computed at compile time INITIALIZE_DISCRIMINATOR => initialize(program_id, accounts, remaining_data), UPDATE_COUNTER_DISCRIMINATOR => update_counter(program_id, accounts, remaining_data), _ => return Err(ProgramError::InvalidInstructionData), } } -
Step 3 — Anchor instruction parameters को डीसीरियलाइज़ (deserialize) करता है। पैरामीटर्स वाले instructions के लिए, Anchor शेष instruction data को अपेक्षित Rust प्रकारों (types) में डीसीरियलाइज़ करता है। इसका मतलब है कि आपके फंक्शन्स को कच्चे बाइट्स (raw bytes) के बजाय वे पैरामीटर्स मिलते हैं जिनकी उन्हें अपेक्षा होती है।
इन तीन चरणों के साथ, हम Rust फंक्शन्स लिखते हैं और Anchor हमारे लिए instruction routing और सभी instruction data पार्सिंग को हैंडल करता है। लेकिन क्योंकि हम नेटिव Rust का उपयोग कर रहे हैं, हमें ये चरण खुद ही करने होंगे।
Implementing Function Dispatching in Native Rust Programs
हम Rust में तीन फंक्शन्स के साथ एक नेटिव Solana प्रोग्राम बनाएंगे: process_instruction फंक्शन और दो instruction handlers। process_instruction में, हम instruction data के पहले बाइट की जांच करेंगे और उचित handler को डिस्पैच करने के लिए match स्टेटमेंट का उपयोग करेंगे। पहला फंक्शन केवल यह प्रदर्शित करने के लिए एक मैसेज लॉग करेगा कि राउटिंग मैकेनिज्म (routing mechanism) सही ढंग से इच्छित handler की पहचान करता है और उसे कॉल करता है। दूसरा फंक्शन accounts के माध्यम से इटररेट (iterate) करेगा और instruction data बाइट्स को पार्स करेगा।
एक बार जब हम कवर कर लेते हैं कि राउटिंग कैसे काम करती है, तो नेटिव Rust Solana पर हमारे पिछले ट्यूटोरियल्स में कवर किए गए अन्य सभी कॉन्सेप्ट्स लागू किए जा सकते हैं, जैसे, अकाउंट क्रिएशन, Borsh सीरियलाइज़ेशन, cross-program invocation। ये सभी आपके handler functions के अंदर उसी तरह काम करते हैं।
हम function dispatching को कई तरीकों से लागू कर सकते हैं। हालाँकि इसके लिए कोई एक अनिवार्य नियम (enforced convention) नहीं है (प्रोग्राम अपना खुद का तरीका चुनने के लिए स्वतंत्र हैं), नेटिव Rust प्रोग्राम्स में simple byte तरीका और Borsh-serialized enums सबसे आम हैं, जबकि Anchor अपने हैशिंग (hashing) तरीके का उपयोग करता है। यहाँ मुख्य तरीके दिए गए हैं:
- Simple byte approach: हम अपने प्रोग्राम में प्रत्येक फंक्शन को दर्शाने के लिए एक यूनिक कांस्टेंट (constant) असाइन करते हैं, उदाहरण के लिए,
const INITIALIZE: u8 = 0औरconst UPDATE: u8 = 1। जब कोई क्लाइंट हमारे प्रोग्राम को कॉल करता है, तो वह इनमें से किसी एक वैल्यू को instruction data की शुरुआत (byte position 0) में रखता है। फिर हमारा प्रोग्राम पहले बाइट को पढ़ता है और यह निर्धारित करने के लिए कि क्लाइंट किस फंक्शन को कॉल करना चाहता था, इसकी तुलना अपने परिभाषित कांस्टेंट्स के साथ करता है, और उसी के अनुसार एग्जीक्यूशन (execution) को रूट करता है। - Borsh-serialized enum: यह तरीका सीरियलाइज़ेशन के लिए Borsh का उपयोग करता है। हम प्रत्येक instruction के लिए वेरिएंट्स (variants) के साथ एक Rust enum परिभाषित करते हैं, Borsh सीरियलाइज़ेशन ट्रेट्स (traits) डिराइव (derive) करते हैं, और क्लाइंट को सीरियलाइज़्ड enum भेजने देते हैं। प्रोग्राम साइड पर, हम instruction data को वापस अपने enum में डीसीरियलाइज़ करते हैं और वेरिएंट्स पर match करते हैं।
- Anchor-style hashing: यह तरीका दर्शाता है कि Anchor आंतरिक रूप से कैसे काम करता है। हम “global:” और प्रत्येक instruction के नाम के SHA-256 हैश के पहले 8 बाइट्स लेकर यूनिक आइडेंटिफायर्स बना सकते हैं। क्लाइंट इस हैश की गणना उसी तरह करता है और इसे instruction data के आगे जोड़ता है, और हमारा प्रोग्राम इन प्री-कंप्यूटेड (pre-computed) हैश कांस्टेंट्स के खिलाफ मैच करता है।
हम अपने उदाहरण के लिए simple byte approach का उपयोग करेंगे।
हमारे प्रोग्राम में तीन मुख्य फंक्शन्स होंगे:
process_instruction: वह instruction processor जो सभी instructions को प्राप्त करता है और instruction data के आधार पर उन्हें उचित handler तक रूट करता है।say_hello: एक साधारण handler फंक्शन जो ग्रीटिंग (greeting) मैसेजेस को लॉग करता है।inspect_accounts: यह फंक्शन हमारे द्वारा बनाए जाने वाले क्लाइंट से एक स्ट्रिंग मैसेज प्राप्त करेगा, और यह मैसेज को प्रोग्राम ID और उस क्लाइंट द्वारा प्रदान की गई अकाउंट जानकारी (account information) के साथ लॉग करेगा।
Project Setup
Function dispatching को प्रदर्शित करने के लिए आइए सबसे पहले अपना प्रोजेक्ट स्ट्रक्चर सेटअप करें:
mkdir solana-dispatch-example
cd solana-dispatch-example
cargo init --lib
अब आवश्यक डिपेंडेंसीज़ (dependencies) शामिल करने के लिए अपने Cargo.toml को अपडेट करें:
[package]
name = "solana-dispatch-example"
version = "0.1.0"
edition = "2021"
[lib]
crate-type = ["cdylib", "lib"]
[dependencies]
solana-program = "2.2.0"
src/lib.rs खोलें और इसके कंटेंट को नीचे दिए गए कोड से बदलें। यह प्रोग्राम:
- प्रत्येक instruction प्रकार के लिए कांस्टेंट्स परिभाषित करता है (
SAY_HELLO= 0 औरINSPECT_ACCOUNTS= 1) process_instructionको लागू करता है और इसेentrypoint!मैक्रो (macro) में पास करता है- किस फंक्शन को कॉल करना है यह निर्धारित करने के लिए instruction data का पहला बाइट पढ़ता है
- instruction प्रकार पर मैच करता है और एग्जीक्यूशन को सही handler function तक रूट करता है
use solana_program::{
account_info::AccountInfo,
entrypoint,
entrypoint::ProgramResult,
msg,
pubkey::Pubkey,
};
// Define instruction type constants
pub const SAY_HELLO: u8 = 0;
pub const INSPECT_ACCOUNTS: u8 = 1;
entrypoint!(process_instruction);
pub fn process_instruction(
program_id: &Pubkey,
accounts: &[AccountInfo],
instruction_data: &[u8],
) -> ProgramResult {
// Read first byte to determine which function to call
match instruction_data[0] {
SAY_HELLO => say_hello(),
INSPECT_ACCOUNTS => inspect_accounts(program_id, accounts, &instruction_data[1..]),
_ => {
msg!("Unknown instruction: {}", instruction_data[0]);
}
}
Ok(())
}
match स्टेटमेंट वह जगह है जहाँ वास्तविक dispatching होती है। हम instruction data के पहले बाइट को अपने परिभाषित कांस्टेंट्स (SAY_HELLO और INSPECT_ACCOUNTS) के खिलाफ मैच करते हैं। चूँकि हमारे कांस्टेंट्स सिंगल-बाइट वैल्यूज़ हैं, इसलिए हमें केवल instruction_data[0] चेक करने की आवश्यकता है। INSPECT_ACCOUNTS फंक्शन के लिए, हम शेष बाइट्स (&instruction_data[1..]) को handler function में पास करते हैं।
अब say_hello फंक्शन जोड़ें। हम बस कुछ मैसेजेस को लॉग करते हैं:
fn say_hello() {
msg!("Hello from our first function!");
}
अंत में, आइए inspect_accounts फंक्शन जोड़ें। यह फंक्शन क्लाइंट से एक टेक्स्ट मैसेज (instruction data के रूप में भेजा गया) प्राप्त करेगा, इसे डीसीरियलाइज़ करेगा, और इसे पास किए गए प्रोग्राम ID और अकाउंट जानकारी के साथ लॉग करेगा:
fn inspect_accounts(program_id: &Pubkey, accounts: &[AccountInfo], data: &[u8]) {
msg!("Hello from our second function!");
msg!("Program ID: {}", program_id);
msg!("Number of accounts: {}", accounts.len());
msg!("Instruction data length: {}", data.len());
// Show account details
for (i, account) in accounts.iter().enumerate() {
msg!("Account {}: {}", i, account.key);
msg!(" Lamports: {}", account.lamports());
msg!(" Owner: {}", account.owner);
}
}
ध्यान दें कि inspect_accounts फंक्शन उन्हीं पैरामीटर्स का उपयोग करता है जिनका उपयोग process_instruction फंक्शन करता है। यह कोई अनिवार्यता (requirement) नहीं है, बल्कि यह एक सामान्य पैटर्न है।
अब हम प्रोग्राम को बिल्ड और डिप्लॉय करते हैं:
# Build the program
cargo build-sbf
# Start a local validator (in a separate terminal)
solana-test-validator
# Monitor logs (in another terminal)
solana logs
# Deploy the program
solana program deploy target/deploy/solana_dispatch_example.so
आपको इसके जैसा ही आउटपुट मिलना चाहिए:

आउटपुट से अपना प्रोग्राम ID कॉपी करें, क्लाइंट के लिए आपको इसकी आवश्यकता होगी।
हमारे प्रोग्राम की टेस्टिंग
हमने सफलतापूर्वक अपना प्रोग्राम बिल्ड और डिप्लॉय कर लिया है। अब, function dispatch को टेस्ट करने के लिए एक TypeScript क्लाइंट बनाते हैं। यह क्लाइंट हमारे प्रोग्राम के दोनों फंक्शन्स को कॉल करेगा।
सबसे पहले, हमारी प्रोजेक्ट डायरेक्टरी में क्लाइंट एनवायरनमेंट सेट अप करें:
mkdir client && cd client
npm init -y
npm install @solana/web3.js typescript ts-node @types/node
एक टेस्ट स्क्रिप्ट जोड़ने के लिए client/package.json को अपडेट करें ताकि हम npm run test के साथ अपना क्लाइंट चला सकें:
{
"scripts": {
"test": "ts-node client.ts"
}
}
निम्नलिखित TypeScript कंपाइलर कॉन्फ़िगरेशन के साथ एक client/tsconfig.json फ़ाइल बनाएं, जो हमारे क्लाइंट TypeScript कोड को ts-node के साथ कंपाइल और रन होने की अनुमति देता है।
{
"compilerOptions": {
"target": "ES2020",
"module": "commonjs",
"moduleResolution": "node",
"strict": true,
"esModuleInterop": true,
"skipLibCheck": true,
"types": ["node"]
},
"include": ["*.ts"]
}
अंत में, हमारे क्लाइंट कोड के लिए एक client/client.ts फ़ाइल बनाएं और नीचे दिया गया कोड जोड़ें। इस कोड में हम:
- वही instruction कांस्टेंट्स परिभाषित करते हैं जो हमारे प्रोग्राम फंक्शन्स से मेल खाते हैं (
SAY_HELLO= 0,INSPECT_ACCOUNTS= 1) - लोकल Solana टेस्ट वैलिडेटर (test validator) से कनेक्शन सेट अप करते हैं
- एक payer अकाउंट बनाते हैं और उसमें फंड डालते हैं (लेनदेन शुल्क का भुगतान करने के लिए transaction signer के रूप में उपयोग किया जाता है)
say_helloफंक्शन को कॉल करते हैं (बिना किसी अकाउंट को पास किए, केवल discriminator बाइट 0 भेजता है)inspect_accountsफंक्शन को कॉल करते हैं (discriminator + ग्रीटिंग स्ट्रिंग मैसेज भेजता है, इंस्पेक्शन के लिए payer और प्रोग्राम ID को अकाउंट्स के रूप में पास करता है)
import {
Connection,
Keypair,
LAMPORTS_PER_SOL,
PublicKey,
Transaction,
TransactionInstruction,
sendAndConfirmTransaction,
} from '@solana/web3.js';
// Constants that match our program
const SAY_HELLO = 0;
const INSPECT_ACCOUNTS = 1;
// Replace with your actual program ID after deployment
const PROGRAM_ID = new PublicKey('YOUR_PROGRAM_ID_HERE');
const connection = new Connection('http://localhost:8899', 'confirmed');
async function testFunctionDispatching() {
console.log('Testing Function Dispatching');
// Create a funded payer account
const payer = Keypair.generate();
console.log('Funding payer account...');
await connection.requestAirdrop(payer.publicKey, LAMPORTS_PER_SOL);
// Wait for airdrop confirmation
await new Promise((resolve) => setTimeout(resolve, 2000));
console.log(`Payer: ${payer.publicKey.toString()}`);
// Test the say_hello function
console.log('1. Testing say_hello function:');
const sayHelloIx = new TransactionInstruction({
keys: [],
programId: PROGRAM_ID,
data: Buffer.from([SAY_HELLO]),
});
await sendAndConfirmTransaction(
connection,
new Transaction().add(sayHelloIx),
[payer]
);
console.log('First function called successfully');
// Test the inspect_accounts function
console.log('2. Testing inspect_accounts function:');
// Create message to send to the program
const message = "Hello from TypeScript client!";
const messageBytes = Buffer.from(message, 'utf-8');
const instructionData = Buffer.concat([
Buffer.from([INSPECT_ACCOUNTS]), // Discriminator byte
messageBytes // Message payload
]);
const inspectAccountsIx = new TransactionInstruction({
keys: [
{ pubkey: payer.publicKey, isSigner: false, isWritable: false },
{ pubkey: PROGRAM_ID, isSigner: false, isWritable: false },
],
programId: PROGRAM_ID,
data: instructionData,
});
await sendAndConfirmTransaction(
connection,
new Transaction().add(inspectAccountsIx),
[payer]
);
console.log('Second function called successfully');
console.log('Check the logs to see detailed function output!');
}
testFunctionDispatching().catch(console.error);
सुनिश्चित करें कि टेस्ट रन करने से पहले टेस्ट वैलिडेटर और लॉग्स अभी भी चल रहे हैं।
अब टेस्ट रन करें:
cd client
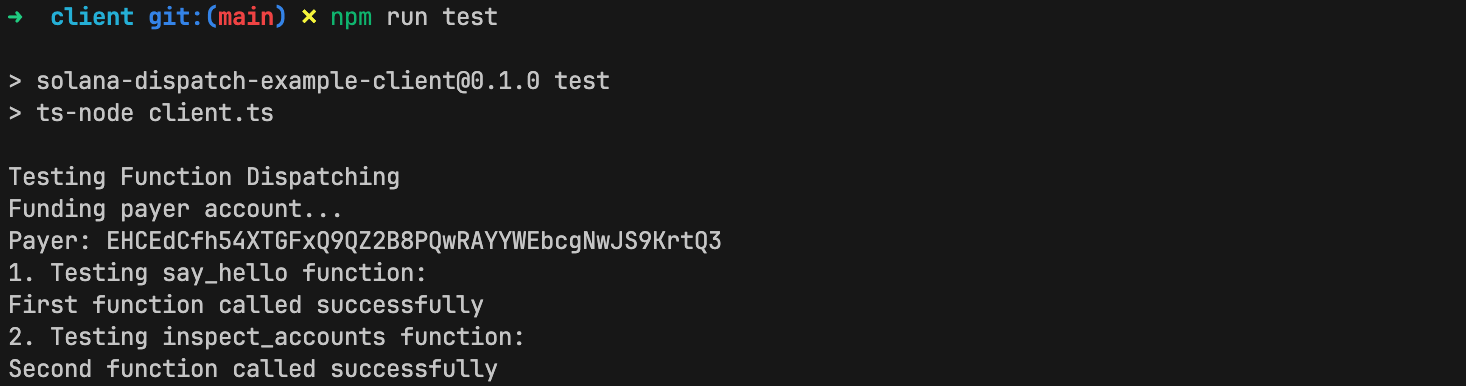
npm run test
यह सफलतापूर्वक चलता है!
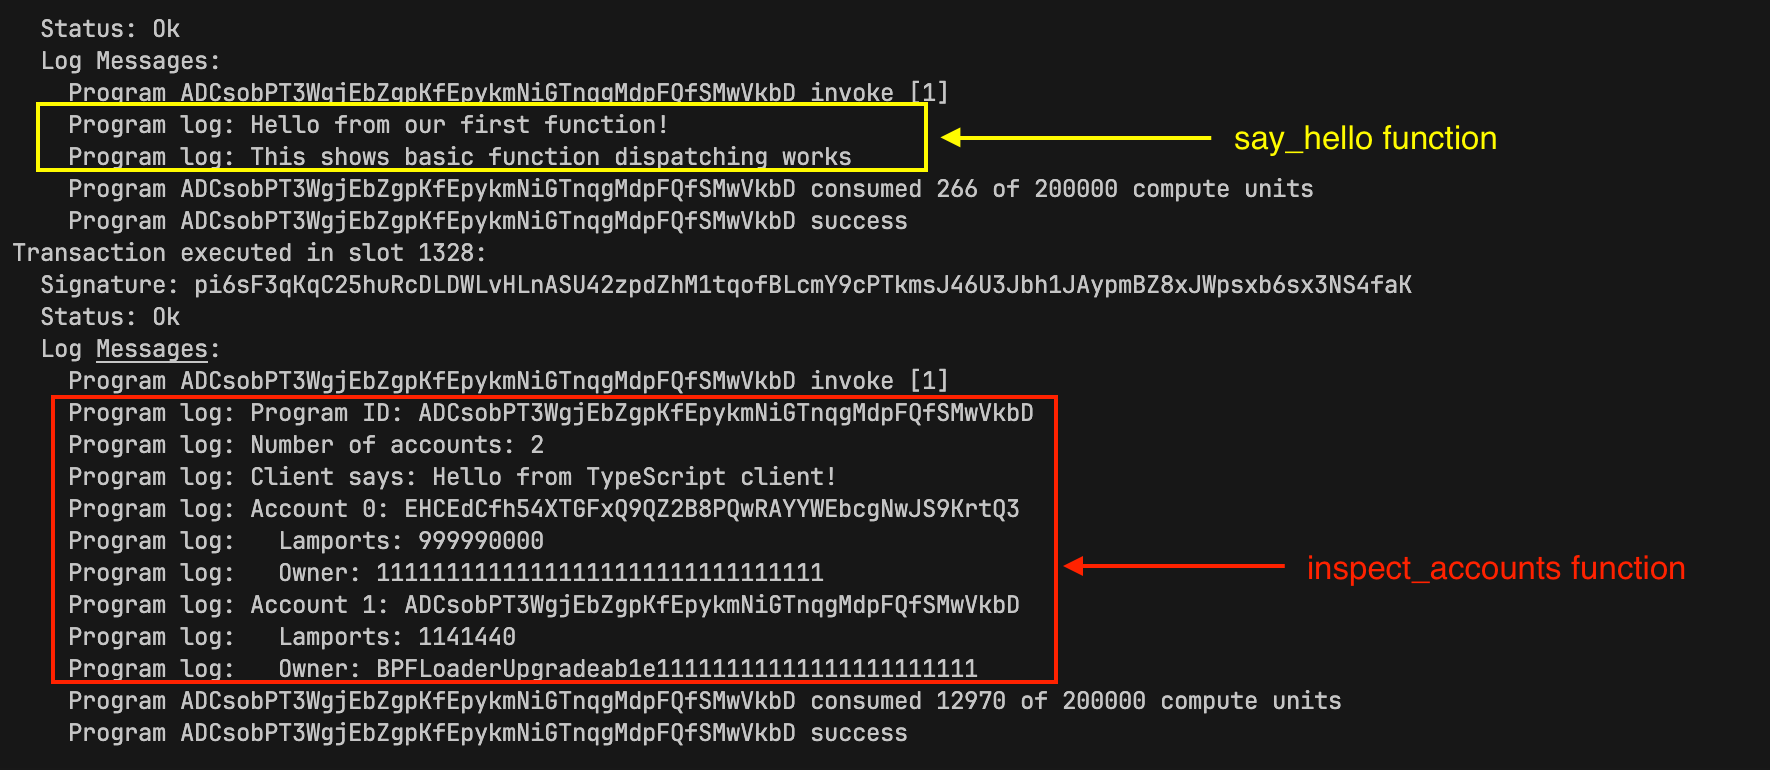
लॉग्स को देखते हुए, हम देख सकते हैं कि हमारे दोनों प्रोग्राम फंक्शन्स निष्पादित (execute) हुए।
यह लेख Solana development पर एक ट्यूटोरियल श्रृंखला का हिस्सा है।