在 Solana 中,函数分发(Function dispatching)是指根据编码在指令数据中的特定标识符,将传入的指令路由到相应的处理函数的过程。
在我们之前的原生 Rust Solana 教程中,我们将所有程序逻辑都放在了 process_instruction 函数中。这对于只有一个指令的简单程序来说是可行的。然而,当程序支持多个指令时,入口点就会被解析逻辑、条件检查和处理程序代码填满。一种更清晰的方法是将逻辑移到单独的函数中,并将每个指令路由到正确的处理程序。
与 Ethereum 不同(在 Ethereum 中,EVM 使用内置的选择器将调用路由到正确的函数),Solana 程序必须自行路由指令。Anchor 通过生成 8 字节的鉴别器(discriminator)并将其前置到指令数据中来解决这个问题。程序读取该值并分发到正确的处理程序。我们将在下一节详细解释这一点。
在本教程中,我们将演示如何在原生 Rust Solana 程序中处理函数分发。
Anchor 如何处理函数分发
当你在 Anchor 中像这样编写函数时:
#[program]
pub mod my_program {
pub fn initialize(ctx: Context<Initialize>) -> Result<()> {
// Initialize logic
Ok(())
}
pub fn update_counter(ctx: Context<UpdateCounter>, new_value: u64) -> Result<()> {
// Update logic
Ok(())
}
pub fn close_account(ctx: Context<CloseAccount>) -> Result<()> {
// Close logic
Ok(())
}
}
Anchor 会根据指令数据生成必要的代码,将指令路由到适当的函数。在底层,它执行三个主要步骤:
-
步骤 1 — Anchor 在每个指令前附加一个 8 字节的鉴别器(discriminator)。 这个鉴别器是通过取 “global:” 加上函数名(
sha256("global:" + function_name))的 SHA-256 哈希值的前 8 个字节来创建的。这个唯一标识符有助于将每个指令路由到正确的处理函数,这与 Ethereum 类似,在 Ethereum 中,函数选择器是函数签名的 Keccak-256 哈希值的前 4 个字节。let mutdiscriminator = [0u8; 8]; let preimage = format!("global:{}", ix_name); // ix_name = function name let hash = sha2::Sha256::digest(preimage.as_bytes()); discriminator.copy_from_slice(&hash[..8]); -
步骤 2 — Anchor 在编译时生成一个分发器(dispatcher)。 它在 8 字节标记处分割指令数据,并在指令处理器内部使用 Rust 的 match 语句通过鉴别器将指令路由到合适的处理程序。
// Conceptual representation of what Anchor generates pub fn process_instruction( program_id: &Pubkey, accounts: &[AccountInfo], instruction_data: &[u8], ) -> ProgramResult { // Split off the 8-byte discriminator let (discriminator, remaining_data) = instruction_data.split_at(8); // Match against known instruction discriminators match discriminator { // Each instruction's discriminator is computed at compile time INITIALIZE_DISCRIMINATOR => initialize(program_id, accounts, remaining_data), UPDATE_COUNTER_DISCRIMINATOR => update_counter(program_id, accounts, remaining_data), _ => return Err(ProgramError::InvalidInstructionData), } } -
步骤 3 — Anchor 反序列化指令参数。 对于带有参数的指令,Anchor 会将剩余的指令数据反序列化为预期的 Rust 类型。这意味着你的函数接收到的是它所期望的参数,而不是原始字节。
有了这三个步骤,我们只需编写 Rust 函数,Anchor 就会为我们处理指令路由和所有指令数据的解析。但因为我们使用的是原生 Rust,我们必须自己执行这些步骤。
在原生 Rust 程序中实现函数分发
我们将用 Rust 构建一个原生 Solana 程序,它包含三个函数:process_instruction 函数和两个指令处理函数。在 process_instruction 中,我们将检查指令数据的第一个字节,并使用 match 语句将其分发到适当的处理程序。第一个函数将简单地记录一条消息,以演示路由机制能够正确识别并调用预期的处理程序。第二个函数将遍历账户并解析指令数据字节。
一旦我们介绍了路由的工作原理,我们在之前关于原生 Rust Solana 的教程中涵盖的所有其他概念都可以被应用,例如,账户创建、Borsh 序列化、跨程序调用(cross-program invocation)。它们在你的处理函数中的工作方式都是一样的。
我们可以通过多种方式实现函数分发。虽然没有单一的强制约定(程序可以自由选择自己的方法),但简单的字节方法和 Borsh 序列化枚举(enums)在原生 Rust 程序中最常见,而 Anchor 则使用其哈希方法。以下是主要的方法:
- 简单字节法: 我们分配一个唯一的常量来表示程序中的每个函数,例如
const INITIALIZE: u8 = 0和const UPDATE: u8 = 1。当客户端调用我们的程序时,它将这些值之一放置在指令数据的开头(字节位置 0)。然后,我们的程序读取第一个字节,并将其与其定义的常量进行比较,以确定客户端意图调用哪个函数,并相应地路由执行。 - Borsh 序列化枚举法: 这种方法使用 Borsh 进行序列化。我们定义一个包含每个指令变体(variants)的 Rust 枚举(enum),派生 Borsh 序列化 traits,并让客户端发送序列化后的枚举。在程序端,我们将指令数据反序列化回我们的枚举,并基于变体进行 match 匹配。
- Anchor 风格哈希法: 这种方法反映了 Anchor 内部的工作方式。我们可以通过取 “global:” 加上每个指令名的 SHA-256 哈希值的前 8 个字节来创建唯一标识符。客户端以相同的方式计算此哈希值,并将其前置到指令数据中,而我们的程序则与这些预先计算的哈希常量进行匹配。
我们将在示例中使用简单的字节法。
我们的程序将包含三个主要函数:
process_instruction:指令处理器,它接收所有指令并根据指令数据将它们路由到适当的处理程序。say_hello:一个简单的处理函数,用于记录问候消息。inspect_accounts:此函数将从我们将构建的客户端接收一条字符串消息,并将记录该消息以及客户端提供的程序 ID 和账户信息。
项目设置
让我们首先设置项目结构,以演示函数分发:
mkdir solana-dispatch-example
cd solana-dispatch-example
cargo init --lib
现在更新你的 Cargo.toml 以包含必要的依赖项:
[package]
name = "solana-dispatch-example"
version = "0.1.0"
edition = "2021"
[lib]
crate-type = ["cdylib", "lib"]
[dependencies]
solana-program = "2.2.0"
打开 src/lib.rs 并将其内容替换为以下代码。此程序:
- 为每种指令类型定义常量(
SAY_HELLO= 0 且INSPECT_ACCOUNTS= 1) - 实现
process_instruction并将其传递给entrypoint!宏 - 读取指令数据的第一个字节以确定调用哪个函数
- 对指令类型进行 match 匹配,并将执行路由到正确的处理函数
use solana_program::{
account_info::AccountInfo,
entrypoint,
entrypoint::ProgramResult,
msg,
pubkey::Pubkey,
};
// Define instruction type constants
pub const SAY_HELLO: u8 = 0;
pub const INSPECT_ACCOUNTS: u8 = 1;
entrypoint!(process_instruction);
pub fn process_instruction(
program_id: &Pubkey,
accounts: &[AccountInfo],
instruction_data: &[u8],
) -> ProgramResult {
// Read first byte to determine which function to call
match instruction_data[0] {
SAY_HELLO => say_hello(),
INSPECT_ACCOUNTS => inspect_accounts(program_id, accounts, &instruction_data[1..]),
_ => {
msg!("Unknown instruction: {}", instruction_data[0]);
}
}
Ok(())
}
match 语句是发生实际分发的地方。我们将指令数据的第一个字节与我们定义的常量(SAY_HELLO 和 INSPECT_ACCOUNTS)进行匹配。由于我们的常量是单字节值,我们只需检查 instruction_data[0]。对于 INSPECT_ACCOUNTS 函数,我们将剩余的字节(&instruction_data[1..])传递给处理函数。
现在添加 say_hello 函数。我们只需记录一些消息:
fn say_hello() {
msg!("Hello from our first function!");
}
最后,让我们添加 inspect_accounts 函数。该函数将接收来自客户端的文本消息(作为指令数据发送),将其反序列化,并记录下来,同时记录传递的程序 ID 和账户信息:
fn inspect_accounts(program_id: &Pubkey, accounts: &[AccountInfo], data: &[u8]) {
msg!("Hello from our second function!");
msg!("Program ID: {}", program_id);
msg!("Number of accounts: {}", accounts.len());
msg!("Instruction data length: {}", data.len());
// Show account details
for (i, account) in accounts.iter().enumerate() {
msg!("Account {}: {}", i, account.key);
msg!(" Lamports: {}", account.lamports());
msg!(" Owner: {}", account.owner);
}
}
请注意,inspect_accounts 函数使用与 process_instruction 函数相同的参数。这并不是强制要求,但这是一种常见的模式。
现在我们构建并部署该程序:
# Build the program
cargo build-sbf
# Start a local validator (in a separate terminal)
solana-test-validator
# Monitor logs (in another terminal)
solana logs
# Deploy the program
solana program deploy target/deploy/solana_dispatch_example.so
你应该会得到类似如下的输出:

从输出中复制你的程序 ID,你在客户端中将需要它。
测试我们的程序
我们已经成功构建并部署了我们的程序。现在,让我们创建一个 TypeScript 客户端来测试函数分发。这个客户端将调用我们程序中的两个函数。
首先,在我们的项目目录中设置客户端环境:
mkdir client && cd client
npm init -y
npm install @solana/web3.js typescript ts-node @types/node
更新 client/package.json 以添加一个测试脚本,这样我们就可以使用 npm run test 来运行我们的客户端:
{
"scripts": {
"test": "ts-node client.ts"
}
}
创建一个包含以下 TypeScript 编译器配置的 client/tsconfig.json 文件,这将允许我们的客户端 TypeScript 代码能够编译并使用 ts-node 运行。
{
"compilerOptions": {
"target": "ES2020",
"module": "commonjs",
"moduleResolution": "node",
"strict": true,
"esModuleInterop": true,
"skipLibCheck": true,
"types": ["node"]
},
"include": ["*.ts"]
}
最后,为我们的客户端代码创建一个 client/client.ts 文件并添加以下代码。在这段代码中,我们:
- 定义与我们的程序函数匹配的相同指令常量(
SAY_HELLO= 0,INSPECT_ACCOUNTS= 1) - 设置与本地 Solana 测试验证器的连接
- 创建并资助一个付款人(payer)账户(用作交易签名者以支付交易费用)
- 调用
say_hello函数(仅发送鉴别器字节 0,不传递任何账户) - 调用
inspect_accounts函数(发送鉴别器 + 问候字符串消息,将付款人和程序 ID 作为账户传递以供检查)
import {
Connection,
Keypair,
LAMPORTS_PER_SOL,
PublicKey,
Transaction,
TransactionInstruction,
sendAndConfirmTransaction,
} from '@solana/web3.js';
// Constants that match our program
const SAY_HELLO = 0;
const INSPECT_ACCOUNTS = 1;
// Replace with your actual program ID after deployment
const PROGRAM_ID = new PublicKey('YOUR_PROGRAM_ID_HERE');
const connection = new Connection('http://localhost:8899', 'confirmed');
async function testFunctionDispatching() {
console.log('Testing Function Dispatching');
// Create a funded payer account
const payer = Keypair.generate();
console.log('Funding payer account...');
await connection.requestAirdrop(payer.publicKey, LAMPORTS_PER_SOL);
// Wait for airdrop confirmation
await new Promise((resolve) => setTimeout(resolve, 2000));
console.log(`Payer: ${payer.publicKey.toString()}`);
// Test the say_hello function
console.log('1. Testing say_hello function:');
const sayHelloIx = new TransactionInstruction({
keys: [],
programId: PROGRAM_ID,
data: Buffer.from([SAY_HELLO]),
});
await sendAndConfirmTransaction(
connection,
new Transaction().add(sayHelloIx),
[payer]
);
console.log('First function called successfully');
// Test the inspect_accounts function
console.log('2. Testing inspect_accounts function:');
// Create message to send to the program
const message = "Hello from TypeScript client!";
const messageBytes = Buffer.from(message, 'utf-8');
const instructionData = Buffer.concat([
Buffer.from([INSPECT_ACCOUNTS]), // Discriminator byte
messageBytes // Message payload
]);
const inspectAccountsIx = new TransactionInstruction({
keys: [
{ pubkey: payer.publicKey, isSigner: false, isWritable: false },
{ pubkey: PROGRAM_ID, isSigner: false, isWritable: false },
],
programId: PROGRAM_ID,
data: instructionData,
});
await sendAndConfirmTransaction(
connection,
new Transaction().add(inspectAccountsIx),
[payer]
);
console.log('Second function called successfully');
console.log('Check the logs to see detailed function output!');
}
testFunctionDispatching().catch(console.error);
在运行测试之前,请确保测试验证器和日志仍在运行。
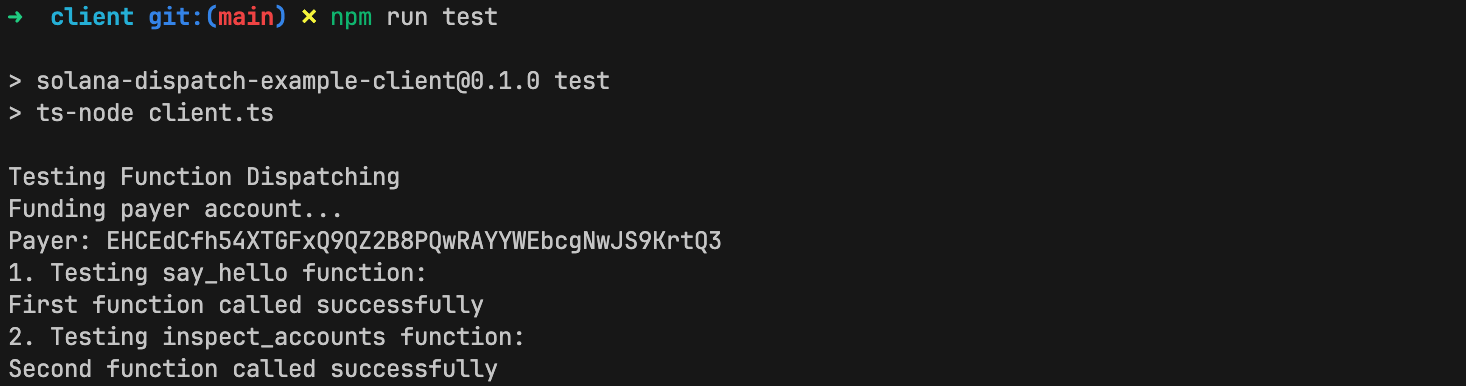
现在运行测试:
cd client
npm run test
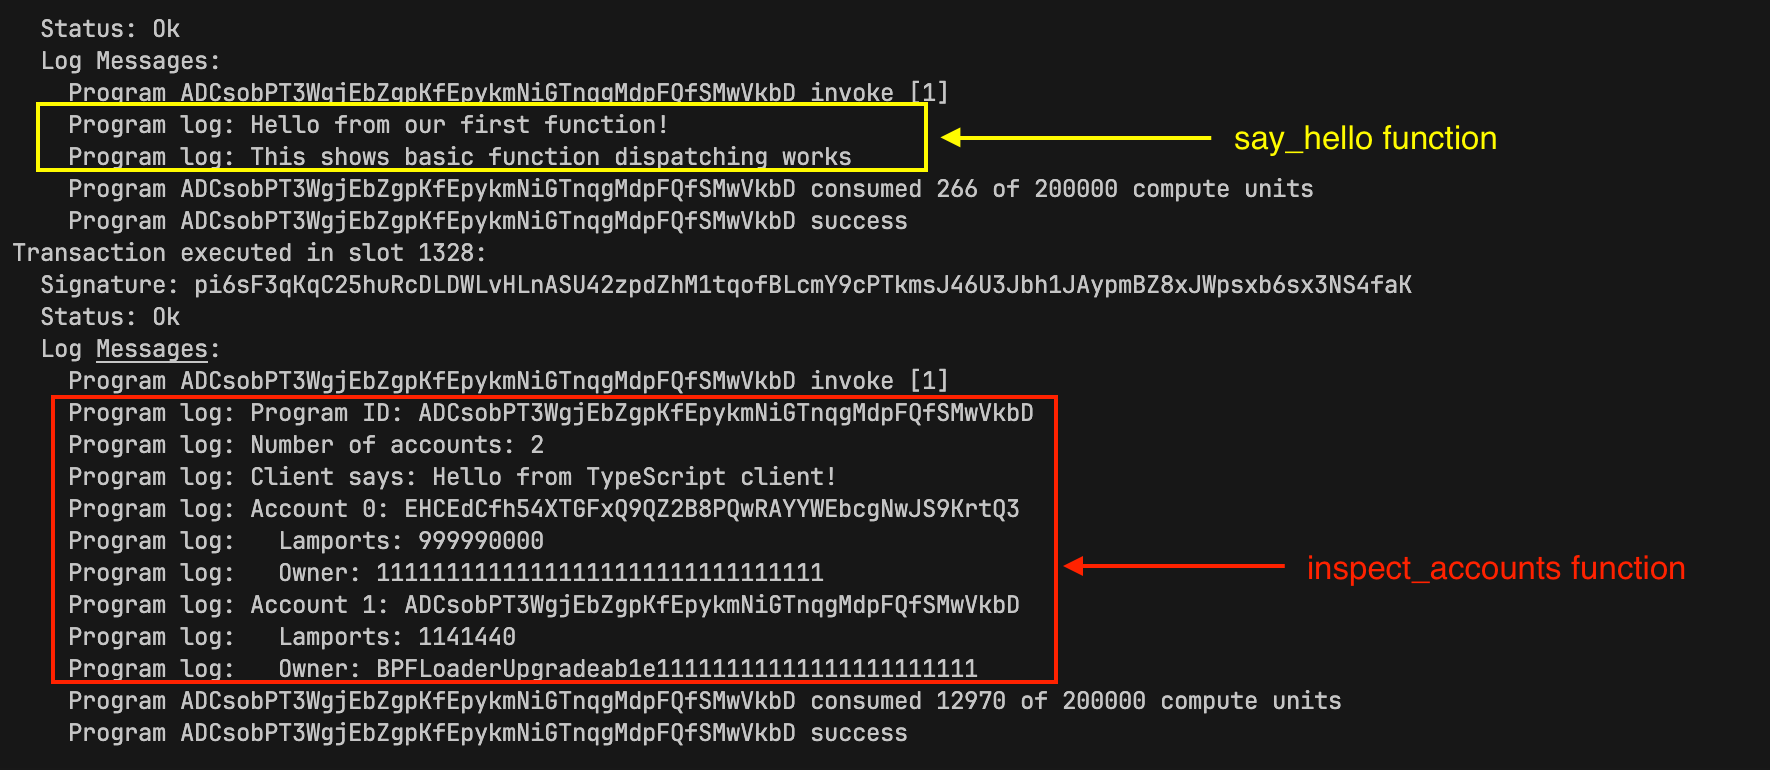
运行成功!
查看日志,我们可以看到我们的两个程序函数都已执行。
本文是 Solana 开发教程系列的一部分。