जैसा कि हमने पिछले ट्यूटोरियल में चर्चा की थी, entrypoint आपके Solana प्रोग्राम का “front door” (मुख्य द्वार) होता है और यह प्रोग्राम में आने वाले सभी निर्देशों (instructions) को हैंडल करता है।
इस ट्यूटोरियल में, हम सीखेंगे कि entrypoint के माध्यम से हमारे नेटिव Rust Solana प्रोग्राम में पास किए गए accounts को कैसे पढ़ा जाए।
Anchor में, आप #[derive(Accounts)] मैक्रो का उपयोग करके उन accounts को परिभाषित करते हैं जिनकी आपके प्रोग्राम को आवश्यकता होती है:
#[derive(Accounts)]
pub struct Initialize<'info> {
#[account(init, payer = user, space = 8 + 32)]
pub data_account: Account<'info, MyData>,
#[account(mut)]
pub user: Signer<'info>,
pub system_program: Program<'info, System>,
}
#[account]
pub struct MyData {
pub value: u64,
}
फिर आप अपने instruction handler में Context के माध्यम से उन accounts को एक्सेस करते हैं:
#[program]
pub mod my_program {
pub fn initialize(ctx: Context<Initialize>) -> Result<()> {
// other function logic
ctx.accounts.data_account.value = 100;
Ok(())
}
}
Anchor अकाउंट वैलिडेशन को हैंडल करता है और Context के माध्यम से टाइप्ड एक्सेस (typed access) प्रदान करता है। नेटिव Rust में, आप सीधे raw accounts स्लाइस के साथ काम करते हैं जिसे आपके instruction processor फंक्शन में पास किया जाता है (हमने इसे पिछले ट्यूटोरियल में देखा था)।
यदि आपको Solana accounts को दोबारा समझने की आवश्यकता है, तो Initializing Accounts in Solana and Anchor और Solana Counter Program देखें।
Rust Program बनाना
आइए एक ऐसा प्रोग्राम बनाएं जो instruction processor फंक्शन में पास किए गए accounts को पढ़ता है और लॉग (log) करता है।
सबसे पहले, प्रोजेक्ट सेटअप करें:
mkdir solana-storage
cd solana-storage
cargo init --lib solana-storage
अपने Cargo.toml को इससे अपडेट करें:
[package]
name = "solana-storage"
version = "0.1.0"
edition = "2021"
[lib]
crate-type = ["cdylib", "lib"]
[dependencies]
solana-program = "3.0.0"
borsh = "0.10"
हमने भविष्य के ट्यूटोरियल्स के लिए borsh = "0.10" जोड़ा है, जहां हम अकाउंट डेटा को सीरियलाइज़ (serialize) करेंगे।
Entry Point Function में Accounts को पढ़ना
src/lib.rs के कोड को निम्नलिखित कोड से बदलें। यह प्रोग्राम प्रदान किए गए प्रत्येक अकाउंट पर इटरेट (iterate) करता है और इसकी public key, lamport बैलेंस, owner, डेटा लेंथ, और क्या अकाउंट executable, writable या signer है, इसे लॉग करता है। यह process_instruction में पास किए गए accounts पैरामीटर के माध्यम से इन accounts को एक्सेस करता है, जो AccountInfo स्ट्रक्ट्स का एक एरे (array) होता है। AccountInfo नेटिव Solana टाइप है जिसका उपयोग ऑन-चेन (on-chain) accounts को दर्शाने के लिए किया जाता है। बड़ी मात्रा में डेटा लॉग करने से बचने के लिए, प्रोग्राम प्रत्येक अकाउंट के डेटा के केवल पहले 8 बाइट्स को स्टोर किए गए डेटा के प्रीव्यू (preview) के रूप में प्रिंट करता है।
use solana_program::{
account_info::AccountInfo,
entrypoint,
entrypoint::ProgramResult,
msg,
pubkey::Pubkey,
};
entrypoint!(process_instruction);
pub fn process_instruction(
_program_id: &Pubkey,
accounts: &[AccountInfo],
_instruction_data: &[u8],
) -> ProgramResult {
msg!("Storage Program: Examining {} accounts", accounts.len());
*// Create an iterator over accounts to safely access each account*
let accounts_iter = &mut accounts.iter();
*// Loop through each account and log its metadata*
for (index, account) in accounts_iter.enumerate() {
msg!("Account {}: {}", index, account.key);
msg!("Lamports: {}", account.lamports());
msg!("Owner: {}", account.owner);
msg!("Data length: {} bytes", account.data_len());
msg!("Executable: {}", account.executable);
msg!("Writable: {}", account.is_writable);
msg!("Is signer: {}", account.is_signer);
*// Log only the first 8 bytes to avoid overwhelming the logs*
if account.data_len() > 0 {
let data = account.try_borrow_data()?;
// Take the smaller value between 8 and data.len() so we never slice past the buffer.
// This caps the preview to at most 8 bytes while staying within bounds.
let preview_len = std::cmp::min(8, data.len());
msg!("First {} bytes: {:?}", preview_len, &data[..preview_len]);
} else {
msg!("No data stored");
}
msg!(""); // Empty line for readability
}
Ok(())
}
हमारे पिछले Anchor-आधारित ट्यूटोरियल्स में, हमने इस टाइप का उपयोग अकाउंट वैलिडेशन (account validation) कॉन्टेक्स्ट्स में किया है। नेटिव प्रोग्राम्स में, AccountInfo हमें उस सभी अकाउंट मेटाडेटा तक पहुंच प्रदान करता है जिसे Solana मेंटेन करता है - जिसमें अकाउंट की public key, lamports (बैलेंस), owner प्रोग्राम, डेटा फील्ड, और यह executable, writable, या signer है या नहीं, जैसे फ्लैग्स (flags) शामिल हैं।
इस कोड के कुछ प्रमुख कॉन्सेप्ट्स (key concepts) नीचे दिए गए डायग्राम में हाईलाइट किए गए हैं:
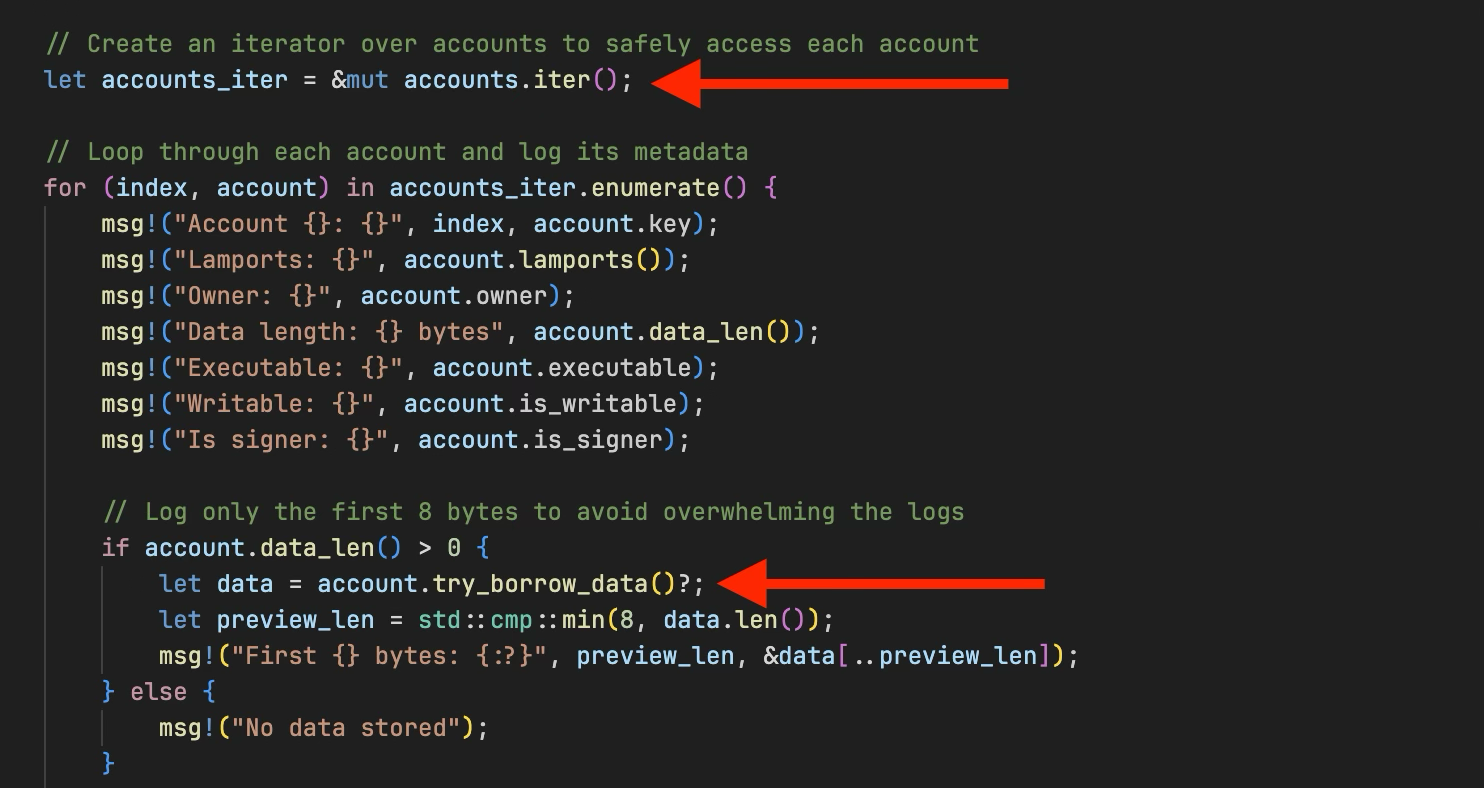
accounts.iter(): यह accounts स्लाइस पर एक इटरेटर (iterator) बनाता हैaccount.try_borrow_data()?: यह अकाउंट के डेटा फील्ड का रीड-ओनली रेफरेंस (read-only reference) लौटाता है। हम अकाउंट डेटा को सुरक्षित रूप से बॉरो (borrow) करने के लिएtry_borrow_data()का उपयोग करते हैं। यदि डेटा पहले से ही mutably बॉरो किया जा चुका है तो यह एक एरर (error) लौटाता है।
जब आप क्लाइंट से कोई ट्रांज़ेक्शन बनाते हैं और keys एरे में accounts निर्दिष्ट करते हैं:
const ix = new TransactionInstruction({
keys: [
{ pubkey: payer.publicKey, isSigner: true, isWritable: false },
],
programId: PROGRAM_ID,
data: Buffer.alloc(0),
});
सभी निर्दिष्ट accounts आपके प्रोग्राम के process_instruction में accounts पैरामीटर के रूप में पास हो जाते हैं। इसी तरह आपका प्रोग्राम उन सभी accounts को प्राप्त करता है और उनका निरीक्षण (inspect) कर सकता है जिनके साथ क्लाइंट काम करना चाहता है—चाहे वे signers हों, writable accounts हों, या ऐसे accounts हों जिन्हें आपको केवल पढ़ना है।
अब प्रोग्राम को बिल्ड (build) और डिप्लॉय (deploy) करें:
cargo build-sbf
solana-test-validator # in another terminal
solana program deploy target/deploy/solana_storage_tutorial.so

प्रोग्राम आईडी (program ID) को कॉपी कर लें, जब हम प्रोग्राम का परीक्षण (test) करेंगे तब हम इसका उपयोग करेंगे।
प्रोग्राम को लोकल Solana वैलिडेटर (validator) पर डिप्लॉय करने के बाद, अब हम अपने प्रोग्राम का परीक्षण (test) करने के लिए तैयार हैं।
Account Inspection का परीक्षण (Testing)
आइए एक क्लाइंट बनाएं जो हमारे प्रोग्राम में कई accounts पास करता है और उनके मेटाडेटा को लॉग करता है।
हमारी प्रोजेक्ट रूट डायरेक्टरी (project root directory) से क्लाइंट एनवायरनमेंट सेटअप करें:
mkdir client && cd client
npm init -y
npm install @solana/web3.js typescript ts-node @types/node
client/package.json को अपडेट करें:
{
"scripts": {
"test": "ts-node client.ts"
}
}
client/tsconfig.json बनाएं:
{
"compilerOptions": {
"target": "ES2020",
"module": "commonjs",
"moduleResolution": "node",
"strict": true,
"esModuleInterop": true,
"skipLibCheck": true,
"types": ["node"]
},
"include": ["*.ts"]
}
अब client/client.ts बनाएं और निम्नलिखित कोड जोड़ें। इस क्लाइंट में, हम:
@solana/web3.jsसे आवश्यक डिपेंडेंसीज़ (dependencies) इम्पोर्ट करते हैं- एक
testAccountInspectionफंक्शन बनाते हैं जो:- दो कीपेयर (keypair) accounts (
payerऔरemptyAccount) बनाता है - payer अकाउंट में SOL फंड करता है
- इन accounts को, सिस्टम प्रोग्राम (system program) सहित, मेटाडेटा पढ़ने और लॉग करने के लिए हमारे प्रोग्राम में पास करता है
- दो कीपेयर (keypair) accounts (
import {
Connection,
Keypair,
LAMPORTS_PER_SOL,
PublicKey,
SystemProgram,
Transaction,
TransactionInstruction,
sendAndConfirmTransaction,
} from '@solana/web3.js';
const PROGRAM_ID = new PublicKey('YOUR_PROGRAM_ID_HERE');// Replace with your actual program IDconst connection = new Connection('http://localhost:8899', 'confirmed');
async function testAccountInspection() {
console.log('Testing Account Inspection\n');
// Create accounts to inspect
const payer = Keypair.generate();
const emptyAccount = Keypair.generate();
// Fund the payer account
console.log('Funding accounts...');
await connection.requestAirdrop(payer.publicKey, LAMPORTS_PER_SOL);
// Wait for airdrops
await new Promise(resolve => setTimeout(resolve, 2000));
console.log(`Payer: ${payer.publicKey.toString()}`);
console.log(`Empty Account: ${emptyAccount.publicKey.toString()}\n`);
// Create instruction with multiple accounts
const instruction = new TransactionInstruction({
keys: [
{ pubkey: payer.publicKey, isSigner: true, isWritable: false },
{ pubkey: emptyAccount.publicKey, isSigner: false, isWritable: false },
{ pubkey: SystemProgram.programId, isSigner: false, isWritable: false },
],
programId: PROGRAM_ID,
data: Buffer.alloc(0),
});
const transaction = new Transaction().add(instruction);
console.log('Sending transaction with 3 accounts for inspection...');
const signature = await sendAndConfirmTransaction(connection, transaction, [payer]);
console.log(`Transaction confirmed: ${signature}`);
console.log('Check the logs to see detailed account information!');
console.log('Run: solana logs');
}
testAccountInspection().catch(console.error);
PROGRAM_ID वेरिएबल को अपनी प्रोग्राम आईडी (program ID) से अपडेट करें।
टेस्ट चलाने से पहले, सुनिश्चित करें कि आपका लोकल Solana वैलिडेटर (validator) चल रहा है और प्रोग्राम उस पर डिप्लॉय (deploy) हो चुका है।
अब टेस्ट रन (run) करें:
cd client
npm run test
यह सफलतापूर्वक रन हो जाता है।
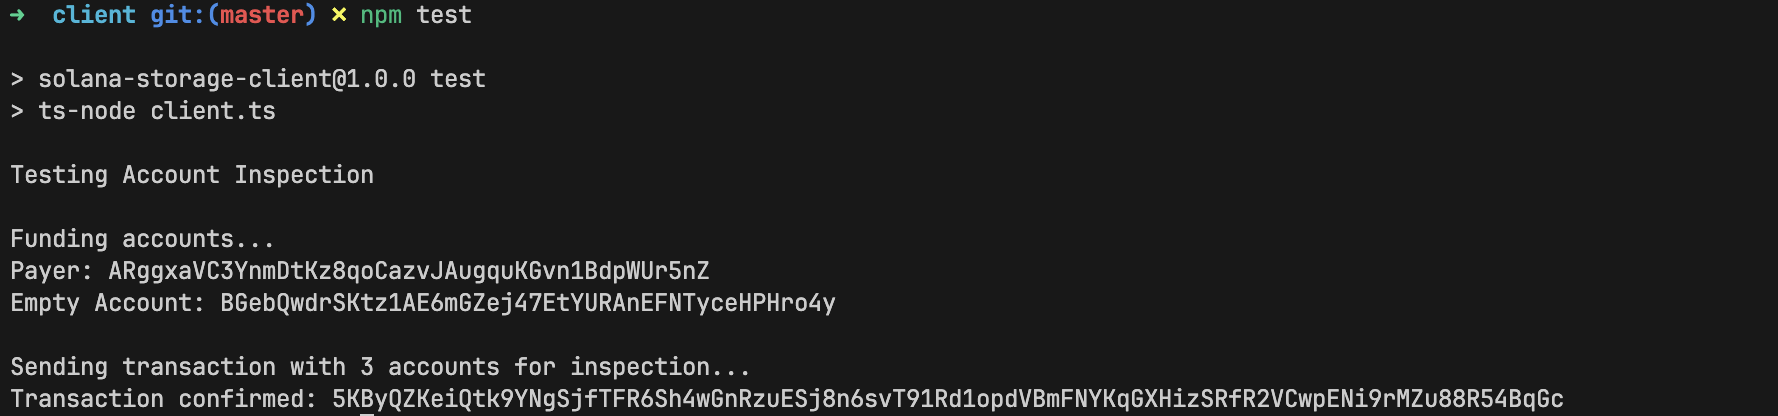
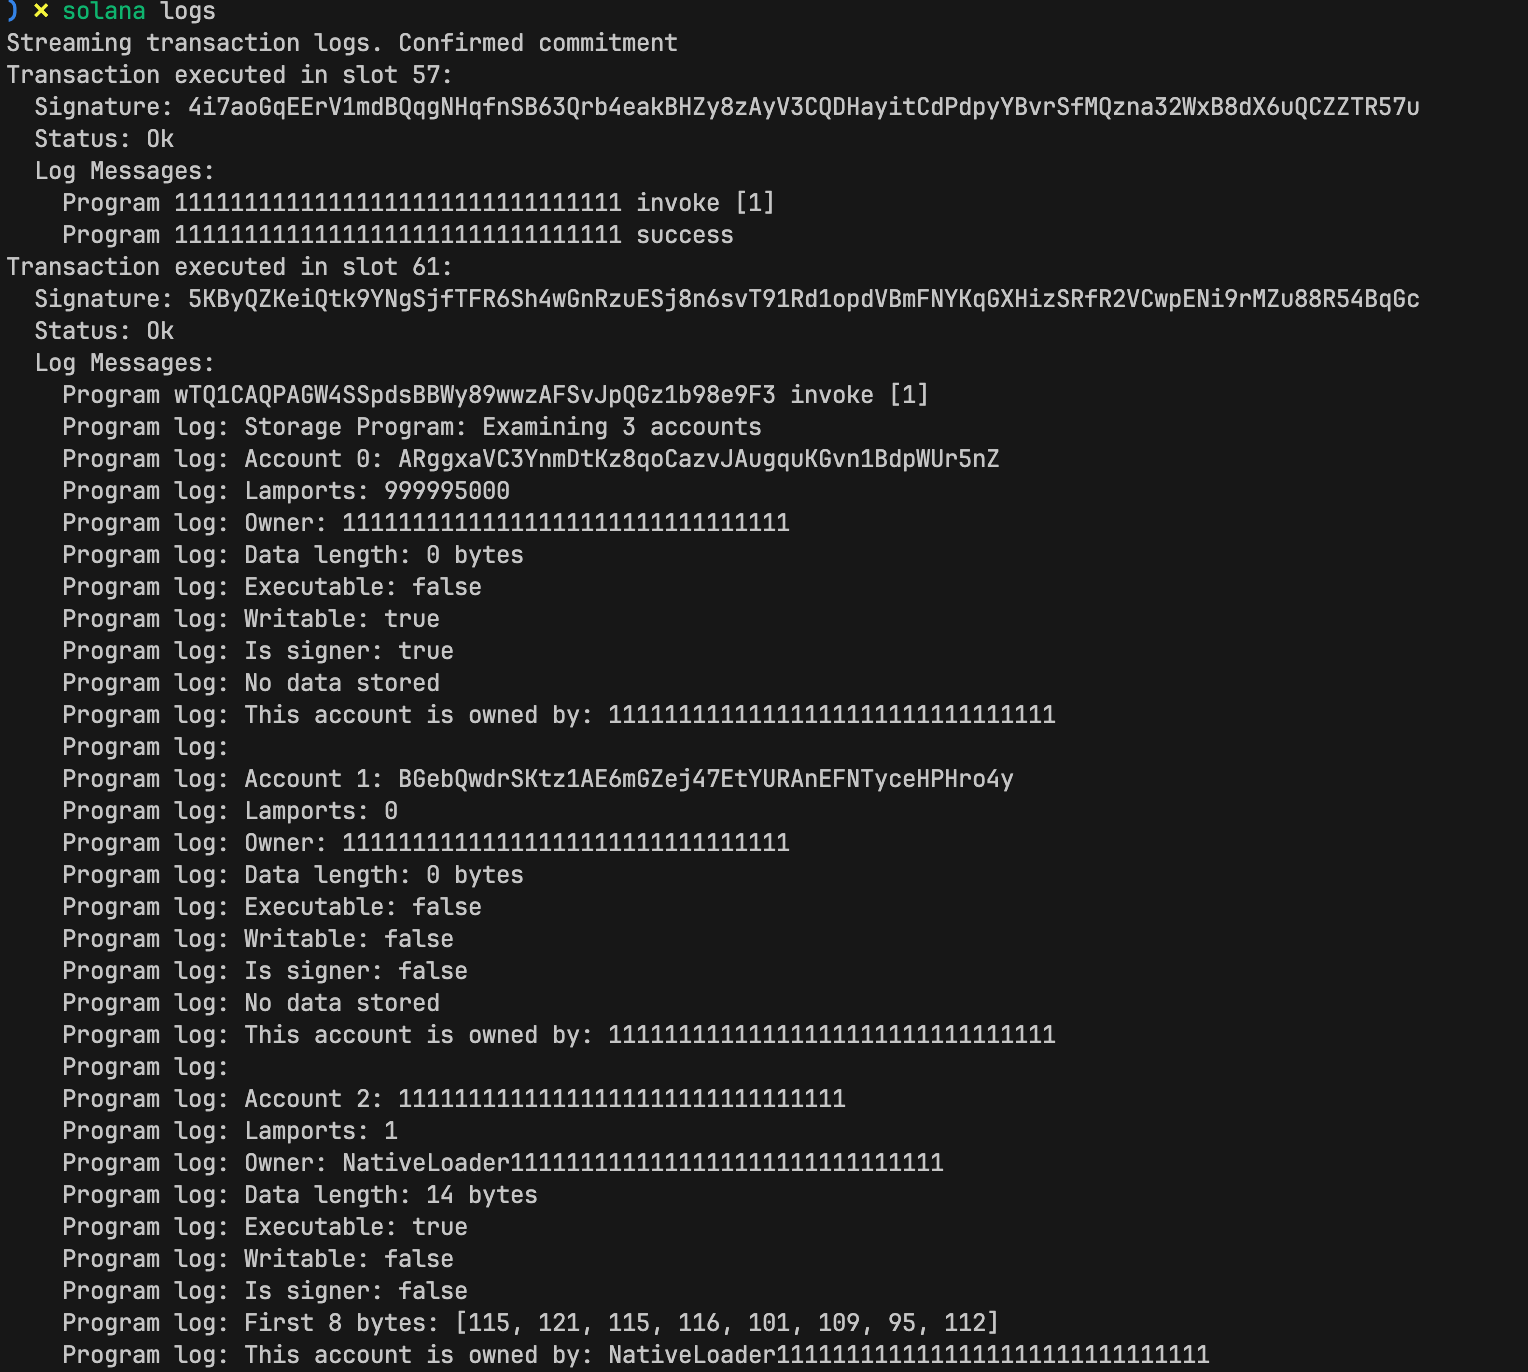
अपने solana logs टर्मिनल में, आपको प्रत्येक अकाउंट के लिए विस्तृत जानकारी (detailed information) दिखाई देनी चाहिए, जिसमें बैलेंस, ओनर्स (owners) और मेटाडेटा शामिल हैं:
यह लेख Solana development पर एक ट्यूटोरियल सीरीज़ का हिस्सा है।