interest-bearing एक्सटेंशन किसी token mint में समय के साथ ब्याज (interest) अर्जित करने की क्षमता जोड़ता है। Token-2022 के बारे में हमारी पिछली चर्चा में, हमने interest-bearing एक्सटेंशन पेश किया था और बताया था कि कैसे कच्चे ऑन-चेन अकाउंट बैलेंस को बदले बिना बैलेंस वर्चुअली बढ़ता है। हमारा ध्यान इस बात पर था कि एक्सटेंशन वैचारिक (conceptually) रूप से कैसे काम करता है, और Solana के क्लाइंट फ़ंक्शंस अर्जित ब्याज की गणना कैसे करते हैं।
इस लेख में, हम उस ज्ञान को व्यवहार (practice) में लाएंगे। हम Anchor का उपयोग करके एक मैनेजमेंट सिस्टम बनाएंगे जो एक PDA (program-derived address) ऑथोरिटी के तहत प्रोग्रामेटिक रूप से एक interest-bearing token mint बनाता है, जो यह सुनिश्चित करता है कि केवल प्रोग्राम ही इसे नियंत्रित कर सके। यह सिस्टम एक निर्धारित रेट ऑथोरिटी के माध्यम से रेट अपडेट की भी अनुमति देगा।
हम जो प्रोग्राम बनाएंगे वह एक interest-bearing token के पूरे जीवनचक्र को प्रदर्शित करेगा: इनीशियलाइज़ेशन (initialization), मिन्टिंग (minting), ब्याज अर्जित करना (interest accrual), और रेट में बदलाव (rate changes)। हम LiteSVM के साथ टाइम ट्रैवलिंग का उपयोग करके समय बीतने के साथ ब्याज अर्जित करने का परीक्षण (test) भी करेंगे।
इस लेख के अंत तक, आपको इस बात की ठोस समझ हो जाएगी कि interest-bearing token व्यवहार में कैसे काम करता है।
प्रोजेक्ट इनीशियलाइज़ेशन
हम एक नया Anchor प्रोजेक्ट बनाकर शुरुआत करेंगे। प्रोजेक्ट को इनिशियलाइज़ करने के लिए नीचे दिया गया कमांड रन करें:
anchor init interest-bearing && cd interest-bearing
अब, anchor-spl डिपेंडेंसी को शामिल करने और idl-build को इनेबल करने के लिए अपनी program/src/Cargo.toml फ़ाइल को अपडेट करें। idl-build फ़ीचर Anchor को CPI (Cross-Program Invocation) कॉल्स के लिए IDL डेफ़िनेशन जनरेट करने में मदद करता है, जिसका उपयोग हम बाद में प्रोग्राम फ़ंक्शंस को कॉल करने के लिए टेस्ट लिखते समय करेंगे।
[package]
name = "interest-bearing"
version = "0.1.0"
description = "Created with Anchor"
edition = "2021"
[lib]
crate-type = ["cdylib", "lib"]
name = "interest_bearing"
[features]
default = []
cpi = ["no-entrypoint"]
no-entrypoint = []
no-idl = []
no-log-ix-name = []
idl-build = ["anchor-lang/idl-build", "anchor-spl/idl-build"] # We added this
[dependencies]
anchor-lang = { version = "0.31.1", features = ["init-if-needed"] } # Include this
anchor-spl = { version = "0.31.1", features = ["idl-build"] } # include this
अब आप यह पुष्टि करने के लिए कि आपका प्रोजेक्ट सही ढंग से सेटअप हो गया है, सफलतापूर्वक anchor build रन कर सकते हैं।
प्रोजेक्ट स्ट्रक्चर
प्रोजेक्ट दो चरणों में होगा:
- Anchor Rust प्रोग्राम
- और TypeScript टेस्ट
1. Anchor Rust प्रोग्राम
Anchor Rust प्रोग्राम तीन मुख्य एक्शन्स को संभालेगा:
- एक नया interest-bearing mint बनाना और इनिशियलाइज़ करना, और PDA को mint authority के रूप में सेट करना
- interest-bearing tokens को मिंट (mint) करना
- रेट ऑथोरिटी के माध्यम से ब्याज दर (interest rate) को अपडेट करना।
इनमें से प्रत्येक एक्शन को Anchor में ऑन-चेन फ़ंक्शन एंट्री पॉइंट्स के रूप में लागू किया जाएगा।
#[program]
pub mod interest_bearing {
pub fn create_interest_bearing_mint(...) -> Result<()> { ... }
pub fn mint_tokens(...) -> Result<()> { ... }
pub fn update_rate(...) -> Result<()> { ... }
}
हम इन फ़ंक्शंस को programs/interest-bearing/src/lib.rs फ़ाइल में परिभाषित करेंगे:
create_interest_bearing_mint:InterestBearingConfigएक्सटेंशन इनेबल के साथ एक टोकन मिंट बनाता है और रेट ऑथोरिटी सेट करता है।mint_tokens: PDA को mint authority के रूप में उपयोग करके यूज़र के अकाउंट में टोकन मिंट करता है।update_rate: मिंट की वार्षिक ब्याज दर (annual interest rate) को अपडेट करता है, जो केवल रेट ऑथोरिटी तक सीमित है।
2. TypeScript टेस्ट
TypeScript टेस्ट यह वेरिफ़ाई करेगा कि प्रोग्राम कर सकता है:
- एक interest-bearing mint बना सकता है
- PDA ऑथोरिटी के तहत टोकन मिंट कर सकता है
- रेट ऑथोरिटी के माध्यम से ब्याज दर को अपडेट कर सकता है
- वर्चुअल ब्याज उपार्जन (virtual interest accrual) को सटीक रूप से प्रदर्शित कर सकता है।
Anchor Rust प्रोग्राम को इम्प्लीमेंट करना
अब जब हम प्रोजेक्ट स्ट्रक्चर को समझ गए हैं, तो आइए ऑन-चेन प्रोग्राम को इम्प्लीमेंट करें।
हम आवश्यक Anchor और Token-2022 डिपेंडेंसी को इम्पोर्ट करके और program/interest-bearing/src/lib.rs फ़ाइल में प्रोग्राम ID घोषित करके शुरुआत करते हैं:
use anchor_lang::prelude::*;
use anchor_lang::system_program::{self, CreateAccount};
use anchor_spl::{
token_2022::{
initialize_mint2,
spl_token_2022::{
extension::{ExtensionType},
pod::PodMint,
},
InitializeMint2, Token2022,
},
token_interface::{Mint, TokenAccount, mint_to, MintTo},
token_2022_extensions::interest_bearing_mint::{
interest_bearing_mint_initialize,
interest_bearing_mint_update_rate,
InterestBearingMintInitialize,
InterestBearingMintUpdateRate,
},
};
declare_id!("5fRtYEKp81rfRRqcYxp9XMnucgvtt6JxQ5GDDQy2TMtx");
ध्यान दें कि हमने spl-token-2022 को सीधे इंस्टॉल नहीं किया—बल्कि हम Anchor के री-एक्सपोर्ट का उपयोग कर रहे हैं। दोनों को मिलाने से वर्ज़न मिसमैच और रनटाइम कॉन्फ्लिक्ट हो सकते हैं।
अंत में, यह सुनिश्चित करने के लिए कि declare_id! मैक्रो में आपका प्रोग्राम ID आपके Anchor.toml में परिभाषित कीपेयर (keypair) से मेल खाता है, anchor keys sync रन करें।
हमारे पास सभी डिपेंडेंसी तैयार हैं, अब, आइए interest bearing token mints बनाने और इनिशियलाइज़ करने के लिए वर्कफ़्लो सेटअप करें।
i. interest bearing token mints बनाएं और इनिशियलाइज़ करें
अब हम create_interest_bearing_mint फ़ंक्शन बनाएंगे:
pub fn create_interest_bearing_mint(...) -> Result<()> { ... }
यह फ़ंक्शन इनेबल किए गए InterestBearingConfig एक्सटेंशन के साथ एक नया Token-2022 मिंट सेटअप करने के लिए चार स्टेप्स करता है। ये स्टेप्स हैं:
- स्टेप 1:
InterestBearingConfigअकाउंट साइज़ की गणना करना - स्टेप 2: मिंट अकाउंट बनाना और उसमें रेंट (rent) के लिए lamports फ़ंड करना
- स्टेप 3:
InterestBearingConfigएक्सटेंशन को इनिशियलाइज़ करना - स्टेप 4: स्टैण्डर्ड
initialize_mint2फ़ंक्शन को रन करना
स्टेप 1: आवश्यक अकाउंट साइज़ की गणना करना
Solana में अकाउंट बनाते समय, आपको अकाउंट का साइज़ निर्दिष्ट करना होता है और उसके अनुसार रेंट (rent) देना होता है।
हम बेस मिंट डेटा और एक्सटेंशन डेटा दोनों को स्वचालित रूप से रखने के लिए आवश्यक अकाउंट साइज़ की गणना करने के लिए, हमारे द्वारा पहले इम्पोर्ट किए गए ExtensionType से try_calculate_account_len फ़ंक्शन का उपयोग करेंगे। यह सुनिश्चित करता है कि अकाउंट को InterestBearingConfig एक्सटेंशन के लिए पर्याप्त स्थान (space) आवंटित किया गया है।
let mint_size = ExtensionType::try_calculate_account_len::<Mint>(&[
ExtensionType::InterestBearingConfig,
])?;
भाग एक में, हमने चर्चा की थी कि एक्सटेंशन डेटा की मैन्युअल रूप से गणना कैसे करें, लेकिन हम यहाँ try_calculate_account_len का उपयोग करेंगे। try_calculate_account_len का उपयोग करना एक स्टैण्डर्ड प्रैक्टिस है और यह हमें एक ही बार में मिंट अकाउंट और एक्सटेंशन डेटा के सटीक साइज़ की गणना करने की अनुमति देता है।
स्टेप 2: मिंट अकाउंट बनाएं और फ़ंड करें
अब जब हमारे पास सटीक साइज़ की गणना करने का मैकेनिज़्म है, तो हम सिस्टम प्रोग्राम का उपयोग करके मैन्युअल रूप से मिंट अकाउंट बनाएंगे, और इसे रेंट-एक्ज़ेम्प्ट (rent-exempt) lamports के साथ फ़ंड करेंगे (जब किसी अकाउंट में उसके साइज़ के अनुपात में पर्याप्त lamports होते हैं, तो वह “rent-exempt” हो जाता है और उससे कभी भी रेंट नहीं लिया जाएगा या उसे डिलीट नहीं किया जाएगा)।
Anchor यह स्टेप स्वचालित रूप से नहीं करता है क्योंकि Token-2022 मिंट्स को एक्सटेंशन्स के लिए कस्टम साइज़िंग की आवश्यकता होती है। अकाउंट्स पर #[account(init)] एट्रिब्यूट एक निश्चित साइज़ मान लेता है (जो स्टैण्डर्ड SPL Token मिंट्स के लिए मान्य है), लेकिन Token-2022 मिंट्स इस बात पर निर्भर करते हैं कि उनमें कौन से एक्सटेंशन शामिल हैं। इसे सही ढंग से संभालने के लिए, आपको आवश्यक स्थान (space) की गणना स्वयं करनी होगी और अकाउंट मैन्युअल रूप से बनाना होगा।
नीचे दिया गया कोड रेंट एक्ज़ेम्प्शन के लिए आवश्यक सटीक स्पेस और lamports के साथ मिंट अकाउंट बनाता है।
Rent::get()?.minimum_balance(mint_size)अकाउंट को उसके साइज़ के आधार पर रेंट-एक्ज़ेम्प्ट बनाने के लिए आवश्यक न्यूनतम lamports की गणना करता है।system_program::create_accountफिर Token-2022 प्रोग्राम (token_program.key()) को ओनरशिप (ownership) सौंपते हुए, अकाउंट को एलोकेट और फ़ंड करता है।- CPI कॉन्टेक्स्ट यह निर्दिष्ट करता है कि lamports भुगतानकर्ता (payer) से आते हैं, और बनाया जा रहा नया अकाउंट मिंट है।
यह सुनिश्चित करता है कि किसी भी Token-2022 निर्देशों के इसे इनिशियलाइज़ करने से पहले मिंट अकाउंट का साइज़ सही है, रेंट-एक्ज़ेम्प्ट है, और सही प्रोग्राम के स्वामित्व में है।
// 2) Create the mint account with correct space and rent
let lamports = Rent::get()?.minimum_balance(mint_size);
system_program::create_account(
CpiContext::new(
ctx.accounts.system_program.to_account_info(),
CreateAccount {
from: ctx.accounts.payer.to_account_info(),
to: ctx.accounts.mint.to_account_info(),
},
),
lamports,
mint_size as u64,
&ctx.accounts.token_program.key(),
)?;
हम इस लेख में बाद में पूर्ण CreateInterestBearingMint अकाउंट्स स्ट्रक्चर (struct) को परिभाषित करेंगे जिसका संदर्भ ऊपर दिए गए कोड में &ctx देता है।
स्टेप 3: InterestBearingConfig एक्सटेंशन को इनिशियलाइज़ करें
इसके बाद, हम रेट ऑथोरिटी और प्रारंभिक ब्याज दर (basis points में) सेट करके InterestBearingConfig एक्सटेंशन को इनिशियलाइज़ करते हैं।
यह स्टेप बेस मिंट को इनिशियलाइज़ करने से पहले होना चाहिए, क्योंकि एक्सटेंशन्स को पहले सेट किया जाना चाहिए — अन्यथा, मिंट का लेआउट अपेक्षित अकाउंट साइज़ से मेल नहीं खाएगा और initialize_mint2 विफल हो जाएगा।
// 3) Initialize the interest-bearing extension BEFORE base mint init
interest_bearing_mint_initialize(
CpiContext::new(
ctx.accounts.token_program.to_account_info(),
InterestBearingMintInitialize {
token_program_id: ctx.accounts.token_program.to_account_info(),
mint: ctx.accounts.mint.to_account_info(),
},
),
Some(ctx.accounts.rate_authority.key()),
rate_bps,
)?;
हमने यहाँ Some(ctx.accounts.rate_authority.key()) का उपयोग किया है क्योंकि रेट ऑथोरिटी वैकल्पिक (optional) है। जैसा कि भाग एक में बताया गया है, यदि कोई रेट ऑथोरिटी प्रदान नहीं किया जाता है, तो फ़ील्ड शून्य से भर जाएगी, जिससे रेट अपरिवर्तनीय (immutable) हो जाएगा।
स्टेप 4: स्टैण्डर्ड initialize_mint2 फ़ंक्शन को रन करना
अंत में, नीचे दिया गया कोड स्टैण्डर्ड initialize_mint2 CPI का उपयोग करके बेस मिंट को ही इनिशियलाइज़ करता है। यह मिंट के डेसिमल्स (decimals) सेट करता है, PDA को मिंट और फ्रीज़ ऑथोरिटी (freeze authority) के रूप में असाइन करता है, और Token-2022 मिंट कॉन्फ़िगरेशन को फ़ाइनलाइज़ करता है।
चूंकि प्रोग्राम्स प्राइवेट कीज़ (private keys) को स्टोर नहीं कर सकते हैं, इसलिए PDA मिंट की ऑथोरिटी के रूप में कार्य करता है। जब भी प्रोग्राम को इस PDA की ओर से साइन करने की आवश्यकता होती है (उदाहरण के लिए, नए टोकन मिंट करते समय), तो उसे उसी seed और bump संयोजन ([b"mint-authority", &[bump]]) का उपयोग करके PDA को फिर से डिराइव (rederive) करना चाहिए।
Anchor इस bump को ctx.bumps के माध्यम से एक्सपोज़ करता है।
bump एक सिंगल-बाइट वैल्यू (0-255) है जिसे PDA डेरिवेशन के दौरान जोड़ा जाता है। यह सुनिश्चित करता है कि परिणामी एड्रेस किसी भी प्राइवेट की से जनरेट नहीं किया जा सकता है। इसे PDA सिग्नेचर वेरिफ़िकेशन के दौरान signer seeds में भी शामिल किया जाना चाहिए; अन्यथा, वेरिफ़िकेशन विफल हो जाएगा।
हम mint authority और freeze authority दोनों को PDA पर भी सेट करते हैं ताकि यह सुनिश्चित किया जा सके कि केवल प्रोग्राम का लॉजिक ही टोकन मिंट या फ्रीज़ कर सके।
// 4) Initialize base mint (decimals, authorities)
let mint_auth_bump = ctx.bumps.mint_authority;
let signer_seeds: &[&[&[u8]]] = &[&[b"mint-authority", &[mint_auth_bump]]];
initialize_mint2(
CpiContext::new_with_signer(
ctx.accounts.token_program.to_account_info(),
InitializeMint2 {
mint: ctx.accounts.mint.to_account_info(),
},
signer_seeds,
),
decimals,
&ctx.accounts.mint_authority.key(),
Some(&ctx.accounts.mint_authority.key()),
)?;
CreateInterestBearingMint अकाउंट्स कॉन्टेक्स्ट
नीचे वह स्ट्रक्चर (struct) है जो CreateInterestBearingMint फ़ंक्शन के लिए अकाउंट्स कॉन्टेक्स्ट को परिभाषित करता है जिसका हमने अब तक उपयोग किया है।
ध्यान दें कि मिंट को InterfaceAccount<Mint> (AccountInfo के चारों ओर एक Anchor रैपर जो किसी अकाउंट को यह सुनिश्चित करने के लिए स्वचालित रूप से मान्य करता है कि यह एक इनिशियलाइज़्ड टोकन मिंट है) के बजाय एक UncheckedAccount के रूप में घोषित किया गया है।
हम यहाँ UncheckedAccount का उपयोग करते हैं क्योंकि हमें एक्सटेंशन स्पेस के साथ मिंट बनाने की आवश्यकता है, और Anchor इसे इनिशियलाइज़ेशन के बाद तक एक Mint के रूप में मान्य नहीं कर सकता है।
यह स्ट्रक्चर mint_authority PDA को उसके seed और bump के साथ परिभाषित करता है। एक बार यह हो जाने के बाद, प्रोग्राम लॉजिक टोकन मिंट या फ्रीज़ कर सकता है, लेकिन कोई बाहरी कीपेयर (keypair) ऐसा नहीं कर सकता है।
यह स्ट्रक्चर हमारे द्वारा उपयोग किए गए अन्य अकाउंट्स को भी परिभाषित करता है; हमने उन्हें निर्दिष्ट करने वाली टिप्पणियाँ (comments) जोड़ दी हैं।
#[derive(Accounts)]
pub struct CreateInterestBearingMint<'info> {
/// CHECK: This account is created manually as a Token-2022 mint with extensions.
#[account(mut)]
pub payer: Signer<'info>,
/// CHECK: PDA account used as mint and freeze authority
#[account(
seeds = [b"mint-authority"],
bump
)]
pub mint_authority: UncheckedAccount<'info>,
/// Raw mint account to be created with extension space
/// CHECK: We trust the token program to validate this is a proper mint account.
#[account(mut, signer)]
pub mint: UncheckedAccount<'info>,
/// Token-2022 program
pub token_program: Program<'info, Token2022>,
pub system_program: Program<'info, System>,
/// Signer that will control interest rate updates
pub rate_authority: Signer<'info>,
}
टोकन मिंट बनाने का पूरा कोड, जिस पर हमने अब तक चर्चा की है, नीचे दिखाया गया है:
use anchor_lang::prelude::*;
use anchor_lang::system_program::{self, CreateAccount};
use anchor_spl::{
token_2022::{
initialize_mint2,
spl_token_2022::{
extension::{ExtensionType},
pod::PodMint,
},
InitializeMint2, Token2022,
},
token_interface::{Mint, TokenAccount, mint_to, MintTo},
token_2022_extensions::interest_bearing_mint::{
interest_bearing_mint_initialize,
interest_bearing_mint_update_rate,
InterestBearingMintInitialize,
InterestBearingMintUpdateRate,
},
};
declare_id!("5fRtYEKp81rfRRqcYxp9XMnucgvtt6JxQ5GDDQy2TMtx");
#[program]
pub mod interest_bearing {
use super::*;
pub fn create_interest_bearing_mint(
ctx: Context<CreateInterestBearingMint>,
rate_bps: i16,
decimals: u8,
) -> Result<()> {
msg!("Create interest-bearing mint @ {} bps", rate_bps);
// 1) Compute mint size including extension header + InterestBearingConfig
let mint_size = ExtensionType::try_calculate_account_len::<PodMint>(&[
ExtensionType::InterestBearingConfig,
])?;
// 2) Create the mint account with correct space and rent
let lamports = Rent::get()?.minimum_balance(mint_size);
system_program::create_account(
CpiContext::new(
ctx.accounts.system_program.to_account_info(),
CreateAccount {
from: ctx.accounts.payer.to_account_info(),
to: ctx.accounts.mint.to_account_info(),
},
),
lamports,
mint_size as u64,
&ctx.accounts.token_program.key(),
)?;
// 3) Initialize the interest-bearing extension BEFORE base mint init
interest_bearing_mint_initialize(
CpiContext::new(
ctx.accounts.token_program.to_account_info(),
InterestBearingMintInitialize {
token_program_id: ctx.accounts.token_program.to_account_info(),
mint: ctx.accounts.mint.to_account_info(),
},
),
Some(ctx.accounts.rate_authority.key()),
rate_bps,
)?;
// 4) Initialize base mint (decimals, authorities)
let mint_auth_bump = ctx.bumps.mint_authority;
let signer_seeds: &[&[&[u8]]] = &[&[b"mint-authority", &[mint_auth_bump]]];
initialize_mint2(
CpiContext::new_with_signer(
ctx.accounts.token_program.to_account_info(),
InitializeMint2 {
mint: ctx.accounts.mint.to_account_info(),
},
signer_seeds,
),
decimals,
&ctx.accounts.mint_authority.key(),
Some(&ctx.accounts.mint_authority.key()),
)?;
Ok(())
}
#[derive(Accounts)]
pub struct CreateInterestBearingMint<'info> {
/// CHECK: This account is created manually as a Token-2022 mint with extensions.
#[account(mut)]
pub payer: Signer<'info>,
/// CHECK: PDA account used as mint and freeze authority
#[account(
seeds = [b"mint-authority"],
bump
)]
pub mint_authority: UncheckedAccount<'info>,
/// Raw mint account to be created with extension space
/// CHECK: We trust the token program to validate this is a proper mint account.
// #[account(mut)]
#[account(mut, signer)]
pub mint: UncheckedAccount<'info>,
/// Token-2022 program
pub token_program: Program<'info, Token2022>,
pub system_program: Program<'info, System>,
/// Signer that will control interest rate updates
pub rate_authority: Signer<'info>,
}
}
अब जब हमने टोकन मिंट्स बना लिए हैं और एक्सटेंशन को इनिशियलाइज़ कर लिया है, तो आइए mint_tokens फ़ंक्शन को इम्प्लीमेंट करने की ओर बढ़ें।
ii. Mint tokens फ़ंक्शन बनाना
PDA को मिंट ऑथोरिटी के रूप में उपयोग करते हुए, mint_tokens फ़ंक्शन यूज़र के अकाउंट में टोकन मिंट करता है।
यहाँ बताया गया है कि mint_tokens फ़ंक्शन क्या करता है:
- यह सबसे पहले PDA के bump को पुनर्प्राप्त (retrieve) करता है और वेरिफ़िकेशन के लिए आवश्यक signer seeds को फिर से बनाता है।
- फिर, यह Token-2022 प्रोग्राम के
mint_toCPI को कॉल करता है। यहCpiContext::new_with_signerके माध्यम से signer seeds पास करता है, रनटाइम PDA को अधिकृत (authorized) साइनर के रूप में पहचानता है और प्राप्तकर्ता (recipient) के टोकन अकाउंट में निर्दिष्ट संख्या में टोकन मिंट करता है।
pub fn mint_tokens(ctx: Context<MintTokens>, amount: u64) -> Result<()> {
// Fetch the bump for the PDA so we can recreate the same signer seeds
let bump = ctx.bumps.mint_authority;
let signer_seeds: &[&[&[u8]]] = &[&[b"mint-authority", &[bump]]];
// Call into the Token-2022 program to mint tokens
// `CpiContext::new_with_signer` lets us pass the PDA seeds so the runtime
// can treat the PDA as if it signed the instruction
mint_to(
CpiContext::new_with_signer(
ctx.accounts.token_program.to_account_info(),
MintTo {
// Mint account whose supply will increase
mint: ctx.accounts.mint.to_account_info(),
// Recipient’s token account that will receive the minted tokens
to: ctx.accounts.to_token_account.to_account_info(),
// PDA that acts as mint authority
authority: ctx.accounts.mint_authority.to_account_info(),
},
signer_seeds,
),
amount, // Number of tokens to mint
)?;
Ok(())
}
नीचे वह स्ट्रक्चर (struct) है जो उपरोक्त mint_tokens फ़ंक्शन में हमारे द्वारा उपयोग किए गए सभी अकाउंट्स को परिभाषित करता है।
यह PDA की ऑथोरिटी के तहत नए टोकन मिंट करने के लिए आवश्यक सभी अकाउंट्स को सूचीबद्ध करता है, यह सुनिश्चित करते हुए कि सही मिंट, प्राप्तकर्ता और Token-2022 प्रोग्राम का उपयोग किया गया है।
pub struct MintTokens<'info> {
/// CHECK: PDA authority must match the seed used during mint init
#[account(
seeds = [b"mint-authority"],
bump
)]
/// CHECK: This is the mint authority PDA we created during mint init.
pub mint_authority: UncheckedAccount<'info>,
/// Use token_interface to bind this Mint to Token2022 program
/// CHECK: We trust the token program to validate this is a proper mint account.
#[account(mut, mint::token_program = token_program)]
pub mint: InterfaceAccount<'info, Mint>,
#[account(mut, token::mint = mint, token::authority = recipient)]
pub to_token_account: InterfaceAccount<'info, TokenAccount>,
pub recipient: Signer<'info>,
pub token_program: Program<'info, Token2022>,
}
iii. ब्याज दर (interest rate) को अपडेट करना
हमने देखा है कि टोकन मिंट कैसे बनाया जाता है, एक्सटेंशन को कैसे इनिशियलाइज़ किया जाता है, और टोकन को कैसे मिंट किया जाता है। अगला कदम ब्याज दर को अपडेट करना है।
नीचे दिया गया update_rate फ़ंक्शन यह सुनिश्चित करता है कि केवल कॉन्फ़िगर किया गया rate_authority ही मिंट की वार्षिक ब्याज दर को अपडेट कर सकता है। यह Token-2022 CPI interest_bearing_mint_update_rate को कॉल करके ऐसा करता है।
यह फ़ंक्शन यह निर्दिष्ट करने के लिए InterestBearingMintUpdateRate स्ट्रक्चर का भी उपयोग करता है कि CPI कॉल के लिए कौन से अकाउंट्स (मिंट, टोकन प्रोग्राम और रेट ऑथोरिटी) आवश्यक हैं, फिर मिंट के एक्सटेंशन डेटा में संग्रहीत रेट को अपडेट करने से पहले यह आंतरिक रूप से सत्यापित करता है कि साइनर कॉन्फ़िगर की गई ऑथोरिटी से मेल खाता है।
pub fn update_rate(ctx: Context<UpdateRate>, new_rate_bps: i16) -> Result<()> {
msg!("Update interest rate -> {} bps", new_rate_bps);
// Call into the Token-2022 program to update interest rate on the mint
// The CPI will check that the provided rate_authority signer matches the
// authority configured in the mint's extension data
interest_bearing_mint_update_rate(
CpiContext::new(
ctx.accounts.token_program.to_account_info(),
InterestBearingMintUpdateRate {
token_program_id: ctx.accounts.token_program.to_account_info(),
mint: ctx.accounts.mint.to_account_info(),
rate_authority: ctx.accounts.rate_authority.to_account_info(),
},
),
new_rate_bps, // new interest rate in basis points (1% = 100 bps)
)?;
Ok(())
}
नीचे दिया गया कॉन्टेक्स्ट स्ट्रक्चर रेट को अपडेट करने के लिए आवश्यक अकाउंट्स को परिभाषित करता है। rate_authority को ट्रांज़ैक्शन पर साइन करना होगा, और Token-2022 प्रोग्राम यह सुनिश्चित करता है कि यह मिंट के एक्सटेंशन में सेट की गई ऑथोरिटी से मेल खाता है।
#[derive(Accounts)]
pub struct UpdateRate<'info> {
/// CHECK: This is the mint account we’re updating. We rely on Token-2022
/// program logic to validate its data, so Anchor does not need to enforce checks here.
#[account(mut, mint::token_program = token_program)]
pub mint: InterfaceAccount<'info, Mint>,
/// Must sign and match the extension’s configured rate authority
pub rate_authority: Signer<'info>,
pub token_program: Program<'info, Token2022>,
}
पूर्ण इम्प्लीमेंटेशन
संपूर्ण कोड को एक्सप्लोर करने के लिए आप नीचे दी गई रिपॉजिटरी से पूर्ण इम्प्लीमेंटेशन को क्लोन कर सकते हैं:
git clone [https://github.com/ezesundayeze/interest-bearing-mint](https://github.com/ezesundayeze/interest-bearing-mint/blob/main/programs/interest-bearing/src/lib.rs)
TypeScript टेस्ट
सबसे पहले, अपने टर्मिनल पर anchor build रन करके प्रोग्राम को बिल्ड करें।
समय की अवधि में अर्जित यील्ड (yields) को सही मायने में प्रदर्शित करने के लिए हमें अलग-अलग टाइमलाइन का परीक्षण करने की आवश्यकता होगी। टेस्ट में ऐसा करना मुश्किल हो सकता है, हम टाइम प्रोग्रेशन को सिमुलेट (simulate) करने और लाइव क्लस्टर पर रन किए बिना ब्याज उपार्जन (interest accrual) को सत्यापित करने के लिए LiteSVM (एक हल्का Solana वर्चुअल मशीन) का उपयोग करेंगे।
LiteSVM और Solana SPL टोकन लाइब्रेरी डिपेंडेंसी इंस्टॉल करें जिसका उपयोग हम टोकन के साथ इंटरैक्ट करने के लिए करेंगे:
yarn add anchor-litesvm @solana/spl-token
अपनी interest_bearing.ts फ़ाइल के कॉन्टेंट (contents) को नीचे दिए गए कोड से बदलें।
यह टेस्ट हमारे प्रोग्राम के साथ इंटरैक्ट करता है ताकि यह प्रदर्शित किया जा सके कि Interest-Bearing Token एक्सटेंशन समय के साथ मूल्य को कैसे कंपाउंड (compound) करता है।
टेस्ट इन स्टेप्स का पालन करता है:
-
एक interest-bearing mint इनिशियलाइज़ करना: 3% वार्षिक ब्याज दर के साथ कॉन्फ़िगर किया गया एक नया टोकन मिंट बनाता है और एक ऑथोरिटी असाइन करता है जो बाद में इस रेट को अपडेट कर सकता है। सटीक ब्याज ट्रैकिंग के लिए इनिशियलाइज़ेशन टाइमस्टैम्प भी रिकॉर्ड किया जाता है।
-
प्राप्तकर्ता (recipient) को टोकन मिंट करना: प्राप्तकर्ता के संबंधित टोकन अकाउंट (associated token account) में 1000 टोकन मिंट करता है। टेस्ट पुष्टि करता है कि इनिशियलाइज़ेशन पर ऑन-चेन मिंट कॉन्फ़िगरेशन और टोकन बैलेंस सही हैं।
-
विभिन्न अवधियों (periods) में कंपाउंडिंग को सिमुलेट (simulate) करना:
समय को फ़ास्ट-फ़ॉरवर्ड करने और कंपाउंडिंग वृद्धि (compounding growth) को प्रदर्शित करने के लिए LiteSVM की वर्चुअल घड़ी का उपयोग करता है:
- अवधि 1: 3% वार्षिक दर पर 3 महीने
- अवधि 2: 5% वार्षिक दर पर और 9 महीने (रेट अपडेट के बाद, 12वें महीने पर)
- अवधि 3: 7% वार्षिक दर पर और 3 महीने (अंतिम अवधि, 15वें महीने पर)
प्रत्येक अवधि (period) में गणना की जाती है:
- कंटीन्यूअस कंपाउंडिंग (continuous compounding) फ़ॉर्मूला का उपयोग करके अपेक्षित बैलेंस
- SPL Token हेल्पर्स द्वारा गणना किया गया वर्चुअल बैलेंस, जो अर्जित ब्याज (accrued interest) को दर्शाता है।
यह पुष्टि करने के लिए दोनों परिणामों की तुलना की जाती है कि वर्चुअल वृद्धि कंटीन्यूअस कंपाउंडिंग की गणितीय अपेक्षा से मेल खाती है।
-
15 महीनों में कंपाउंड वृद्धि (compound growth) को मान्य करना:
पुष्टि करता है कि कई बार रेट परिवर्तन के बाद भी, टोकन बैलेंस अपेक्षित एक्सपोनेंशियल कर्व (exponential curve) के अनुरूप बढ़ता है। टेस्ट यह दिखाने के लिए मध्यवर्ती (intermediate) परिणाम भी प्रिंट करता है कि प्रत्येक चरण में कंपाउंडिंग कैसे विकसित होती है।
इस कोड में ऐसी टिप्पणियाँ (comments) हैं जो बताती हैं कि प्रत्येक ब्लॉक क्या कर रहा है:
import * as anchor from "@coral-xyz/anchor";
import { Program } from "@coral-xyz/anchor";
import { InterestBearing } from "../target/types/interest_bearing";
import {
TOKEN_2022_PROGRAM_ID,
createAssociatedTokenAccountInstruction,
getAssociatedTokenAddressSync,
getAccount,
getMint,
getInterestBearingMintConfigState,
} from "@solana/spl-token";
import {
PublicKey,
Keypair,
Transaction,
LAMPORTS_PER_SOL,
} from "@solana/web3.js";
import { fromWorkspace, LiteSVMProvider } from "anchor-litesvm";
import assert from "assert";
// Constants for interest calculations (must be at module level)
const SECONDS_PER_YEAR = 365.24 * 24 * 60 * 60; // 365.24 days
const ONE_IN_BASIS_POINTS = 10000;
/**
* Calculate the exponential factor for continuous compounding
* This mirrors the SPL Token implementation exactly.
* We are copying it here because it's not exported from the SPL token library.
*
* Formula: e^((rate * timespan) / (SECONDS_PER_YEAR * 10000))
*
* @param t1 - Start time in seconds
* @param t2 - End time in seconds
* @param rateBps - Interest rate in basis points
*/
const calculateExponentForTimesAndRate = (
t1: number,
t2: number,
rateBps: number
): number => {
const timespan = t2 - t1;
const numerator = rateBps * timespan;
const exponent = numerator / (SECONDS_PER_YEAR * ONE_IN_BASIS_POINTS);
return Math.exp(exponent);
};
describe("interest-bearing", () => {
// Set up a lightweight Solana VM for testing
const svm = fromWorkspace("./").withBuiltins().withSysvars();
const provider = new LiteSVMProvider(svm);
anchor.setProvider(provider);
// Get reference to our compiled program
const program = anchor.workspace.InterestBearing as Program<InterestBearing>;
// Key accounts we'll use throughout the tests
let mint: Keypair;
let rateAuthority: Keypair;
let recipient: Keypair;
let recipientAta: PublicKey;
// Interest rates in basis points (1 basis point = 0.01%)
const RATE_1_BPS = 300; // 3.00% annual rate
const RATE_2_BPS = 500; // 5.00% annual rate
const RATE_3_BPS = 700; // 7.00% annual rate
// More precise year definition (accounts for leap years)
const SECONDS_PER_YEAR = 365.24 * 24 * 60 * 60; // ~31,556,736 seconds
// Token configuration
const DECIMALS = 9;
const INITIAL_BALANCE = 1000; // Start with 1000 tokens (UI amount)
// Starting point for our virtual clock (Jan 1, 2024)
const INITIAL_TIMESTAMP = 1704067200n;
/**
* Get UI amount for interest-bearing tokens
* This implements the exact same logic as amountToUiAmountForInterestBearingMintWithoutSimulation
* from the SPL Token library, adapted for LiteSVM
*
* The calculation happens in two phases:
* 1. Pre-update: Interest from initialization to last rate update
* 2. Post-update: Interest from last rate update to current time
*
* Total scale = e^(r1*t1) * e^(r2*t2)
*/
const getInterestBearingUiAmount = async (
rawAmount: bigint
): Promise<number> => {
// Fetch mint configuration
const mintInfo = await getMint(
provider.connection,
mint.publicKey,
"confirmed",
TOKEN_2022_PROGRAM_ID
);
const interestConfig = getInterestBearingMintConfigState(mintInfo);
if (!interestConfig) {
throw new Error("Interest config not found");
}
// Get current timestamp from LiteSVM clock
const currentTimestamp = Number(svm.getClock().unixTimestamp);
const lastUpdateTimestamp = Number(interestConfig.lastUpdateTimestamp);
const initializationTimestamp = Number(
interestConfig.initializationTimestamp
);
// Calculate pre-update exponent (initialization to last update)
const preUpdateExp = calculateExponentForTimesAndRate(
initializationTimestamp,
lastUpdateTimestamp,
interestConfig.preUpdateAverageRate
);
// Calculate post-update exponent (last update to current time)
const postUpdateExp = calculateExponentForTimesAndRate(
lastUpdateTimestamp,
currentTimestamp,
interestConfig.currentRate
);
// Total scale factor is the product of both exponentials
const totalScale = preUpdateExp * postUpdateExp;
// Apply the scale to the raw amount
const scaledAmount = Number(rawAmount) * totalScale;
// Convert to UI amount by dividing by decimal factor
const decimalFactor = Math.pow(10, DECIMALS);
const uiAmount = Math.trunc(scaledAmount) / decimalFactor;
return uiAmount;
};
/**
* Manually calculate expected balance with continuous compounding
* This serves as our "test oracle" to verify the SPL Token calculations are correct
*
* Formula: A_final = A_start * e^(rate * time_in_years)
*/
const calculateExpectedBalance = (
startBalance: number,
rateBps: number,
timeInYears: number
): number => {
const rateDecimal = rateBps / 10000;
return startBalance * Math.exp(rateDecimal * timeInYears);
};
before(async () => {
// Set our virtual clock to Jan 1, 2024 (for a consistent starting point)
const clock = svm.getClock();
clock.unixTimestamp = INITIAL_TIMESTAMP;
svm.setClock(clock);
console.log("Initial clock set to:", INITIAL_TIMESTAMP.toString());
// Generate fresh keypairs for this test run
mint = Keypair.generate();
rateAuthority = Keypair.generate();
recipient = Keypair.generate();
// Give accounts some SOL to pay for transactions
svm.airdrop(provider.wallet.publicKey, BigInt(5 * LAMPORTS_PER_SOL));
svm.airdrop(recipient.publicKey, BigInt(5 * LAMPORTS_PER_SOL));
});
/**
* Test 1: Create the interest-bearing mint
*/
it("creates an interest bearing mint", async () => {
// Call our program to initialize the mint with starting rate of 3%
await program.methods
.createInterestBearingMint(RATE_1_BPS, DECIMALS)
.accounts({
payer: provider.wallet.publicKey, // Who pays for the transaction
mint: mint.publicKey, // The new mint we're creating
rateAuthority: rateAuthority.publicKey, // Who can update interest rates
})
.signers([rateAuthority, mint])
.rpc();
// Verify the mint was created with correct configuration
const mintInfo = await getMint(
provider.connection,
mint.publicKey,
"confirmed",
TOKEN_2022_PROGRAM_ID
);
const interestConfig = await getInterestBearingMintConfigState(mintInfo);
console.log("Interest-bearing config:", {
rateAuthority: interestConfig?.rateAuthority?.toBase58(),
currentRate: interestConfig?.currentRate,
initializationTimestamp: interestConfig?.initializationTimestamp,
lastUpdateTimestamp: interestConfig?.lastUpdateTimestamp,
});
// Ensure initialization timestamp was recorded (important for interest calculations)
assert.ok(
interestConfig?.initializationTimestamp !== 0,
"Initialization timestamp should not be 0"
);
});
/**
* Test 2: Mint initial tokens to recipient
*/
it("mints tokens to a recipient", async () => {
recipientAta = getAssociatedTokenAddressSync(
mint.publicKey,
recipient.publicKey,
false,
TOKEN_2022_PROGRAM_ID
);
// Create the ATA (it doesn't exist yet)
const createAtaTx = new Transaction().add(
createAssociatedTokenAccountInstruction(
provider.wallet.publicKey,
recipientAta,
recipient.publicKey,
mint.publicKey,
TOKEN_2022_PROGRAM_ID
)
);
await provider.sendAndConfirm(createAtaTx, []);
// Mint the initial balance of tokens to the recipient
// Convert UI amount (1000) to raw amount (1000 * 10^9)
await program.methods
.mintTokens(new anchor.BN(INITIAL_BALANCE * 10 ** DECIMALS))
.accounts({
mint: mint.publicKey,
toTokenAccount: recipientAta,
recipient: recipient.publicKey,
})
.signers([recipient])
.rpc();
// Verify the correct amount was minted
const tokenAccount = await getAccount(
provider.connection,
recipientAta,
"confirmed",
TOKEN_2022_PROGRAM_ID
);
// For interest-bearing tokens, we need to use the SPL Token method to get UI amount
const balance = await getInterestBearingUiAmount(tokenAccount.amount);
assert.strictEqual(
balance,
INITIAL_BALANCE,
`Initial balance should be ${INITIAL_BALANCE}`
);
console.log(`Initial balance: ${balance} tokens`);
});
/**
* Test 3: demonstrate compound interest over 15 months
*
* Timeline:
* 1. Start with 1000 tokens at 3% rate
* 2. Wait 3 months → balance grows with 3% rate
* 3. Change rate to 5%
* 4. Wait 9 more months → balance grows with 5% rate (12 months total)
* 5. Change rate to 7%
* 6. Wait 3 more months → balance grows with 7% rate (15 months total)
*/
it("demonstrates compounded interest growth: 3 months, 12 months, 15 months", async () => {
console.log("\n=== Starting Interest Accrual Test ===");
console.log(`Starting balance: ${INITIAL_BALANCE} tokens\n`);
// ==================================
// PERIOD 1: First 3 months at 3% annual rate
// ==================================
console.log(`\n--- Period 1: 3 Months @ ${RATE_1_BPS / 100}% ---`);
// Fast-forward time by 3 months (0.25 years)
const clock1 = svm.getClock();
clock1.unixTimestamp += BigInt(Math.floor(SECONDS_PER_YEAR * 0.25));
svm.setClock(clock1);
// Check the recipient's token balance
const tokenAccount1 = await getAccount(
provider.connection,
recipientAta,
"confirmed",
TOKEN_2022_PROGRAM_ID
);
// Use the official SPL Token method to get UI amount with interest applied
const balanceAfter3Months = await getInterestBearingUiAmount(
tokenAccount1.amount
);
// Calculate what we expect using the continuous compounding formula
const expectedBalance1 = calculateExpectedBalance(
INITIAL_BALANCE,
RATE_1_BPS,
0.25
);
console.log(`Balance after 3 months: ${balanceAfter3Months.toFixed(6)}`);
console.log(
`Expected balance (A = P e^{r t}): ${expectedBalance1.toFixed(6)}`
);
console.log(
`Interest earned: ${(balanceAfter3Months - INITIAL_BALANCE).toFixed(6)}`
);
// Verify the calculation is correct (within 0.01 token tolerance)
assert.ok(
Math.abs(balanceAfter3Months - expectedBalance1) < 0.01,
"Balance after 3 months is incorrect"
);
// ===============================================
// PERIOD 2: Change rate to 5%, then advance 9 more months
// ===============================================
// Update the interest rate to 5%
await program.methods
.updateRate(RATE_2_BPS)
.accounts({
mint: mint.publicKey,
rateAuthority: rateAuthority.publicKey,
})
.signers([rateAuthority])
.rpc();
console.log(
`\n--- Period 2: 9 Months @ ${
RATE_2_BPS / 100
}% after initial 3 months (total = 12 months) ---`
);
// Fast-forward time by 9 more months (total of 12 months from start)
const clock2 = svm.getClock();
clock2.unixTimestamp += BigInt(Math.floor(SECONDS_PER_YEAR * 0.75));
svm.setClock(clock2);
const tokenAccount2 = await getAccount(
provider.connection,
recipientAta,
"confirmed",
TOKEN_2022_PROGRAM_ID
);
// Get UI amount using SPL Token's official method
const balanceAfter12Months = await getInterestBearingUiAmount(
tokenAccount2.amount
);
// Expected: (balance after 3 months) * e^(0.05 * 0.75)
const expectedBalance2 = calculateExpectedBalance(
balanceAfter3Months,
RATE_2_BPS,
0.75
);
console.log(`Balance after 12 months: ${balanceAfter12Months.toFixed(6)}`);
console.log(
`Expected balance (A2 = A1 * e^{r2 * 0.75}): ${expectedBalance2.toFixed(
6
)}`
);
console.log(
`Total interest earned: ${(
balanceAfter12Months - INITIAL_BALANCE
).toFixed(6)}`
);
assert.ok(
Math.abs(balanceAfter12Months - expectedBalance2) < 0.01,
"Balance after 12 months is incorrect"
);
// ==============================================
// PERIOD 3: Change rate to 7%, then advance final 3 months
// ==============================================
// Update the interest rate to 7%
await program.methods
.updateRate(RATE_3_BPS)
.accounts({
mint: mint.publicKey,
rateAuthority: rateAuthority.publicKey,
})
.signers([rateAuthority])
.rpc();
console.log(
`\n--- Period 3: extra 3 Months @ ${
RATE_3_BPS / 100
}% (total = 15 months) ---`
);
// Fast-forward time by 3 final months (total of 15 months from start)
const clock3 = svm.getClock();
clock3.unixTimestamp += BigInt(Math.floor(SECONDS_PER_YEAR * 0.25));
svm.setClock(clock3);
const tokenAccount3 = await getAccount(
provider.connection,
recipientAta,
"confirmed",
TOKEN_2022_PROGRAM_ID
);
// Get final UI amount using SPL Token's official method
const balanceAfter15Months = await getInterestBearingUiAmount(
tokenAccount3.amount
);
// Expected: (balance after 12 months) * e^(0.07 * 0.25)
const expectedBalance3 = calculateExpectedBalance(
balanceAfter12Months,
RATE_3_BPS,
0.25
);
console.log(`Balance after 15 months: ${balanceAfter15Months.toFixed(6)}`);
console.log(
`Expected balance (A3 = A2 * e^{r3 * 0.25}): ${expectedBalance3.toFixed(
6
)}`
);
console.log(
`Total interest earned: ${(
balanceAfter15Months - INITIAL_BALANCE
).toFixed(6)}`
);
console.log(
`Effective return over 15 months: ${(
(balanceAfter15Months / INITIAL_BALANCE - 1) *
100
).toFixed(6)}%`
);
// Final verification (slightly larger tolerance for accumulated rounding)
assert.ok(
Math.abs(balanceAfter15Months - expectedBalance3) < 0.02,
"Final balance after 15 months is incorrect"
);
});
});
anchor test कमांड के साथ टेस्ट रन करें। टेस्ट आउटपुट कुछ इस तरह दिखना चाहिए:
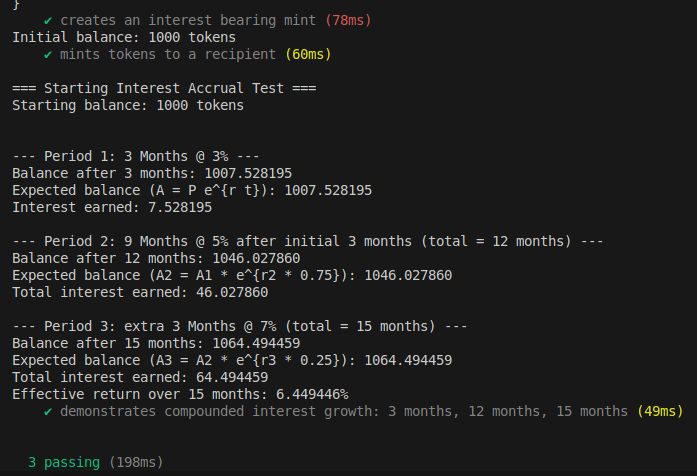
उपरोक्त स्क्रीनशॉट से, आप देखेंगे कि हमारा ब्याज उपार्जन (interest accrual) सही ढंग से काम करता है और उस कंटीन्यूअस कंपाउंडिंग ब्याज गणना के अनुरूप है जिसकी हमने पहले चर्चा की थी।
निष्कर्ष (Conclusion)
अब तक हमने interest bearing एक्सटेंशन के पूरे जीवनचक्र को देखा है। इससे हमें अवधारणाओं (concepts) से परे गहराई से यह समझने में मदद मिली कि interest bearing एक्सटेंशन कैसे काम करता है। और यह आपको एक्सटेंशन्स के साथ प्रयोग करने और उन्हें वास्तविक प्रोग्राम्स में इंटीग्रेट करने के लिए एक ठोस शुरुआती बिंदु देता है।
सेल्फ-स्टडी एक्सरसाइज़ (Self-Study Exercise)
एक साधारण स्टैकिंग रिवॉर्ड्स प्रोग्राम (Staking Rewards Program) बनाएं
यूज़र्स स्टैकिंग पूल में नियमित टोकन (जैसे USDC) जमा करते हैं और interest bearing “रिसीट (receipt) टोकन” प्राप्त करते हैं जिनका मूल्य समय के साथ स्वचालित रूप से बढ़ता है, जिससे जटिल रिवॉर्ड क्लेमिंग (reward claiming) मैकेनिज़्म की आवश्यकता समाप्त हो जाती है।
जब आप अपना प्रोटोटाइप सफलतापूर्वक बना लें तो X पर @rareskills_io को टैग करें!
यह लेख Solana पर ट्यूटोरियल सीरीज़ का हिस्सा है।